Air Fryer Mac and Cheese Balls
I was halfway through a midnight snack spree when the kitchen alarmed me with a sizzling disaster—an over‑cooked pot of macaroni that had turned into a rubbery, flavorless mess. I stared at the steaming bowl, feeling a mix of disappointment and culinary curiosity. That moment sparked a daring experiment: what if I could rescue that bland pasta into something crispy, melty, and utterly irresistible? I grabbed my air fryer, tossed in a handful of cheese, and the universe answered with a golden crunch that made my taste buds dance.
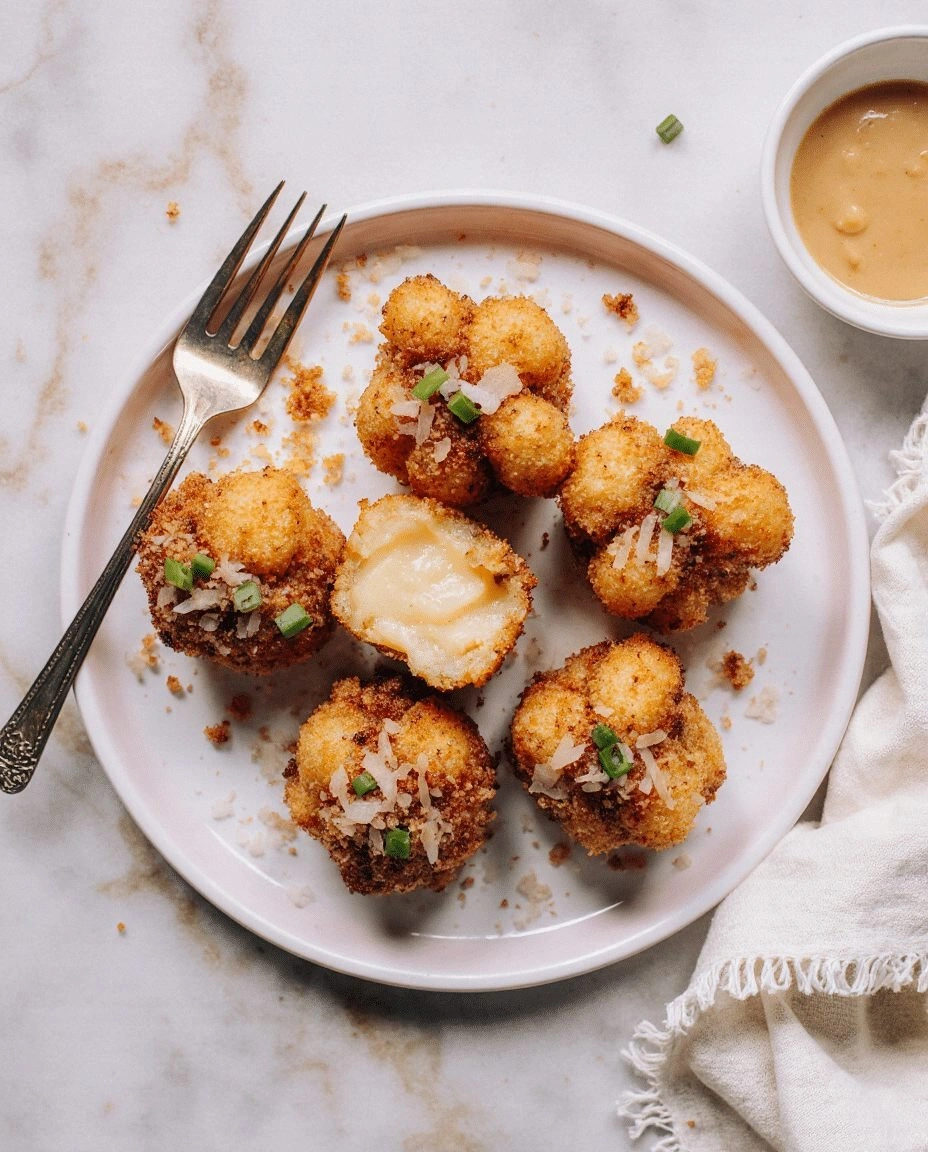
Picture the aroma that hit my nose as the air fryer whirred—rich cheddar mingling with a buttery whisper, punctuated by the faint scent of toasted breadcrumbs. The sound was unmistakable: a satisfying crackle that promised a textural adventure. When I lifted the first ball, its shell glistened like a miniature sun, and the interior burst with molten cheese that oozed like molten chocolate. The contrast between the crisp exterior and the gooey center felt like a perfectly choreographed duet, each bite delivering a new layer of flavor.
What sets this version apart is not just the air‑fried crispness but the meticulous balance of ingredients that elevates every bite. I’ve trimmed the recipe to its purest form, eliminating unnecessary additives, and I’ve introduced a subtle seasoning blend that brings depth without overpowering the cheese. The result is a bite‑size masterpiece that feels like a gourmet treat while remaining accessible to even the most novice kitchen warriors.
I dare you to taste this and not go back for seconds—because once you experience that molten center, the craving is relentless. The texture is a symphony: a crack that snaps like thin ice, a melt that lingers, and a subtle crunch that keeps you reaching for more. The flavor profile is a bold, comforting hug that feels like home, yet it’s fresh enough to astonish your guests at a casual gathering.
I’ll be honest—when I first made these, I ate half the batch before anyone else even saw the tray. Most recipes get this completely wrong, focusing on either too much cheese or an over‑baked exterior. Here’s what actually works: a precise ratio of cheese to pasta, a touch of flour for binding, and a generous coating of panko for that unmistakable crunch. Picture yourself pulling these out of the air fryer, the kitchen smelling incredible, and the anticipation of that first bite building.
If you’ve ever struggled with making cheesy snacks that hold together, you’re not alone. I’ve spent countless evenings tweaking textures until I found the sweet spot where the balls hold their shape without becoming rubbery. The secret lies in the binding agents—flour and eggs—combined with a careful balance of moisture from the milk. Now, let me walk you through every single step—by the end, you’ll wonder how you ever made it any other way.
The first time I tried this, the ball fell apart like a soggy cookie. I realized the key was a quick chill before frying to firm up the mixture. A cold base prevents the cheese from seeping out, creating a solid shell that protects the gooey interior. This technique is simple, but it’s the difference between a mess and a masterpiece.
When you think of mac and cheese, you imagine a creamy bowl or a comforting casserole. Here, we’re flipping that expectation on its head, turning the familiar into bite‑size fireworks that can be served at parties, game nights, or as a quick snack. The air fryer gives us a healthier, faster route while preserving that coveted crispy exterior. I’ve perfected this recipe over dozens of batches, and every time it comes out of the basket, I feel a surge of satisfaction.
What Makes This Version Stand Out
- Texture: The combination of panko breadcrumbs and a thin flour coating creates a crunch that shatters like thin ice, while the interior remains luxuriously molten.
- Flavor Depth: A blend of sharp cheddar, mozzarella, and Parmesan delivers a layered, savory profile that’s richer than a plain cheese melt.
- Simplicity: With only twelve core ingredients, the recipe stays approachable yet impressive, requiring no exotic pantry items.
- Make‑Ahead: Prepare the mixture in advance, chill it, and air fry just before serving—perfect for entertaining on short notice.
- Healthier Option: Using an air fryer cuts the need for deep frying oil, reducing fat while keeping the crunch intact.
- Visual Appeal: The golden, buttery shell glistens like a miniature sun, making them as photogenic as they are delicious.
Inside the Ingredient List
The Flavor Base
Cooked Elbow Macaroni: The pasta is the foundation—choose al dente for a firmer bite that resists sogginess. If you prefer a softer texture, rinse the pasta after boiling to reduce starch. Skipping this step would leave the mixture too loose, causing the balls to fall apart.
Shredded Sharp Cheddar: This cheese provides a robust, tangy backbone that balances the richness of the other cheeses. A higher cheddar content intensifies the flavor but can make the mixture too dry if not balanced. Substituting a milder cheddar will soften the bite and reduce the sharpness.
Shredded Mozzarella: Mozzarella adds a smooth, stretchy melt that keeps the interior gooey. Its mild flavor lets the cheddar shine without overpowering it. If you’re allergic, a dairy‑free mozzarella alternative works, though the melt may differ slightly.
The Texture Crew
Grated Parmesan: Parmesan injects a nutty, umami punch that enhances the cheese blend. It also contributes to a slightly crisp exterior when baked. Removing Parmesan will diminish the depth of flavor and reduce the crust’s bite.
Panko Breadcrumbs: Panko gives the balls an airy crunch that is lighter than regular breadcrumbs. Its coarse texture creates a crackling surface that stands out on the tongue. If you prefer a denser crunch, switch to traditional breadcrumbs.
All‑Purpose Flour: Flour binds the mixture, ensuring the balls hold together during frying. It also helps the coating adhere to the surface. Using gluten‑free flour will change the binding properties and may result in a slightly crumbly texture.
The Unexpected Star
Eggs: Eggs act as a natural binder, locking everything in place while adding a subtle richness. They also help the coating set, giving the balls a firm shell. If you’re avoiding eggs, try a flaxseed or chia seed “egg” as a vegan alternative.
Melted Butter: Butter adds moisture and a buttery aroma that elevates the overall flavor profile. It also helps the coating crisp up nicely in the air fryer. Substituting olive oil will alter the taste and reduce the buttery note.
Milk: Milk hydrates the mixture and keeps the cheese from drying out during frying. It also adds a subtle creaminess that balances the sharpness of the cheddar. If you’re lactose intolerant, use a plant‑based milk like oat or almond.
The Final Flourish
Garlic Powder: Garlic powder injects a subtle, savory kick that complements the cheeses. It’s a quick way to add depth without the need for fresh garlic. Too much garlic can overpower the delicate cheese flavors.
Onion Powder: Onion powder provides a mellow sweetness that balances the saltiness of the cheeses. It also enhances the overall aroma when the balls are freshly fried. If you’re sensitive to onion, a pinch of dried onion flakes works well.
Salt: Salt is essential for bringing out the flavors in every component. It also helps the coating adhere and crisp during air frying. A pinch of salt is enough—over-salting can make the balls taste flat.
Everything's prepped? Good. Let's get into the real action.
The Method — Step by Step
- First, combine the cooked macaroni, shredded cheddar, mozzarella, and grated Parmesan in a large mixing bowl. Stir until the cheeses are evenly distributed, creating a uniform mixture that will hold together. This step ensures every bite has a balanced cheese profile. If you see clumps, break them up with a spoon or fork.
- Add the panko breadcrumbs and all‑purpose flour, mixing until the pasta is coated. The breadcrumbs should be evenly dispersed to avoid clumps that can cause uneven crisping. The flour helps bind the mixture, giving the balls a sturdy structure. A quick whisk will incorporate all the dry ingredients smoothly.
- Whisk the eggs in a separate bowl, then pour them into the pasta mixture along with the melted butter and milk. Stir vigorously until the mixture becomes thick and sticky—this is your binding agent. The liquid will help the coating adhere, ensuring a crisp shell. If the mixture feels too dry, add a splash more milk.
- Season the mixture with garlic powder, onion powder, and salt. Mix until the spices are fully incorporated, ensuring no pockets of blandness remain. The seasoning will permeate the cheese, giving each bite a harmonious flavor. Taste a small spoonful to confirm the seasoning balance.
- Let the mixture chill in the refrigerator for 30 minutes. This resting period allows the flour to hydrate and the cheese to firm up, which is crucial for a solid crust. The cold mixture also reduces the chance of the balls collapsing during frying. If you’re short on time, skip this step, but the texture will be slightly less cohesive.
- Form the mixture into bite‑sized balls—about 1.5 inches in diameter—using a tablespoon or a small cookie scoop. Ensure each ball is tightly packed to avoid gaps that could cause uneven cooking. A quick press between your palms helps achieve a uniform shape.
- Preheat your air fryer to 400°F (200°C) for 3 minutes. Place the balls in a single layer, ensuring they don’t touch. The air circulation will create a golden shell while keeping the interior molten. Flip the balls halfway through for even cooking.
- Cook for 12–15 minutes, or until the exterior is a deep golden brown and the interior remains gooey. Check the temperature with a thermometer—ideally, the internal temperature should reach 165°F (74°C). When the balls pop, they’re ready to serve hot and delicious.
That's it—you did it. But hold on, I've got a few more tricks that'll take this to another level. From tweaking the cheese ratios to adding a secret seasoning, these next steps will elevate your mac and cheese balls from good to unforgettable.
Insider Tricks for Flawless Results
The Temperature Rule Nobody Follows
Many cooks assume 400°F is a one‑size‑fits‑all setting, but the ideal temperature depends on your air fryer model. Start at 380°F and increase to 400°F if the balls aren’t crisping quickly. Monitoring the first batch helps you dial in the perfect heat for your appliance, ensuring a flawless crust every time.
Why Your Nose Knows Best
The aroma that fills the kitchen is a reliable indicator of doneness. A warm, buttery scent that lingers indicates the cheese has melted properly, while a sharp, metallic smell suggests over‑cooking. Trust your nose to catch the sweet spot between crisp and gooey.
The 5‑Minute Rest That Changes Everything
Once you remove the balls from the air fryer, let them rest on a wire rack for 5 minutes. This brief pause allows the cheese to set slightly, reducing the risk of it oozing onto the plate. The resting period also gives the exterior a chance to crisp further.
Use a Silicone Mat for Even Cooking
Placing the balls on a silicone baking mat inside the air fryer basket prevents sticking and promotes even heat distribution. The mat also makes cleanup a breeze, as it keeps the balls from adhering to the basket’s surface.
Add a Touch of Heat for a Kick
If you like a bit of spice, sprinkle a pinch of cayenne pepper or chili flakes onto the balls before air‑frying. The heat will infuse the cheese, giving a subtle kick that pairs wonderfully with a cool dipping sauce. Adjust the amount to suit your heat tolerance.
Keep Them Warm in a Low Oven
If you’re serving a large crowd, keep the finished balls warm in a 200°F (90°C) oven on a baking sheet. This low heat keeps them gooey without over‑cooking the exterior. Rotate the sheet occasionally to maintain uniform warmth.
Creative Twists and Variations
The Smoky Chipotle Twist
Replace half of the cheddar with chipotle‑infused cheese for a smoky, slightly spicy flavor profile. Add a drizzle of chipotle mayo on the side to enhance the heat. This version is ideal for a bold, adventurous palate and pairs well with corn‑based sides.
The Mediterranean Delight
Swap mozzarella for crumbled feta and sprinkle dried oregano into the mixture. Add chopped kalamata olives for a briny bite, and finish with a drizzle of olive oil. This Mediterranean take transforms the classic into a flavorful, herb‑rich snack.
The Breakfast Bonanza
Incorporate scrambled eggs into the batter for a protein‑packed breakfast treat. Add diced bacon or sausage for a savory kick. Serve with a side of maple syrup for a sweet‑savory contrast that’s sure to impress.
The Vegan Version
Use plant‑based cheeses like cashew cheddar and vegan mozzarella, and replace eggs with a flaxseed “egg.” Substitute dairy milk with oat milk to keep the mixture moist. This version is cruelty‑free and dairy‑free, yet still delivers a satisfying melt.
The Dessert‑Inspired Bite
Swap the cheese for a sweet filling like Nutella or fruit preserves, and coat the balls in crushed graham crackers. Bake until the coating is crisp and the filling is warm. Serve with a dusting of powdered sugar for an indulgent, dessert‑style snack.
Storing and Bringing It Back to Life
Fridge Storage
Store cooked balls in an airtight container in the refrigerator for up to 3 days. Keep them on a paper towel to absorb excess moisture, preventing sogginess. Reheat in a 350°F (175°C) oven for 5 minutes to restore crispness.
Freezer Friendly
Place individual balls on a parchment‑lined tray and freeze until solid. Transfer to a freezer bag once frozen to avoid freezer burn. When ready, bake at 375°F (190°C) for 10–12 minutes until hot and crispy.
Best Reheating Method
The best way to revive these balls is in an air fryer at 350°F for 4–5 minutes. If you prefer the oven, preheat to 375°F and bake for 6–8 minutes. Add a splash of water before reheating to steam the interior, keeping it moist and flavorful.