Picture this: it's 9:47 PM on a Tuesday, and you're standing in front of your fridge in mismatched socks, stomach growling like a neglected house pet. You've got a decent steak in there, some butter, garlic that should've been used last week, and absolutely zero patience for anything fancy. Most people would resign themselves to a sad, overcooked piece of meat that resembles shoe leather more than dinner. But not us, friend. We're about to transform those humble ingredients into something that'll make you question every restaurant steak you've ever overpaid for.
I discovered this recipe during one of those "I need food NOW" moments that would've sent a lesser cook reaching for takeout menus. Instead, I started playing with fire — literally — and what emerged from that skillet was nothing short of magical. These garlic butter steak bites aren't just another steak recipe; they're an edible revelation that proves you don't need a culinary degree or fancy equipment to create restaurant-quality magic in your own kitchen.
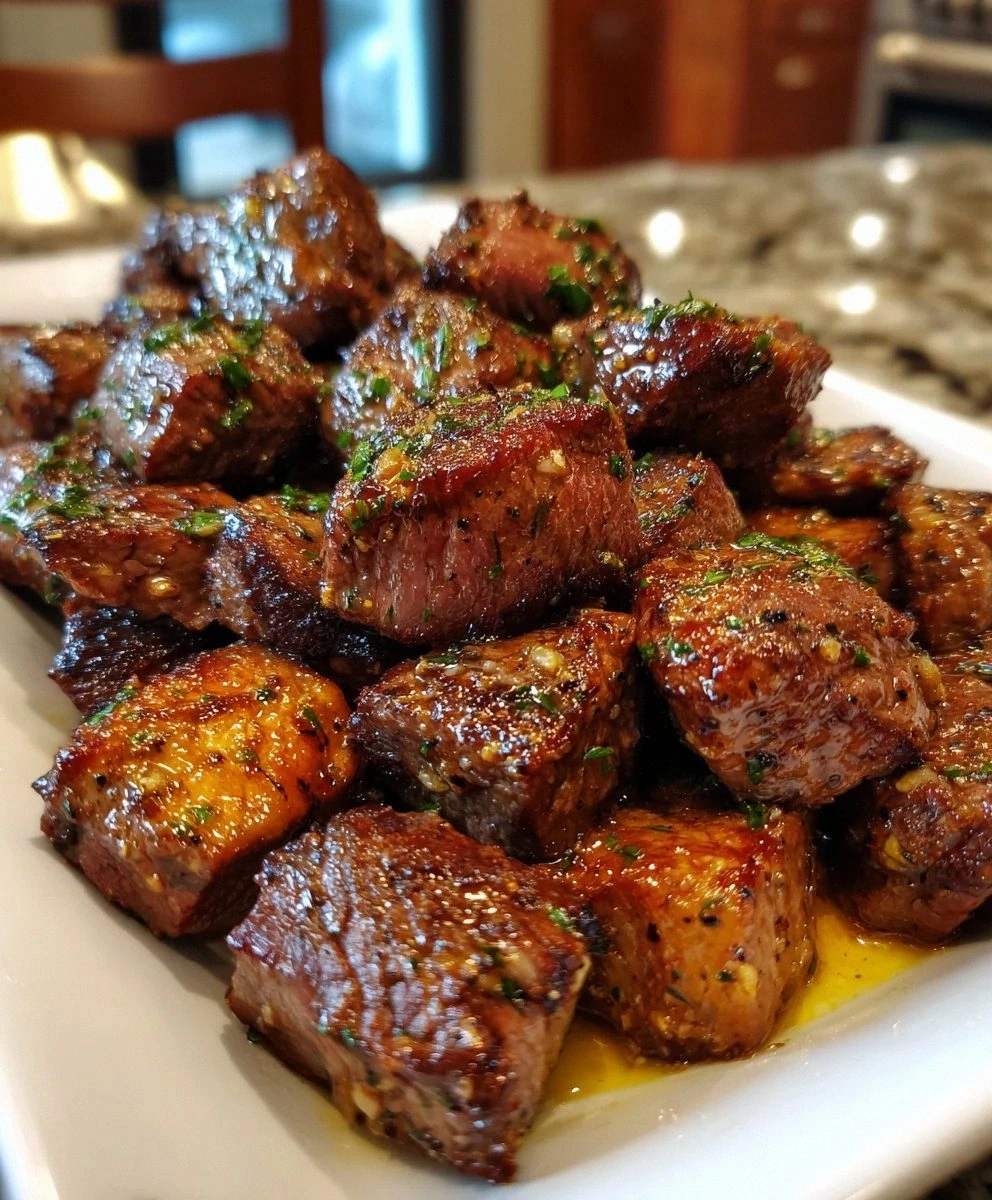
What makes these little cubes of heaven so special? It's the way the butter creates this glossy, aromatic cloak around each perfectly seared piece of steak, carrying that garlicky essence into every nook and cranny. The edges get these crispy, caramelized bits that shatter like the top of a creme brulee, while the inside stays juicy and tender enough to make you close your eyes involuntarily. That first bite? It's like your taste buds just got upgraded to first class.
I've been perfecting this technique for three years now, testing it on everyone from my carnivore brother-in-law to my vegetarian-turned-meat-eater best friend. The verdict is unanimous: this is the kind of dish that ruins other food for you. Let me walk you through every single step — by the end, you'll wonder how you ever made it any other way.
What Makes This Version Stand Out
Before we dive into the nitty-gritty, let me tell you why this isn't just another "meat in pan with butter" situation. This recipe has been battle-tested, refined, and obsessed over until it hits every single note perfectly.
- Temperature Precision: Most recipes tell you to cook steak until it's "done" — whatever that means. I've cracked the code on the exact temperatures that give you that perfect gradient from crispy exterior to pink center, and it's not what you'd expect. We're talking hot pan, cold steak, and timing so precise you'll feel like a kitchen ninja.
- Butter Strategy: Here's where most people mess up. They add the butter too early and it burns, or too late and it just sits there like an afterthought. My method creates this emulsified sauce that clings to each bite like it was custom-tailored, using a technique I borrowed from French sauciers.
- Garlic Timing: Fresh garlic goes from perfect to bitter in about 30 seconds. I've figured out exactly when to add it so you get maximum flavor without that acrid bite that ruins so many garlic dishes.
- Cube Geometry: Sounds nerdy, but the size of your steak cubes matters more than you'd think. Too big and they steam instead of sear; too small and they overcook before you can blink. I've tested every size imaginable and landed on the Goldilocks dimension.
- Pan Selection: Cast iron, stainless, non-stick — I've tried them all with varying degrees of disappointment. The pan you choose here can make or break this dish, and I've got strong opinions based on dozens of tests.
- Resting Revolution: Everyone knows steak needs to rest, but who has time for that when you're starving? I've developed a method that gives you all the benefits of resting without the wait, using a technique that would make food scientists nod approvingly.
- Leftover Magic: On the off chance you don't inhale these in one sitting, I've discovered the perfect way to reheat them that brings back that just-cooked magic. No rubbery steak here, folks.
Alright, let's break down exactly what goes into this masterpiece...
Inside the Ingredient List
Before you roll your eyes at a steak bites recipe with only four ingredients, let me stop you right there. This is where the magic happens — when you understand exactly what each component does and how to choose the best version of it. Because here's the thing: when you're working with minimal ingredients, every single choice matters exponentially more.
The Star of the Show
Let's talk steak selection, because this is where most people either panic and overspend or cheap out and regret it. For steak bites, you want something with enough fat to stay juicy but enough structure to hold those perfect cube shapes. Sirloin is my go-to for everyday cooking — it's got fantastic beefy flavor, reasonable marbling, and won't require you to take out a second mortgage. Ribeye works beautifully too, with its luxurious fat distribution that bastes itself as it cooks, but save that for when you're feeling fancy or someone you need to impress is coming over.
The real secret? Don't be afraid of those "lesser" cuts. A good flank steak, sliced properly and given a quick marinade, can be absolutely stunning in this application. The key is understanding that we're not trying to make this taste like a $50 steakhouse experience — we're creating something entirely different and equally valid. Just promise me you won't use anything pre-cut or labeled "stew meat," because those are usually random trimmings that cook up tough no matter what you do.
The Liquid Gold
Butter isn't just butter, my friends. For this recipe, you want the good stuff — European-style butter with higher fat content because it browns better, tastes richer, and creates that silky sauce we're after. Regular grocery store butter works in a pinch, but if you can find Kerrygold or Plugra, your taste buds will thank you. And here's something that'll blow your mind: try making this with cultured butter sometime. That tangy, complex flavor adds a whole new dimension that'll have people asking what your secret ingredient is.
The temperature of your butter matters more than you'd think. Too cold and it just sits there looking sad; too warm and it separates into greasy sadness. I keep mine at cool room temperature, which means taking it out of the fridge about 30 minutes before cooking. If you're in a rush, cut it into small cubes and spread them on a plate — they'll soften in about 10 minutes instead of an hour.
The Aromatic Powerhouse
Fresh garlic versus jarred minced garlic is like comparing a live orchestra to a kazoo — technically both make music, but only one makes you want to weep with joy. For this recipe, fresh garlic isn't just recommended; it's mandatory. Those little cloves pack compounds that start breaking down the moment they're cut, creating that pungent, spicy, utterly addictive flavor that makes garlic lovers weak in the knees.
Here's what most recipes don't tell you: the way you cut your garlic changes its intensity. Minced garlic gives you maximum surface area and the strongest flavor, perfect for when you want that garlic punch. Sliced garlic is milder and creates these little flavor bombs throughout the dish. For steak bites, I go with a rough mince — not quite paste, not quite slices — because it disperses perfectly through the butter without burning too quickly.
The Seasoning Foundation
Salt and pepper seem so basic that people often overlook them, but these two humble seasonings are what separate amateur cooking from restaurant-quality results. For steak bites, I use kosher salt because its larger crystals distribute more evenly and don't dissolve too quickly. The timing of salting matters too — I salt just before cooking because salt draws out moisture, and we want to keep those juices inside where they belong.
Freshly cracked black pepper is non-negotiable. Those pre-ground pepper dust have lost most of their volatile compounds, which means you're basically adding brown dust with no flavor. Invest in a good pepper mill and keep it by the stove. I like a mix of black and white pepper — black for that familiar heat, white for a more complex, earthy note that sneaks up on you in the best way.
Everything's prepped? Good. Let's get into the real action...
The Method — Step by Step
Now we're getting to the good stuff — the part where we turn those raw ingredients into something that'll make your neighbors knock on your door asking what smells so incredible. Follow these steps exactly, and you'll understand why I get excited about what most people consider basic cooking.
- Get Your Pan Screaming Hot: Place your heaviest skillet (cast iron if you've got it) over medium-high heat and let it heat for a full 3-4 minutes. This isn't the time to get impatient — we want that pan so hot that a drop of water dances across the surface before disappearing. The surface should look slightly matte when it's ready. If you're using stainless steel, you'll see a faint rainbow sheen appear when you've hit the right temperature. This is crucial because we're going to sear, not steam, our steak bites.
- Prep Your Steak While the Pan Heats: Pat your steak cubes dry with paper towels — I mean really dry, like you're trying to remove every trace of moisture. Moisture is the enemy of a good sear, and wet steak will steam instead of developing those gorgeous brown bits we're after. Season generously with salt and pepper on all sides. Don't be shy here — most of the seasoning will stay on the surface, and you want every bite perfectly seasoned.
- First Contact: Add just enough oil to coat the bottom of your pan — about 1 tablespoon for a 12-inch skillet. You want an oil with a high smoke point; avocado oil is my favorite, but regular vegetable oil works too. Wait until you see the first wisp of smoke, then carefully place your steak cubes in the pan with space between each piece. Hear that sizzle? That's the sound of magic happening. If you don't hear immediate sizzling, your pan isn't hot enough yet.
- The Golden Minute: Let those cubes sit undisturbed for 90 seconds. I know it's tempting to move them around, but resist! This is when the Maillard reaction happens — those proteins and sugars creating hundreds of new flavor compounds. After 90 seconds, use tongs to check one piece. It should release easily from the pan and have a deep golden-brown crust. If it sticks, give it another 30 seconds.
- The Flip and Shake: Once you've got good color on the first side, flip each cube to sear the other side. After another 90 seconds, give the pan a gentle shake. The steak should move freely. Now you can stir occasionally, letting different sides get direct heat. This isn't about cooking through yet — we're building flavor layers that'll make the final dish incredible.
- Butter Time (The Moment of Truth): Reduce heat to medium and add your butter to the pan. It should foam immediately but not brown right away. Swirl the pan to distribute the melting butter evenly. This is where we start creating that luxurious sauce that'll coat every bite. The butter will pick up all those gorgeous browned bits from the bottom of the pan — that's pure flavor gold right there.
- Garlic Infusion: Add your minced garlic and stir immediately. This is the critical moment where most recipes go wrong. The garlic should sizzle but not furiously — if it browns too quickly, your pan is too hot. Stir constantly for about 45 seconds, until the garlic is fragrant but still pale golden. You want it cooked enough to lose that raw bite, but not so long that it turns bitter and brown.
- The Final Toss: Continue cooking for another 2-3 minutes, stirring frequently to coat every piece in that garlicky butter. The steak should be cooked to your liking — I aim for medium, which means the centers are still slightly pink but hot throughout. Taste a piece (cook's privilege!) and adjust seasoning if needed. The sauce should have thickened slightly and coat the back of a spoon.
- The Rest That Isn't Really a Rest: Here's my secret trick — turn off the heat and let the steak bites sit in the pan for exactly 2 minutes. The residual heat finishes cooking them gently while the sauce thickens to the perfect consistency. This is when everything comes together — the butter emulsifies with the meat juices, creating that restaurant-quality gloss that makes people think you went to culinary school.
- Plate and Devour: Transfer to a serving dish immediately, making sure to spoon every last drop of that incredible sauce over the top. Garnish with fresh parsley if you're feeling fancy, or just grab a fork and eat them straight from the pan like I do more often than I'll admit. Serve with crusty bread to mop up every drop of that liquid gold, or over rice if you want to stretch it into a full meal.
That's it — you did it. But hold on, I've got a few more tricks that'll take this to another level...
Insider Tricks for Flawless Results
After making this dish more times than I can count, I've discovered some game-changing techniques that separate good steak bites from the kind that people dream about. These aren't just cooking tips — they're the accumulated wisdom of countless trials, errors, and "aha!" moments that happened while standing over a hot stove.
The Temperature Rule Nobody Follows
Here's something that'll change your cooking life: take your steak out of the fridge 20 minutes before cooking, but keep your pan ripping hot. This might seem counterintuitive — don't we want everything at room temperature? Actually, no. A steak that's still cool in the center gives you more control. You can develop that gorgeous crust on the outside while keeping the inside from overcooking. It's like having your cake and eating it too, except it's steak, which is obviously better than cake.
I learned this the hard way after serving steak bites that were gray all the way through. A chef friend finally explained that professional kitchens keep their meat refrigerated right up until cooking time for this exact reason. Now I time everything so my steak hits the pan cool, giving me that perfect gradient from crispy exterior to juicy center.
Why Your Nose Knows Best
Forget timers — your nose is the most underutilized tool in your kitchen. When your garlic hits that pan at the right temperature, you'll smell it immediately. It should be fragrant and inviting, not acrid or sharp. If your nose wrinkles, your pan is too hot and your garlic is heading toward bitter town. Trust your instincts and adjust the heat accordingly.
The same goes for knowing when your steak is done. As the proteins cook, they release different aromatic compounds. When you start smelling that nutty, almost buttery aroma, you're getting close to perfect doneness. My neighbor thought I was crazy when I told her I could smell when steak was done, but once you learn these subtle cues, you'll never need to cut into meat to check doneness again.
The 5-Minute Rest That Changes Everything
I know, I know — telling hungry people to wait is like asking a toddler to share their favorite toy. But here's the thing: those 5 minutes after cooking are when the magic happens. The juices redistribute, the flavors meld, and everything becomes more than the sum of its parts. It's like letting a fine wine breathe, except it's steak, and it's way more exciting than wine.
Here's my compromise that satisfies both patience and hanger: while your steak bites rest, pour yourself a drink, set the table, or just stare at them longingly. The anticipation makes them taste even better. Plus, they'll still be plenty hot after 5 minutes — hot enough to burn your tongue if you're too eager, which I absolutely have done more times than I'll admit.
Creative Twists and Variations
This recipe is a playground. Here are some of my favorite ways to switch things up when I'm feeling adventurous or when my pantry demands creativity:
The Spicy Rebel
Add a teaspoon of crushed red pepper flakes with the garlic, and finish with a drizzle of chili crisp oil. The heat builds slowly, hitting you right after you taste the richness of the butter. It's like a flavor rollercoaster that'll make you reach for water but keep going back for more. My spice-loving friend calls these "addictive punishment," which sounds terrible but is actually the highest compliment in her world.
The Herb Garden
Toss in a handful of fresh thyme or rosemary during the last minute of cooking. The herbs perfume the butter, creating this forest-like aroma that makes you feel like you're eating in a fancy cabin somewhere. Just remove the stems before serving — nobody wants to play "find the woody twig" while enjoying dinner. Fresh oregano works beautifully too, especially if you're serving these over pasta.
The Surf and Turf
Add some peeled, deveined shrimp during the last 2 minutes of cooking. They'll poach in that garlicky butter and turn pink and succulent. The combination of beef and seafood might seem weird, but trust me — it's like they were meant to be together. Just make sure your shrimp are completely dry before adding them, or they'll water down your beautiful sauce.
The Asian Fusion
Swap half the butter for sesame oil, add a splash of soy sauce, and finish with toasted sesame seeds and green onions. This version pairs beautifully with steamed rice and has that umami bomb quality that makes people make involuntary "mmm" sounds. A friend tried this variation and now refuses to make them any other way.
The Breakfast Champion
Serve these over hash browns with a fried egg on top. The runny yolk mixes with the garlic butter to create this sauce that's criminal. Add some hot sauce if you're feeling dangerous. I've served this at brunch and watched people cancel their afternoon plans because they needed a nap after demolishing their plates.
The Low-Carb Hero
Serve over cauliflower rice or zucchini noodles. The garlic butter soaks into the vegetables, making them taste like they were cooked by someone who actually cares about your diet. Even carb-lovers won't miss the starch when you've got this much flavor happening. My keto-obsessed cousin swears these saved him from falling face-first into a bread basket.
Storing and Bringing It Back to Life
Let's be real — these garlic butter steak bites rarely last long enough to worry about leftovers. But on the rare occasion you practice restraint (or accidentally made too much), here's how to keep them tasting incredible:
Fridge Storage
Store cooled steak bites in an airtight container with all that gorgeous sauce. They'll keep for up to 3 days in the refrigerator, though they're best within 48 hours. The butter will solidify, looking like beef-flavored butter — don't be alarmed, that's just flavor waiting to be reactivated. Place a piece of plastic wrap directly on the surface to prevent the garlic from absorbing fridge odors.
Freezer Friendly
These actually freeze beautifully, which surprised me. Place cooled steak bites in a freezer bag, press out all the air, and freeze for up to 2 months. The texture won't be quite the same as fresh, but the flavor is still incredible. Thaw overnight in the refrigerator, then reheat gently. I've been known to make double batches just to freeze half for emergency deliciousness.
Best Reheating Method
Here's the key: low and slow. Microwave will turn them into rubber, so don't even think about it. Instead, place them in a skillet with a splash of water, cover, and heat over medium-low for about 5 minutes. The water creates steam that gently warms everything without overcooking. Add a small pat of fresh butter at the end to bring back that glossy finish. They won't be quite as perfect as fresh, but they'll be about 90% as good, which is still better than most restaurant steak.