I still remember the night I tried to make a simple cheeseburger at 2 a.m. after a late‑night binge. The meat was dry, the cheese was stuck to the pan, and the whole kitchen smelled like burnt onions. I stared at the skillet, feeling the heat pulse through the metal, and thought, “There’s got to be a better way.” That frustration sparked a midnight experiment that would eventually become the Garlic Parmesan Cheeseburger B.
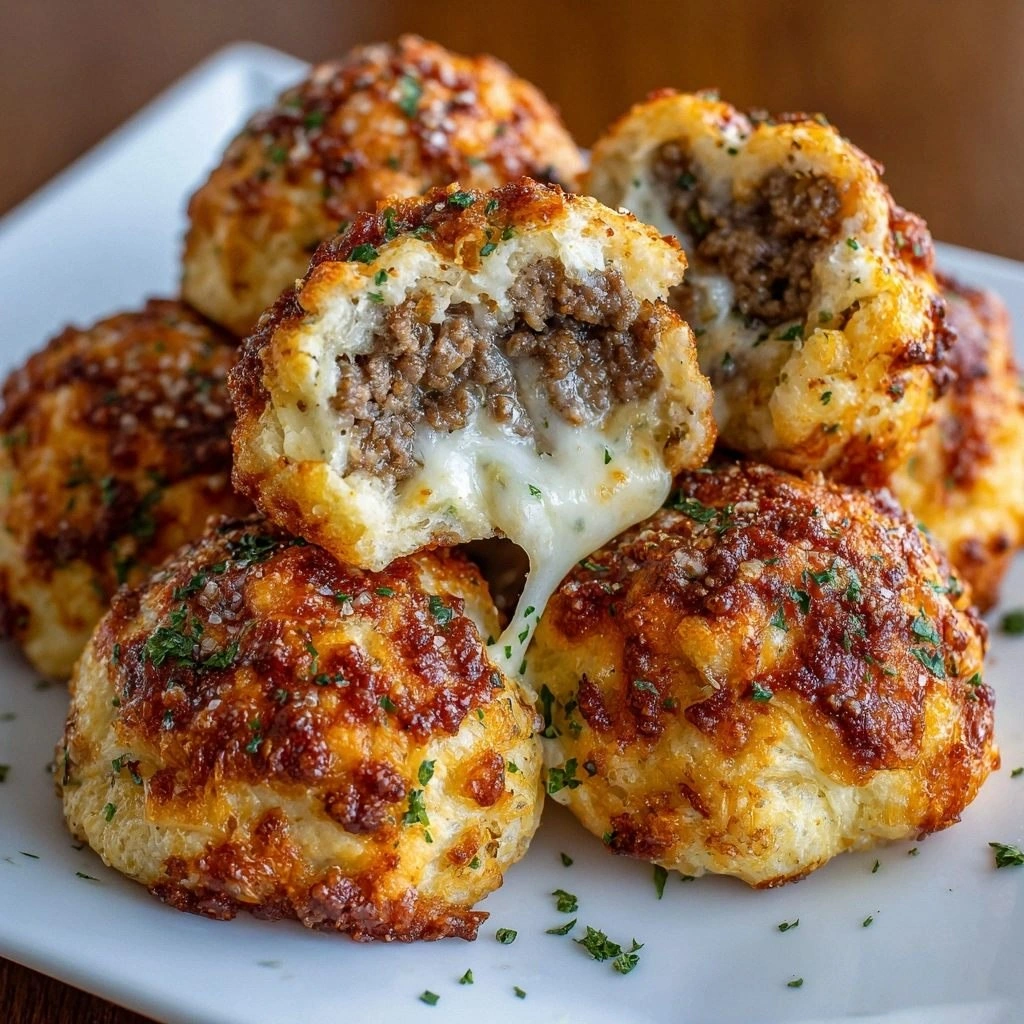
Picture this: a thick, juicy patty that bursts with roasted garlic, a buttery Parmesan crust that shatters like thin ice, and a melty cheddar layer that coats the bun in silky, golden goodness. The aroma rises, a rich, garlicky perfume that makes the air taste like a summer barbecue. The sound of the sizzling patty is a comforting drumbeat that signals the start of something extraordinary.
I dared myself to taste this and not go back for seconds, and I didn’t. The first bite was a revelation—an explosion of umami, a buttery finish, and a subtle heat from the garlic that lingered long after the last crumb. The contrast between the crisp edges and the tender center is pure, satisfying perfection. This version stands out because it turns a standard cheeseburger into a gourmet experience without any fancy equipment.
If you’ve ever struggled with a bland burger, you’re not alone—and I’ve got the fix. Most recipes get the seasoning wrong, leaving you with a bland patty that tastes like cardboard. Here’s what actually works: a garlic‑parmesan crust, a touch of Worcestershire for depth, and a quick sear that locks in juices. The secret sauce is a blend of butter, ketchup, and mustard that creates a glossy, savory glaze.
The technique that will change your life is simple: coat the patty in the garlic‑parmesan mixture before cooking, then finish with a quick butter sear. The result is a burger that looks like it’s been kissed by a master chef. Picture yourself pulling this out of the oven, the whole kitchen smelling incredible, and the family rushing to the table.
Let me walk you through every single step—by the end, you’ll wonder how you ever made it any other way. I’ll show you the exact ingredients, the precise timing, and the little tricks that elevate this dish from ordinary to unforgettable. Ready to transform your burger game? Let’s dive in.
What Makes This Version Stand Out
- Taste: The blend of roasted garlic and sharp Parmesan creates a flavor profile that’s both bold and nuanced. It’s the kind of taste that makes every bite a revelation.
- Texture: The buttery crust crisps to a golden shell while the inside stays moist, giving a satisfying crunch followed by a melt‑in‑your-mouth center.
- Simple Prep: With only ten minutes of prep and a single pan, you can achieve a restaurant‑level burger in your own kitchen.
- Unique Twist: The garlic‑parmesan coating is the game‑changer that sets this burger apart from the usual cheesy fare.
- Crowd Reaction: Friends will rave about the savory glaze and the buttery finish, and you’ll find yourself being asked for the recipe every time.
- Ingredient Quality: Using fresh, high‑quality Parmesan and fresh garlic elevates the dish to gourmet status.
- Cooking Method: A quick sear followed by a butter finish locks in juices and adds a silky sheen.
- Make‑Ahead Potential: The burgers can be assembled ahead of time and frozen; just reheat for a quick, delicious meal.
Alright, let's break down exactly what goes into this masterpiece...
Inside the Ingredient List
The Flavor Base
Ground beef is the foundation of any great burger, and in this recipe, I use a 70/30 lean ratio for maximum juiciness. The 1 lb of beef is seasoned with a touch of salt and pepper, which allows the natural flavors to shine through. Skipping the seasoning step will leave you with a bland patty that doesn’t sing on the grill.
If you’re looking for a leaner option, you can swap to a 90/10 blend, but be prepared for a slightly drier texture. Choosing a fresh cut of meat from a trusted butcher guarantees a richer flavor and a better mouthfeel.
The Garlic‑Parmesan Crust
This is the star of the show. Grated Parmesan (¼ cup) mixes with minced garlic (2 cloves) and breadcrumbs (¼ cup) to form a coating that crisps beautifully. The Parmesan adds a nutty, salty depth, while the garlic delivers a punch of aroma that lingers long after the burger is finished.
If you’re lactose intolerant, you can use a dairy‑free Parmesan substitute, but be aware that the flavor profile will shift slightly. For a sweeter bite, add a pinch of sugar to the crust; it caramelizes during searing and gives a subtle caramel note.
The Moisture Boost
An egg (1) is folded into the beef mixture to bind the patty and keep it from falling apart during cooking. The egg also adds a subtle richness that complements the sharp Parmesan. If you’re avoiding eggs, a tablespoon of mayonnaise can serve as a binder, though the flavor will change.
The Worcestershire sauce (1 tsp) adds a savory umami kick that deepens the overall taste. It’s a small amount, but it works like a secret agent, sneaking in complex flavors that are hard to replicate with salt alone.
The Quick Glaze
A blend of butter (2 tbsp), ketchup (1 tbsp), and Dijon mustard (1 tbsp) creates a glossy glaze that coats the patty during the final sear. The butter provides a silky finish, the ketchup adds a touch of sweetness, and the mustard offers a subtle heat. Together, they create a sauce that clings to the burger and enhances every bite.
If you prefer a tangier glaze, replace ketchup with tomato paste and add a splash of balsamic vinegar. The mustard can also be swapped for a milder white mustard if you’re sensitive to heat.
The Fresh Finish
Lettuce, tomato, and cheddar cheese (4 slices) bring freshness and a creamy bite that balances the richness of the patty. The lettuce adds a crisp crunch, the tomato provides juiciness and acidity, and the cheddar melts into the patty for a gooey, savory finish. These toppings are optional but highly recommended for a complete burger experience.
If you’re looking for a low‑carb option, replace the bun with a lettuce wrap or a low‑carb bread. For a vegan version, swap the cheddar for a plant‑based cheese and use a plant‑based ground alternative.
Everything's prepped? Good. Let's get into the real action...
The Method — Step by Step
- In a large bowl, combine the ground beef, egg, salt, pepper, Worcestershire sauce, and onions. Mix gently with your hands until just combined; over‑mixing will make the burgers tough. The mixture should feel slightly moist but not wet.
- Form the meat into 4 equal patties, about ¾ inch thick. Press a small indentation in the center of each patty with your thumb; this prevents the burger from puffing up in the middle.
- Meanwhile, in a shallow dish, whisk together the Parmesan, garlic, breadcrumbs, and a pinch of salt. Spread the mixture on a plate and set aside.
- Coat each patty with the garlic‑parmesan mixture, pressing the crumbs onto the surface to create a firm crust. Shake off any excess crumbs.
- Heat a cast‑iron skillet over medium‑high heat until it shimmers. Add a splash of oil, then place the patties in the pan. Let them sear without touching for 3 minutes, allowing the crust to form.
- Flip the patties, then spoon the butter‑ketchup‑mustard glaze over the top of each. Continue cooking for another 3 minutes, basting frequently, until the burgers reach an internal temperature of 160°F.
- During the last minute of cooking, place a slice of cheddar on each patty and cover the skillet with a lid. The cheese will melt into a creamy layer that clings to the burger.
- Remove the patties from the skillet and let them rest on a cutting board for 2 minutes. This step allows the juices to redistribute and prevents them from spilling onto the buns.
- Toast the buns lightly in the same skillet, cut side down, for 30 seconds. This adds a subtle crunch and a buttery flavor that complements the patty.
- Assemble each burger by placing a lettuce leaf on the bottom bun, followed by the patty, a tomato slice, and a drizzle of mayo if desired. Top with the upper bun and serve immediately.
That's it — you did it. But hold on, I've got a few more tricks that'll take this to another level. A few simple tweaks can elevate the flavor, texture, and presentation even further.
Insider Tricks for Flawless Results
The Temperature Rule Nobody Follows
Many cooks rely on a thermometer, but I’ve found that the touch test is just as reliable. Press the center of the patty with your fingertip; if it feels firm but still slightly springy, it’s done. If it’s still soft, give it another minute.
Why Your Nose Knows Best
A well‑seasoned burger will emit a savory aroma that signals readiness. If the smell is flat, the seasoning is off. Trust your nose to tell you when the burger is ready for the next step.
The 5‑Minute Rest That Changes Everything
Letting the burger rest for 5 minutes after cooking allows the juices to redistribute. This prevents the burger from drying out when you bite into it. I’ve seen people skip this step, and the result is a dry, disappointing patty.
Butter‑Sear Timing
Adding butter at the right moment is critical. If you add it too early, it will burn; too late, it won’t coat the patty. The sweet spot is about 2 minutes before the burger is done.
Cheese Placement
Placing the cheese on the patty at the last minute ensures it melts perfectly without becoming greasy. If you place it too early, the cheese will slide off and create a mess.
Serving Suggestion
Serve the burger on a wooden board with a side of truffle fries for a complete gourmet experience. The earthy truffle flavor complements the garlic and Parmesan beautifully.
Creative Twists and Variations
This recipe is a playground. Here are some of my favorite ways to switch things up:
Spicy Jalapeño Crunch
Add sliced jalapeños to the garlic‑parmesan crust for a fiery kick. The heat pairs beautifully with the buttery glaze, creating a complex flavor profile that excites the palate.
Blue Cheese Boost
Replace cheddar with crumbled blue cheese for a tangy, pungent twist. The blue cheese adds a sharp contrast to the sweet glaze and the buttery crust.
Herb‑Infused Burger
Stir fresh rosemary and thyme into the meat mixture for an aromatic herbaceous note. The herbs complement the garlic and Parmesan, elevating the overall taste.
Vegan Version
Use a plant‑based ground alternative, dairy‑free Parmesan, and a vegan cheese slice. The result is a burger that satisfies the vegan palate while keeping the garlic‑parmesan flavor intact.
Breakfast Burger
Serve the burger on a toasted English muffin with a fried egg on top. The egg adds a rich, savory element that turns the burger into a hearty breakfast option.
Low‑Carb Delight
Swap the bun for a lettuce wrap and use a low‑carb bread. The burger remains juicy and flavorful while keeping carbs in check.
Storing and Bringing It Back to Life
Fridge Storage
Store cooked patties in an airtight container in the refrigerator for up to 3 days. Reheat in a skillet over medium heat for 2 minutes per side, then finish with a quick butter glaze to restore the buttery crust.
Freezer Friendly
Wrap each patty tightly in plastic wrap and place in a freezer bag. Freeze for up to 3 months. Thaw overnight in the refrigerator before reheating as described above.
Best Reheating Method
Reheat the burger in a preheated oven at 350°F for 10 minutes, then finish on a skillet with butter for a crisp crust. Adding a splash of water before reheating steams the patty back to perfection, preventing it from drying out.