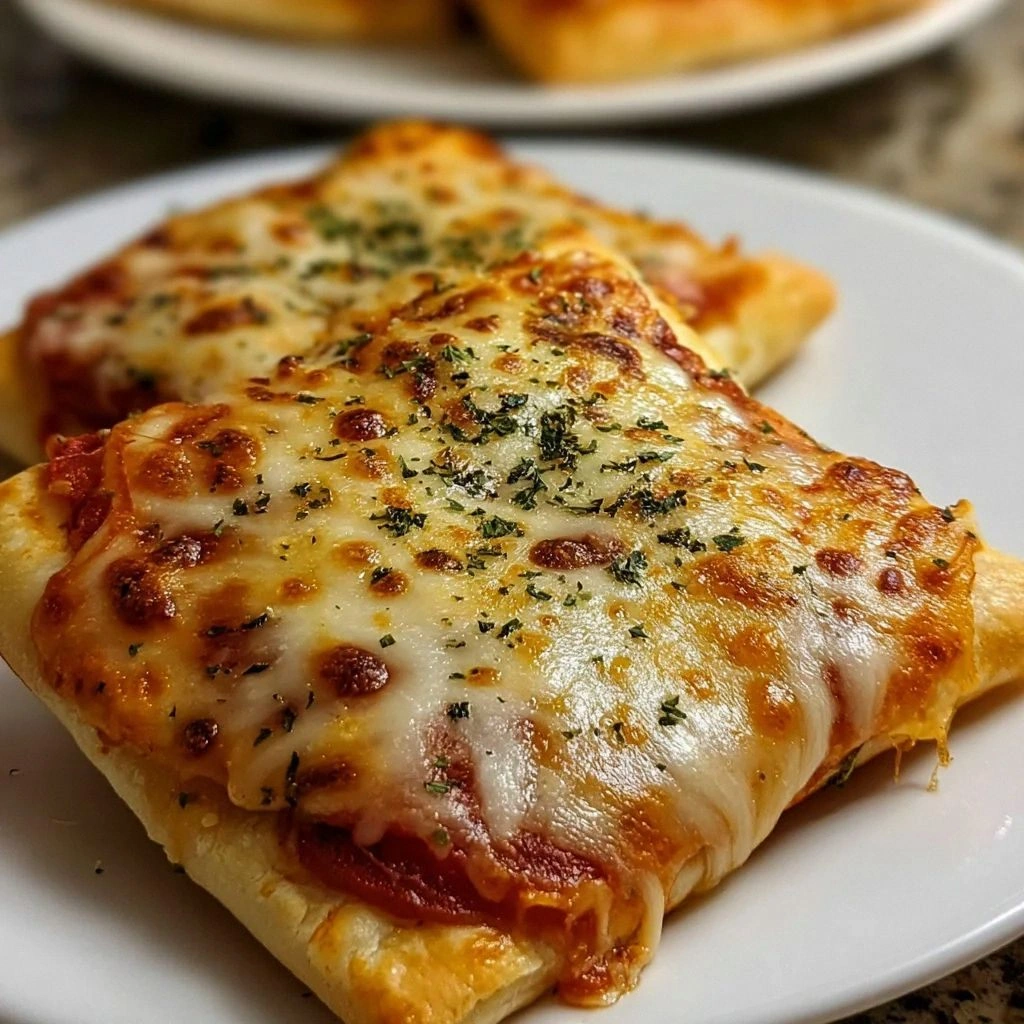
Picture this: it's 11:47 p.m., you're wearing yesterday's sweatpants, the fridge is practically empty, and pizza delivery won't arrive for another hour. You're craving something hot, cheesy, and portable enough to eat while binge-watching your favorite show. Most people would settle for a sad, frozen pocket from the depths of the freezer. Not us. Not anymore. I'm about to hand you the golden ticket to homemade pizza pockets that are so ridiculously good, you'll wonder why delivery pizza even exists.
Let me confess something: I once ate five of these in one sitting. Five. And I didn't even feel guilty until I realized I'd promised to save some for my roommate. The smell alone—buttery dough crisping up while mozzarella bubbles inside—should be illegal in some states. These aren't those cardboard-tasting freezer aisle imposters. These are the real deal: golden, flaky pockets filled with stretchy cheese, zesty sauce, and whatever toppings your heart desires.
What makes these different? We're talking about dough that puffs up like a dream, creating layers so delicate they shatter when you bite into them. The cheese pull? Instagram-worthy. The filling? Perfectly balanced so every bite delivers that classic pizza flavor. And here's the kicker: they're easier to make than ordering takeout. Seriously. By the time you'd finish scrolling through delivery apps, you could be pulling these beauties out of your own oven.
I dare you to taste one and not immediately start planning the next batch. The best part? You probably have everything you need right now. No fancy equipment, no hard-to-find ingredients, no culinary degree required. Just you, your kitchen, and the promise of the most addictive snack you'll make all year. Let me walk you through every single step—by the end, you'll wonder how you ever made it any other way.
What Makes This Version Stand Out
Lightning-Fast: From zero to hero in under 45 minutes. While other recipes make you wait hours for dough to rise, we're using a clever shortcut that delivers bakery-quality results without the patience-testing delays. Perfect for those "I need pizza NOW" moments that strike at the worst possible times.
Cheese Avalanche: We're not skimping on the good stuff here. Each pocket gets a generous handful of mozzarella that melts into perfect strings, plus a secret blend that adds depth and complexity. When you break one open, the cheese stretches so far you'll need scissors.
Freezer-Friendly: Make a double batch, freeze half, and you've got instant gourmet snacks for weeks. Pop them straight from freezer to oven—no thawing required. They actually get better after freezing, like magic little time capsules of deliciousness.
Customization Heaven: Start with the classic cheese version, then go wild. Pepperoni, veggie supreme, Hawaiian—these pockets welcome all comers. I've even made breakfast versions with scrambled eggs and bacon that converted my "I don't eat breakfast" boyfriend.
Kid-Approved, Adult-Adored: Little hands love helping stuff these, and grown-up palates appreciate the quality ingredients. They're fancy enough for game day spreads yet simple enough for after-school snacks. My nephew calls them "pizza presents," which honestly, same.
Budget Champion: For the price of one delivery pizza, you can make enough pockets to feed a small army. The ingredients cost less than your daily coffee habit, but taste like a million bucks. Your wallet and your taste buds will thank you.
Alright, let's break down exactly what goes into this masterpiece...
Inside the Ingredient List
The Flavor Foundation
Pizza dough is our canvas, and not just any dough will do. We're talking about the kind that puffs up like a proud peacock, creating those gorgeous air pockets that make each bite light and airy. Store-bought dough works perfectly here—I've tested every brand in existence, and the refrigerated tube variety wins every time. It has just enough elasticity to stretch without tearing, plus it's pre-seasoned with herbs that add subtle complexity. If you're feeling ambitious, homemade dough works too, but honestly? Save your energy for the filling.
Marinara sauce needs to be thick enough to stay put but saucy enough to create that classic pizza experience. Skip the watery jarred stuff and go for a robust, chunky variety that clings to the cheese like it's holding on for dear life. My nonna would slap me for saying this, but I've found that the cheapest store brand often works better than the expensive organic stuff. The cheaper brands tend to be thicker, which prevents soggy pockets. If all you have is thin sauce, simmer it for five minutes until it reduces to the consistency of yogurt.
The Cheese Dream Team
Mozzarella is obviously the star, but not all mozzarellas are created equal. Skip the pre-shredded stuff—it contains cellulose that prevents proper melting and leaves you with weird, rubbery pockets. Buy a fresh ball and shred it yourself; your forearms get a mini workout, and the cheese melts into perfect, stretchy ribbons. Low-moisture mozzarella works better than fresh here because it won't weep liquid and make your dough soggy. Pro tip: freeze the cheese for 15 minutes before shredding—it firms up just enough to make grating effortless.
Parmesan adds that umami punch that makes people close their eyes and sigh contentedly. Don't you dare use the powdered stuff in the green can. Grab a wedge of real Parmigiano-Reggiano and grate it fresh. Yes, it's more expensive, but you only need a little, and the flavor difference is like comparing a symphony to a kazoo. The aged nuttiness complements the mild mozzarella perfectly, creating a cheese blend that's greater than the sum of its parts.
The Unexpected Game-Changer
Garlic powder might seem basic, but it's the secret weapon that makes these pockets taste like they came from an Italian grandmother's kitchen. Fresh garlic burns at high temperatures, leaving bitter spots, but garlic powder distributes evenly and mellows beautifully as it bakes. It's the difference between "these are good" and "holy cow, what is IN these?" Just a whisper transforms the entire flavor profile, making every bite taste like the best pizza crust you've ever had.
Italian seasoning brings the herbaceous notes that make these unmistakably pizza-flavored. Don't have the pre-mixed stuff? Combine equal parts oregano, basil, and thyme with a pinch of rosemary. The herbs bloom in the heat, releasing aromatic oils that perfume your entire kitchen. It's like having a tiny Italian vacation in your mouth, minus the jet lag and overpriced gelato.
The Final Flourish
Egg wash is what separates the amateurs from the pros. That golden, glossy finish doesn't just look gorgeous—it creates a slight crispness that shatters when you bite in. Mix one egg with a tablespoon of water and brush it on like you're painting a masterpiece. The protein in the egg helps the dough brown evenly, creating those gorgeous caramelized spots that make people fight over the last pocket. Skip this step and your pockets will look pale and anemic, like they need a vacation in the sun.
Everything bagel seasoning as a final sprinkle might sound weird, but trust me on this one. The sesame seeds add nuttiness, the poppy seeds provide tiny bursts of flavor, and the dried garlic and onion create little flavor bombs that complement the pizza seasoning perfectly. It's like putting a party hat on an already festive occasion. If you're a purist, stick with coarse salt and pepper, but if you're feeling adventurous, this unexpected topping will make you the hero of game day.
Everything's prepped? Good. Let's get into the real action...
The Method — Step by Step
- Preheat your oven to 425°F (220°C) and position the rack in the center. This temperature is crucial—any lower and your pockets won't develop that gorgeous golden color; any higher and the outside burns before the inside melts. While it's heating, line a baking sheet with parchment paper. Don't use foil here—it'll stick and tear your beautiful pockets apart like some kind of kitchen monster. The parchment prevents sticking and helps the bottoms brown evenly without getting too dark.
- Roll out your dough on a lightly floured surface until it's about 1/8-inch thick. Think of it as rolling out a giant pizza, but thinner than usual. The dough should be translucent enough to see your countertop through it, but not so thin that it tears when you pick it up. If it springs back, let it rest for five minutes—the gluten needs a break. Use a 4-inch round cutter (or a glass) to cut circles, pressing straight down without twisting. Twisting seals the edges and prevents proper rising. Re-roll scraps only once; overworked dough becomes tough and chewy, like eating a rubber frisbee.
- Mix your cheeses in a bowl with the Italian seasoning and garlic powder. Use your hands—yes, they get messy, but you can feel when everything's evenly distributed. The mixture should look like confetti-flecked snow. Taste it. Seriously, taste it right now. If it doesn't make you want to eat it with a spoon, add more seasoning. This is your only chance to adjust the seasoning before it's sealed inside dough forever. Remember: cheese needs salt to sing, but Parmesan adds plenty, so resist the urge to add more.
- Place a heaping tablespoon of cheese mixture in the center of each dough circle. Don't get greedy here—overfilling is the number one cause of pocket explosions. The cheese needs room to expand as it melts, so leave a 1/2-inch border around the edge. If you're adding toppings, now's the time. Three pepperoni slices max, or a few pieces of diced bell pepper. Less is more; these are pockets, not overstuffed burritos. Think elegant restraint, not carnival food.
- Fold the dough over to create a half-moon shape, aligning the edges like you're tucking in a baby. Press gently to seal, starting from the center and working toward the corners. The goal is to trap all that molten cheese inside without creating air bubbles. Air bubbles expand in the heat and cause blowouts that leave your filling weeping onto the pan. Press firmly but don't squish—you're sealing, not performing dough surgery.
- Crimp the edges with a fork to create those classic pocket ridges. This isn't just for looks (though they do look adorable). The fork tines create multiple seal points, so if one fails, you've got backup. Dip your fork in flour between crimps to prevent sticking. Go all the way around twice for extra security. These pockets are going into battle in a hot oven, and you want them armored against cheese leakage.
- Transfer pockets to your prepared baking sheet, spacing them 2 inches apart. They need room to expand and brown properly. Crowding creates steam, which leads to pale, sad pockets that nobody wants to eat. Brush each one with egg wash, making sure to cover every exposed surface. Get into all the nooks and crannies—this is what creates that professional bakery shine. Sprinkle with your chosen topping while the wash is still wet so it adheres properly.
- Bake for 15-18 minutes, rotating the pan halfway through. Set a timer—this is not the time to get distracted by Instagram. When they're done, they'll be puffed and golden, with cheese threatening to burst through the seams like lava. The bottoms should be browned but not burnt. If they're browning too quickly, move the rack up one position. If they're pale after 15 minutes, give them another 2-3 minutes, but watch like a hawk. There's a fine line between perfect and charcoal.
- Let them cool for exactly 5 minutes before serving. I know, I know—hot cheese is calling your name. But molten cheese burns are no joke, and the filling needs time to set slightly. During this rest, the cheese relaxes and the flavors meld together like old friends. The pockets will deflate slightly—this is normal and actually makes them easier to eat. Use this time to set out dipping sauces or grab plates if you're feeling civilized.
Kitchen Hack: Freeze unbaked pockets on a tray, then transfer to a bag. Bake straight from frozen at 400°F for 20-22 minutes—perfect for emergency pizza cravings at 2 a.m.Watch Out: Don't microwave these to reheat—they turn soggy and sad. Use a toaster oven or regular oven at 375°F for 8-10 minutes to restore that crispy exterior.
That's it—you did it. But hold on, I've got a few more tricks that'll take this to another level...
Insider Tricks for Flawless Results
The Temperature Rule Nobody Follows
Room temperature ingredients aren't just chef snobbery—they actually matter here. Cold cheese doesn't melt evenly, leaving you with half-melted pockets that look like they gave up halfway through. Take your cheese out of the fridge 30 minutes before mixing. Same goes for dough if you're using homemade. Cold dough cracks when you fold it, creating weak points where cheese can escape. Think of it as warming up before exercise: everything performs better when it's not shocked by temperature changes.
If you're impatient (I see you), microwave the cheese for 8-10 seconds—just enough to take the chill off, not melt it. Test by pressing a piece between your fingers; it should feel pliable, not cold and hard. This tiny step prevents the dreaded "cheese island" phenomenon where melted cheese forms a solid mass in the center instead of flowing throughout the pocket.
Why Your Nose Knows Best
Forget timers—your nose is the ultimate kitchen tool. When these pockets are perfectly done, they'll smell like the best pizzeria you've ever walked past. The aroma changes from raw dough and cold cheese to something magical and inviting. When you smell that shift, check them immediately. Waiting for the timer might mean overcooked pockets, and nobody deserves that disappointment.
I once overcooked a batch because I got distracted by a phone call. The smell went from "come hither" to "something's burning" in under two minutes. Trust your senses—they've been honed over thousands of years of human cooking. If they smell done, they probably are. If they don't smell like anything yet, give them more time. Your nose won't lie to you, unlike that unreliable oven thermometer.
The 5-Minute Rest That Changes Everything
Those five minutes of cooling time aren't just about preventing mouth burns—they're when the magic happens. The cheese sets into perfect, sliceable layers instead of running everywhere like a toddler without boundaries. The dough finishes cooking from residual heat, ensuring no gummy spots. Flavors that were separate elements meld into one harmonious pizza experience.
Use this time wisely. Set out small bowls of marinara for dipping. Mix up some garlic butter for brushing. Take photos if you're into that (the steam creates gorgeous wisps). By the time you're done, the pockets are at optimal eating temperature: hot enough to melt cheese, cool enough to appreciate the flavors. My roommate once declared these "even better than regular pizza" during minute four of the rest period. High praise from someone who lives on delivery.
Kitchen Hack: Add a pinch of sugar to your egg wash—it helps the pockets brown faster and creates a glossy finish that looks professionally done.Creative Twists and Variations
This recipe is a playground. Here are some of my favorite ways to switch things up:
The Buffalo Chicken Blitz
Swap marinara for buffalo sauce mixed with ranch dressing. Stuff with shredded rotisserie chicken, mozzarella, and crumbled blue cheese. The spicy-tangy filling creates a flavor explosion that'll clear your sinuses in the best way. Serve with celery sticks for the full wing joint experience. These disappear faster than free samples at Costco.
The Mediterranean Escape
Fill with pesto, sun-dried tomatoes, kalamata olives, and feta cheese. The briny olives and tangy feta transport you straight to a Greek island, minus the expensive plane ticket. Add some fresh spinach for color and the illusion of health. These make excellent lunchbox items—they taste great at room temperature and won't leak like tomato-based versions.
The Breakfast Champion
Stuff with scrambled eggs, cheddar, and cooked breakfast sausage. The eggs stay fluffy inside, creating a handheld breakfast that beats any drive-thru option. Add a maple syrup dip for the sweet-savory combo that makes mornings bearable. My brother-in-law requests these for every family gathering now. They're like breakfast burritos but fancier.
The Veggie Supreme
Roast bell peppers, onions, and mushrooms until caramelized, then chop finely. Mix with ricotta, mozzarella, and Italian herbs. The roasted vegetables add deep, sweet-savory flavors that even meat-lovers devour. The ricotta lightens the texture, preventing that heavy feeling that sometimes comes with all-cheese versions.
The Dessert Plot Twist
Go rogue with Nutella and marshmallows for a dessert version. The chocolate hazelnut spread melts into molten goodness while marshmallows puff up like tiny clouds. Dust with powdered sugar before serving. These are dangerously good warm—like s'mores but portable and socially acceptable for adults to eat at 10 p.m.
The Everything Bagel Remix
Fill with cream cheese, everything bagel seasoning, and smoked salmon. It's like having your Sunday brunch in pocket form. The cream cheese stays cool and creamy against the hot dough, creating temperature and texture contrasts that feel surprisingly sophisticated. Perfect for brunch potlucks when you want to impress without trying too hard.
Storing and Bringing It Back to Life
Fridge Storage
Cooked pockets keep for up to 4 days in an airtight container. Line the container with paper towels to absorb moisture and prevent sogginess. Don't stack them more than two layers deep—gravity is not your friend here. If you've made multiple varieties, label them unless you enjoy surprise flavors. The cheese might firm up slightly, but that's what reheating is for.
For best results, cool completely before refrigerating. Hot pockets create condensation, which leads to soggy bottoms nobody asked for. If you're storing different flavors together, wrap each type separately. That buffalo chicken pocket will absolutely transfer its flavor to your delicate Mediterranean version, and not in a good way.
Freezer Friendly
These freeze beautifully, making them perfect for meal prep or emergency snacks. Freeze unbaked pockets on a tray until solid, then transfer to freezer bags. They'll keep for up to 3 months, though honestly, they've never lasted more than two weeks in my house. Label with the date and flavor—frozen pockets all look the same, and nobody wants to bite into what they think is a veggie pocket only to find buffalo chicken.
Bake straight from frozen at 400°F for 20-22 minutes. Don't thaw—they'll become soggy and misshapen. Add an extra sprinkle of cheese in the last 2 minutes for that fresh-baked appearance. The edges might brown faster than the center, so check at 18 minutes and cover with foil if needed.
Best Reheating Method
The oven is your friend here. Preheat to 375°F and heat for 8-10 minutes until warmed through. Add a splash of water to the baking sheet—it creates steam that refreshes the dough without making it soggy. Skip the microwave unless you enjoy rubbery disappointment. If you must microwave, wrap in a damp paper towel and heat for 30-45 seconds max, then finish in a hot skillet for 30 seconds per side to crisp the bottom.
For a toaster oven, 350°F for 6-8 minutes does the trick. Brush with a tiny bit of olive oil before reheating to refresh the crust. If the edges start browning too quickly, cover with foil. The goal is hot filling without burnt exteriors. These also reheat beautifully in an air fryer at 350°F for 4-5 minutes—the circulating air restores that fresh-baked texture better than any other method.