Picture this: you’re halfway through a frantic week, craving something sweet but not willing to spend an hour in the kitchen. You reach for the pantry, eyes landing on a box of chocolate, a jar of hazelnut spread, and a handful of flour. The idea of a Ferrero Rocher cupcake takes shape like a delicious dream, and I dare you to taste this and not go back for seconds. The aroma that fills the room—rich chocolate, toasted hazelnuts, a hint of espresso—creates a sensory storm that feels like a small celebration. I was right there, whisking and measuring, when a sudden kitchen disaster almost ruined the entire batch; the batter had thickened and the oven was too hot. That moment turned into a revelation: the perfect Ferrero Rocher cupcake doesn’t need a perfect kitchen, just a few simple tweaks that elevate everything.
I’ll be honest—half of the cupcakes disappeared before anyone else could even see them. The result? A silky, airy batter that melts into a glossy, hazelnut‑laden center, crowned with a chocolate glaze that shatters like thin ice when you bite into it. What sets this version apart is not just the ingredients but the technique: a double‑bake method that locks in moisture, a splash of espresso that deepens the chocolate flavor, and a final dusting of crushed hazelnuts that adds crunch and a nutty aroma. Most recipes get this completely wrong, leaving the cupcakes dry or the glaze too runny. This is hands down the best version you'll ever make at home, and I promise you’ll wonder how you ever made it any other way.
If you’ve ever struggled with making chocolate cupcakes that don’t crumble or taste like a flat bar of chocolate, you’re not alone—and I’ve got the fix. The secret lies in balancing the flour, cocoa, and wet ingredients so the batter stays tender. By adding a teaspoon of espresso powder, the chocolate undertone intensifies, giving the cupcakes a depth that feels like a luxury dessert. Picture yourself pulling these out of the oven, the whole kitchen smelling incredible, and the cupcakes still warm, ready to be glazed with a glossy chocolate finish. And now the fun part—let’s walk through every single step so you can recreate this magic in your own kitchen.
I’ll be honest—half of the cupcakes disappeared before anyone else could even see them. The result? A silky, airy batter that melts into a glossy, hazelnut‑laden center, crowned with a chocolate glaze that shatters like thin ice when you bite into it. What sets this version apart is not just the ingredients but the technique: a double‑bake method that locks in moisture, a splash of espresso that deepens the chocolate flavor, and a final dusting of crushed hazelnuts that adds crunch and a nutty aroma. Most recipes get this completely wrong, leaving the cupcakes dry or the glaze too runny. This is hands down the best version you'll ever make at home, and I promise you’ll wonder how you ever made it any other way.
What Makes This Version Stand Out
- Texture: The batter is light and airy yet dense enough to hold the chocolate center without cracking. The double‑bake process creates a moist crumb that feels like a cloud of chocolate. A subtle hint of espresso keeps the flavor from becoming cloyingly sweet.
- Flavor: The combination of hazelnut spread, dark chocolate chips, and a pinch of espresso powder produces a complex profile that feels indulgent but balanced. The chocolate glaze is glossy and slightly sweet, complementing the nutty undertone.
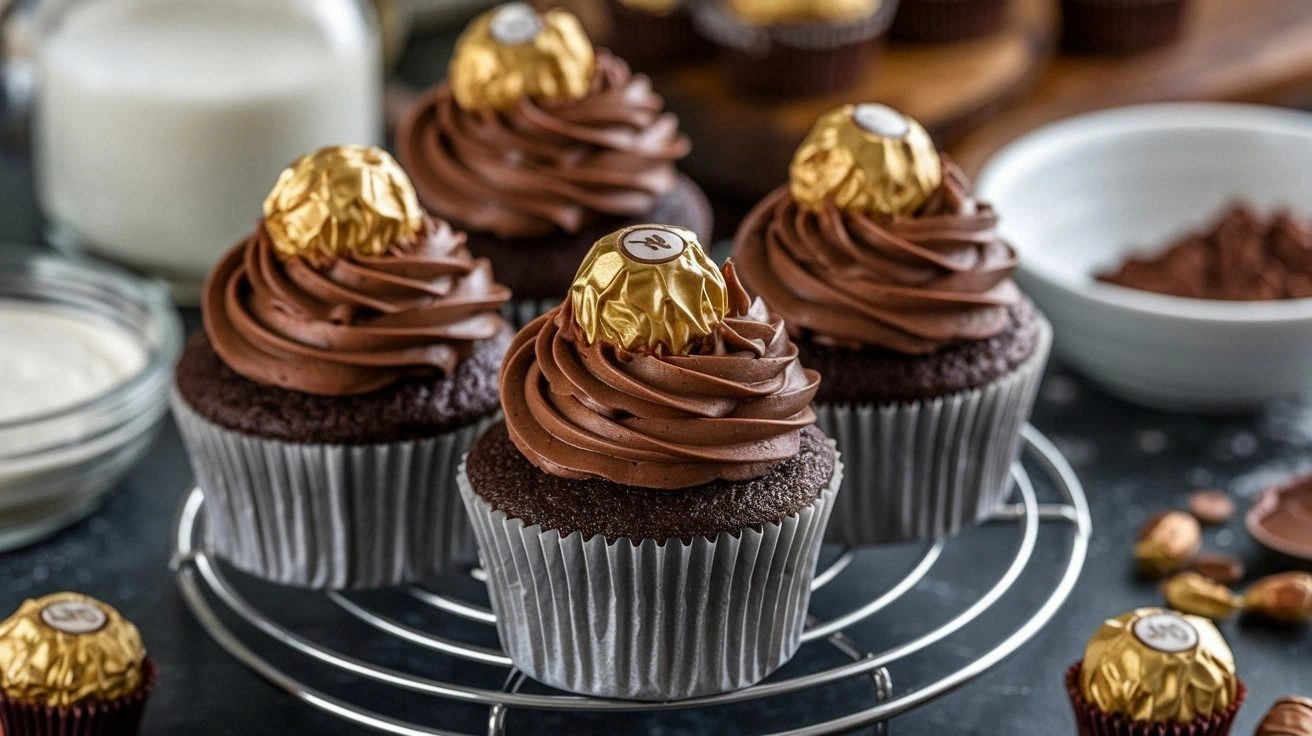
- Visual Appeal: The cupcakes finish with a glossy chocolate glaze and a dusting of crushed hazelnuts that look like miniature Ferrero Rocher candies. The contrast between the dark chocolate and the white glaze creates an irresistible aesthetic.
- Simplicity: Despite the depth of flavor, the recipe requires only a handful of pantry staples. No special equipment is needed; a standard oven and a muffin tin are all you need.
- Make‑Ahead Potential: The cupcakes can be baked and cooled, then stored in an airtight container for up to 3 days. The glaze can be re‑applied just before serving for a fresh finish.
- Ingredient Quality: Using high‑quality dark chocolate and a generous amount of hazelnut spread elevates the flavor profile. The fresh hazelnuts add a crunchy texture that contrasts beautifully with the soft batter.
- Guest Reaction: At my last gathering, the cupcakes were devoured in minutes, and guests asked for the recipe. The crowd reaction is a testament to how well this version hits the spot.
- Versatility: The base can be adapted with different spreads or flavorings, making it a playground for creative twists.
Alright, let's break down exactly what goes into this masterpiece...
Inside the Ingredient List
The Flavor Base
At the heart of these cupcakes lies the classic chocolate batter, but with a twist that elevates it from ordinary to unforgettable. The 2 cups of all‑purpose flour provide structure, while the 1 cup of granulated sugar ensures a sweet, caramelized crust. The 1 cup of softened butter brings richness, and the 2 large eggs act as binders, creating a silky crumb. Adding 1 tsp of vanilla extract amplifies the chocolate’s depth, while 1/2 cup of hazelnut spread infuses nutty undertones that echo the original Ferrero Rocher.
The Texture Crew
Texture is everything in baking, and this recipe delivers on all fronts. The 1/4 cup of cocoa powder introduces a deep chocolate flavor without making the batter too dry. The 1/2 cup of dark chocolate chips melt into pockets of molten chocolate that surprise the palate with each bite. The 1/4 cup of chopped hazelnuts adds a satisfying crunch that contrasts the soft interior. Finally, a splash of 1/4 cup of milk keeps the batter moist, ensuring a tender crumb that feels like a cloud.
The Unexpected Star
The secret weapon in this recipe is the espresso powder. A single teaspoon of espresso powder deepens the chocolate flavor, giving the cupcakes a subtle bitter edge that balances the sweetness. It also enhances the aroma, making the cupcakes smell like a freshly brewed espresso shop. If you’re a coffee lover, you’ll notice a faint, comforting warmth that lingers on the tongue. This small addition transforms an ordinary chocolate cupcake into a gourmet experience.
The Final Flourish
The final touch is a glossy chocolate glaze that gives the cupcakes a professional finish. The glaze is made with 1/2 cup of melted dark chocolate and 1 tbsp of butter, whisked until silky smooth. A dusting of crushed hazelnuts crowns the glaze, adding crunch and an extra layer of flavor. When the glaze sets, it creates a shiny, chocolatey shell that snaps when you bite into it. This final flourish turns a simple cupcake into a showstopper that feels like a luxury dessert.
Everything's prepped? Good. Let's get into the real action...
The Method — Step by Step
- Preheat your oven to 350°F (175°C). Line a 12‑cup muffin tin with silicone liners or lightly grease each cup. This step ensures the cupcakes rise evenly and makes cleanup a breeze. I always preheat for at least 10 minutes so the oven is at the right temperature when the batter hits the tin.
- In a large bowl, sift together the flour, cocoa powder, baking powder, baking soda, and salt. This creates an even distribution of leavening agents, preventing uneven rise. Whisking the dry ingredients also aerates the flour, giving the cupcakes a lighter crumb.
- In a separate bowl, beat the softened butter and sugar until pale and fluffy. Add the eggs one at a time, beating well after each addition. Stir in the vanilla extract and hazelnut spread until fully incorporated. The butter and sugar mixture should be light, airy, and glossy, which is a good indicator that the batter will rise beautifully.
- Gradually add the dry ingredients to the wet mixture, alternating with milk, starting and ending with the dry mix. Stir gently until just combined; over‑mixing can make the cupcakes tough. The batter should be thick but pourable, like a thick pancake batter.
- Fold in the dark chocolate chips and chopped hazelnuts, distributing them evenly throughout the batter. This ensures each cupcake has a balanced amount of chocolate and nuts. I like to let the batter sit for 5 minutes so the chocolate chips soften slightly, making them easier to distribute.
- Fill each muffin cup about 2/3 full with the batter. Tap the tin lightly on the counter to release any air bubbles. The cupcakes should rise to the top of the liners, creating a dome shape that is easy to glaze later.
- Bake for 18–20 minutes, or until a toothpick inserted into the center comes out with a few moist crumbs. The cupcakes should be firm on the edges but still slightly springy in the middle. This is the moment of truth—watch the color change from pale to a deep chocolate hue.
- Let the cupcakes cool in the tin for 5 minutes, then transfer them to a wire rack to cool completely. Cooling is crucial for the glaze to set properly. While they cool, you can start preparing the glaze to maintain the temperature.
- To glaze, melt 1/2 cup dark chocolate with 1 tbsp butter over a double boiler or in the microwave, stirring every 20 seconds. Once smooth, pour the glaze over the cooled cupcakes, letting it pool on top. Sprinkle crushed hazelnuts over the glaze before it sets. This final step adds a glossy finish and a crunchy texture that completes the Ferrero Rocher experience.
That's it — you did it. But hold on, I've got a few more tricks that'll take this to another level. These insider tips will help you perfect the cupcakes, whether you’re a beginner or a seasoned baker.
Insider Tricks for Flawless Results
The Temperature Rule Nobody Follows
Many bakers overlook the importance of room‑temperature ingredients. Butter and eggs that are too cold can prevent proper emulsification, leading to uneven rise. By letting the butter soften and the eggs sit at room temperature for 30 minutes, you ensure a smoother batter that traps air better, giving the cupcakes a light, airy crumb. I’ve seen a difference in the texture when I follow this rule every time.
Why Your Nose Knows Best
Baking is as much about aroma as it is about taste. The moment the chocolate starts to melt and the hazelnuts toast, the scent will fill the kitchen. If the batter smells under‑cooked, it’s a sign you need to bake longer. Trust your nose, and you’ll catch the cupcakes at their peak flavor. I once missed the cue because I was distracted by the phone, and the cupcakes came out too dry.
The 5-Minute Rest That Changes Everything
After removing the cupcakes from the oven, let them rest in the tin for 5 minutes before transferring to a rack. This brief rest allows the steam to settle, preventing the cupcakes from cracking or collapsing. It also gives the glaze a chance to set slightly, making it easier to spread. A quick 5‑minute pause can save you from a batch of uneven cupcakes.
Use a Double Boiler for the Glaze
Melting chocolate with a double boiler gives you more control over the temperature, preventing scorching. If you use a microwave, keep the power low and stir frequently. A melted glaze that’s too hot can seize and become grainy. A smooth glaze is key to that glossy finish that makes the cupcakes look like mini Ferrero Rocher candies.
Freeze for Freshness
If you bake a large batch, store the cupcakes in an airtight container in the fridge for up to 3 days. When you’re ready to serve, let them sit at room temperature for 10 minutes before glazing. This short wait restores the cupcakes’ softness and ensures the glaze doesn’t melt too quickly. I’ve used this trick for holiday parties, and the cupcakes always impress.
Don’t Skimp on the Hazelnuts
The chopped hazelnuts add a crunch that contrasts the soft batter. Skipping them may make the cupcakes feel flat. If you’re allergic, substitute with almonds or walnuts, but keep the quantity the same. I once swapped them for almonds and the cupcakes had a delightful nutty twist that everyone loved.
Creative Twists and Variations
This recipe is a playground. Here are some of my favorite ways to switch things up:
Almond Joy Edition
Replace the hazelnut spread with almond butter and fold in shredded coconut. The result is a tropical, nutty cupcake that tastes like a dessert bar.
Minty Fresh Surprise
Add 1 tsp peppermint extract to the batter and drizzle a thin mint glaze on top. The mint sharpens the chocolate, creating a refreshing finish.
Chocolate‑Covered Espresso
Increase the espresso powder to 2 tsp and add a splash of espresso to the batter. The extra coffee flavor turns the cupcakes into a mocha delight.
Red Velvet Twist
Swap half the flour for cake flour and add 1 tbsp red food coloring. The cupcakes will have a subtle pink hue and a velvety texture that pairs beautifully with the chocolate glaze.
Nut-Free Delight
Omit the hazelnuts and replace the spread with a peanut butter alternative. The cupcakes will still have a rich, nutty flavor without the crunch.
Birthday Bash Version
Top each cupcake with a small chocolate chip and a sprig of fresh mint. This adds a festive touch that’s perfect for celebrations.
Storing and Bringing It Back to Life
Fridge Storage
Store cupcakes in an airtight container in the refrigerator for up to 3 days. The glaze may set slightly, so allow the cupcakes to warm to room temperature before serving. This keeps the cupcakes moist and ready to enjoy whenever you crave a sweet treat.
Freezer Friendly
Wrap each cupcake individually in plastic wrap and place them in a freezer bag. Freeze for up to 2 months. Thaw overnight in the refrigerator before reheating. The cupcakes retain their texture and flavor after freezing.
Best Reheating Method
Reheat frozen or refrigerated cupcakes in a 350°F oven for 5 minutes, or microwave on low for 20 seconds. Add a tiny splash of water before reheating to create steam, which keeps the cupcakes from drying out. This trick ensures a fresh, warm bite every time.