I still remember the first time I tasted a deviled egg that made me stop mid-chew and stare at the plate like it had just revealed the secrets of the universe. It was at my cousin's wedding shower, and I had casually popped what I assumed would be another forgettable egg half into my mouth while chatting about flower arrangements. Instead, this creamy, tangy, utterly luxurious bite hijacked the entire conversation. My aunt actually grabbed my arm mid-sentence because I'd gone completely silent, eyes wide, doing that embarrassing little happy dance that happens when food is just too good. That egg was a game-changer, and I became obsessed with recreating that million-dollar moment in my own kitchen.
Fast forward through three dozen egg trials, two broken mixers, and one unfortunate incident involving curry powder that tasted like regret, and here we are. This isn't just another deviled egg recipe — this is the recipe that'll make you the legendary host who people secretly hope will bring appetizers to every gathering. The secret? It's all about building layers of flavor that make your taste buds do a standing ovation, while keeping that nostalgic comfort that makes deviled eggs the ultimate crowd-pleaser. We're talking about eggs so good that you'll find yourself making them for dinner on a Tuesday night, standing at the counter in your pajamas, telling yourself you'll just have one more.
Here's what makes these particular deviled eggs worthy of their flashy name: they're impossibly creamy without being heavy, tangy without being sharp, and they have this way of disappearing from plates faster than free samples at Costco. The filling is so silky it practically melts on your tongue, with just enough texture to keep things interesting. And the best part? They're actually easier to make than the sad, dry versions you've probably suffered through at office potlucks. We're about to elevate this classic from afterthought to showstopper.
Let me walk you through every single step — by the end, you'll wonder how you ever made it any other way.
What Makes This Version Stand Out
Silk-Smooth Texture: The combination of cream cheese and mayonnaise creates a filling so luxurious it should come with a warning label. No more grainy, sad fillings that crumble when you try to pipe them — this version holds its shape while staying impossibly creamy.
Flavor Depth That Goes for Miles: Most recipes stop at mayo and mustard, but we're building a flavor foundation with garlic powder, onion powder, and a splash of vinegar that makes every bite more interesting than the last. It's like the difference between listening to music on your phone versus hearing it live — same song, completely different experience.
Foolproof Technique: I've cracked the code on getting perfectly centered yolks and shells that practically fall off the whites. No more mangled eggs that look like they've been through a food processor, and definitely no more green-ringed yolks that taste like disappointment.
Make-Ahead Magic: These actually taste better after a few hours in the fridge, which means you can prep them the night before your party and still get eight hours of sleep. Your future self will thank you when you're not frantically piping eggs while your guests are ringing the doorbell.
Customizable Without Being Complicated: Want to add bacon? Go for it. Prefer them extra spicy? Easy fix. The base recipe is perfect as-is, but it plays well with whatever flavors you're craving that day.
Crowd Psychology: There's something about deviled eggs that makes people lose their manners entirely. I've watched CEOs turn into competitive eaters when these hit the table. They're the great equalizer — everyone from toddlers to grandparents will be hovering around the platter.
Alright, let's break down exactly what goes into this masterpiece...
Inside the Ingredient List
The Foundation Players
Large eggs are obviously the headliners here, but not all eggs are created equal when it comes to deviled eggs. You want eggs that are about a week old — not fresh from the chicken, but not ancient either. Older eggs peel more easily because the pH level in the whites increases over time, creating that little air pocket between the membrane and shell that makes peeling a dream instead of a nightmare. If you only have fresh eggs, don't panic — I've got a trick for that coming up.
Mayonnaise is your creamy base, and please, for the love of all that's holy, use the good stuff. This isn't the place for diet mayo or that weird vegan stuff that tastes like sadness. Real, full-fat mayonnaise is what gives these eggs their luxurious texture. I'm partial to Duke's if you can find it, but Hellmann's works beautifully too. The mayo is literally half your filling, so this is not where you want to pinch pennies.
The Texture Transformers
Cream cheese is the secret weapon that takes these eggs from good to "oh my god, what did you put in these?" territory. It adds body and richness that mayo alone can't achieve, plus it helps the filling hold its shape if you're going for fancy piping. Make sure it's properly softened — we're talking room temperature, spreadable, no weird cold lumps. If you're impatient (and who isn't?), cut it into small cubes and microwave for 10-15 seconds, but watch it like a hawk because melted cream cheese is a kitchen tragedy.
Dijon mustard brings the sophistication that yellow mustard just can't touch. It's got that perfect balance of tang and heat without overwhelming the other flavors. If you absolutely must use yellow mustard, cut the amount in half because it's much more aggressive. Whole grain mustard is another excellent choice if you like a bit of texture in your filling.
The Flavor Enhancers
White vinegar might seem like an odd addition, but it's the secret ingredient that makes all the other flavors pop. It's like adding a squeeze of lemon to brighten everything up, but it doesn't add any liquid that could make your filling too loose. Don't skip this — it's the difference between eggs that taste flat and eggs that make people close their eyes when they take a bite.
Garlic powder and onion powder are the dynamic duo that give depth without any harshness. Fresh garlic would be too aggressive here, but the powdered versions add that savory backbone that makes people ask "what's in these?" They're subtle but essential — like a good bass line in a song, you might not consciously notice them, but you'd miss them if they were gone.
The Final Flourish
Fresh chives are non-negotiable in my book. They're like the punctuation mark at the end of a perfect sentence — technically optional, but they complete the whole experience. Their mild onion flavor and bright green color make everything taste fresher and more alive. If you can't find chives, green onion tops work, but chives are worth the extra effort to track down.
Salt and pepper seem basic, but they're your final adjustment tools. Taste your filling before you pipe it and adjust — some mayos are saltier than others, and your taste buds are the only reliable guide here. Start conservative and add more if needed because you can always add salt, but you can't take it away.
Everything's prepped? Good. Let's get into the real action...
The Method — Step by Step
- Start with eggs that have been sitting out for about 15 minutes — this prevents cracking when they hit hot water. Place them in a single layer in a pot and cover with cold water by about an inch. Add a tablespoon of baking soda to the water (this raises the pH and makes peeling easier), then bring to a boil over medium-high heat. Once the water reaches a rolling boil, cover the pot with a lid, turn off the heat, and let them sit for exactly 12 minutes. This gentle cooking method prevents that green ring around the yolks and gives you perfectly cooked centers.
- While the eggs are cooking, prepare an ice bath in a large bowl — equal parts ice and water. When the timer goes off, immediately transfer the eggs to the ice bath using a slotted spoon. This stops the cooking process and makes the eggs contract slightly inside the shell, which helps with peeling. Let them chill for at least 5 minutes, but longer is better. I've left eggs in ice water for 30 minutes while finishing other prep, and they peeled like a dream.
- Now for the peeling technique that changed my life: tap the wider end of the egg on the counter to crack it, then roll the whole egg gently under your palm to create a network of cracks. Start peeling from the wider end where there's usually an air pocket. If you're struggling, peel under running water — the water gets between the membrane and the white, helping everything separate cleanly. Don't worry if a few whites tear; we're going to pipe filling into them anyway, so minor imperfections are totally forgivable.
- Slice each egg in half lengthwise using a sharp knife dipped in water between cuts — this prevents the yolk from sticking and gives you clean edges. Gently remove the yolks and place them in a mixing bowl. The yolks should pop out easily if your eggs are properly cooked, but use a small spoon to scoop out any stubborn bits. Arrange your white shells on a serving platter or storage container, ready for their delicious filling.
- Mash the yolks with a fork until they look like coarse crumbs — this prevents lumps in your final filling. Add the cream cheese first, mashing and mixing until the yolks start to come together in a paste. This step ensures the cream cheese gets fully incorporated without leaving little white flecks in your filling. Once combined, add the mayonnaise, Dijon, vinegar, garlic powder, onion powder, salt, and pepper. Mix everything together until smooth — you can use a fork for a rustic texture or an electric mixer for ultra-smooth filling.
- Here's where the magic happens: taste your filling and adjust. This is crucial because every brand of mayo and mustard tastes different, and your personal preference matters. Need more tang? Add another splash of vinegar. Want it creamier? More mayo. Too bland? A pinch more salt. Remember that the flavors will meld and intensify after chilling, so go just slightly under-seasoned at this stage. The filling should be creamy but hold its shape when you scoop it.
- Transfer your filling to a piping bag fitted with a star tip for fancy presentation, or use a zip-top bag with the corner snipped off for easy piping. If you're feeling rustic, you can absolutely just spoon the filling into the whites — they'll taste the same, just won't look as Instagram-worthy. Pipe in a circular motion, starting from the outside and working your way to the center, creating a beautiful swirl that looks like it came from a professional kitchen.
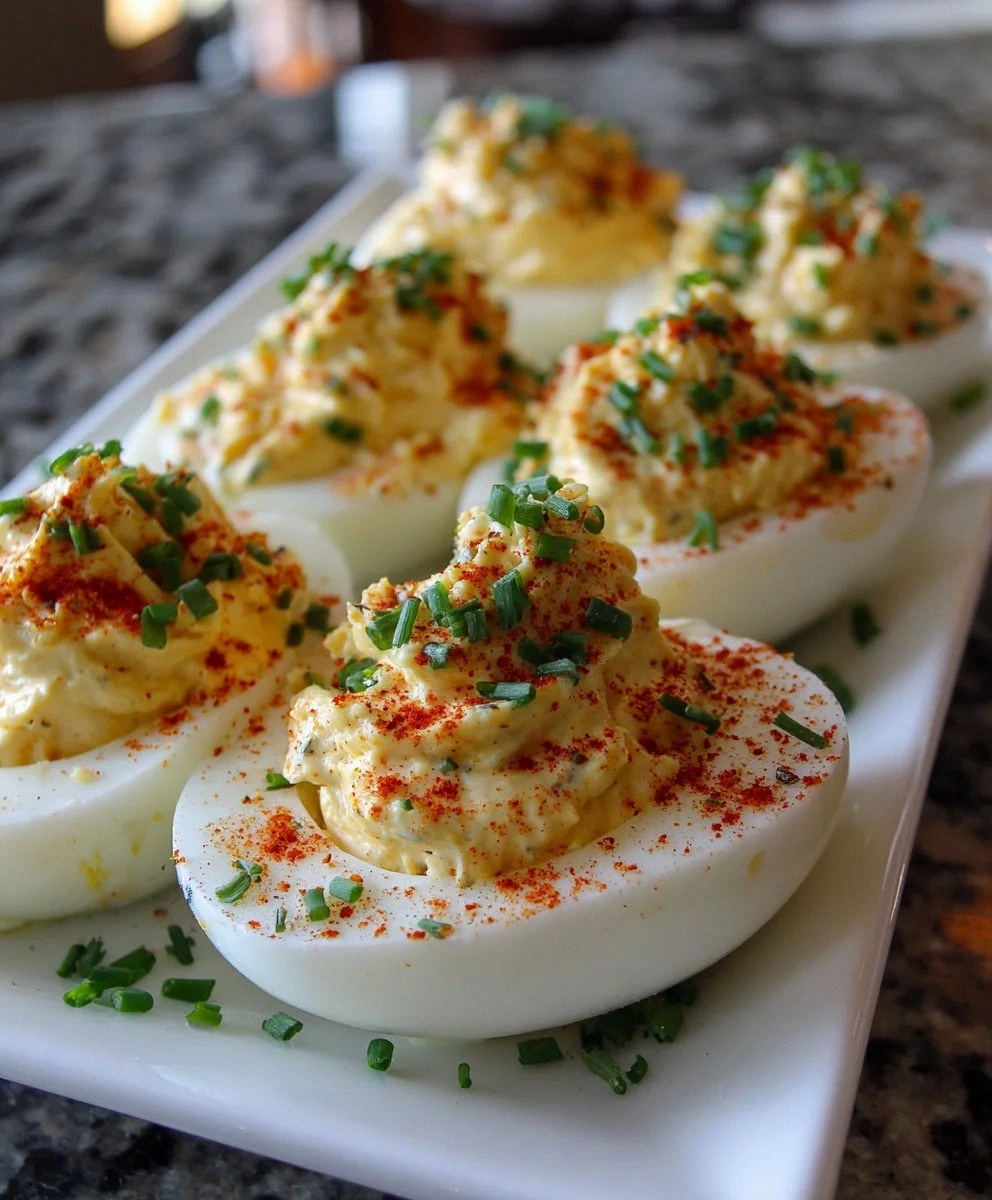
- Garnish each egg with a sprinkle of paprika and chopped chives. The paprika adds that classic deviled egg look and a subtle warmth, while the chives bring freshness and color. Don't go overboard — you're aiming for elegant, not buried under garnish. If you're making these ahead, hold off on the chives until just before serving so they stay bright and perky. Cover and refrigerate for at least 30 minutes before serving — this chilling time lets the flavors meld and the filling firm up slightly.
That's it — you did it. But hold on, I've got a few more tricks that'll take this to another level...
Insider Tricks for Flawless Results
The Temperature Rule Nobody Follows
Here's the thing that separates the pros from the amateurs: everything needs to be at room temperature before you start mixing. Cold cream cheese won't blend smoothly, cold mayo can cause the filling to seize up, and cold yolks won't incorporate properly. Take everything out of the fridge 30 minutes before you start, and your filling will be twice as smooth. I know it's tempting to skip this step when you're in a hurry, but trust me — this is what makes the difference between good eggs and legendary eggs.
Why Your Nose Knows Best
Fresh eggs might seem like the obvious choice for the best deviled eggs, but slightly older eggs actually work better. Eggs that are 7-10 days old have a higher pH level, which helps the whites separate from the membrane during peeling. How can you tell if your eggs are the right age? The float test works — place eggs in a bowl of water. If they lie flat on the bottom, they're very fresh (great for poaching, not ideal for deviled eggs). If they stand upright or float slightly, they're perfect for hard-boiling and will peel like a dream.
The 5-Minute Rest That Changes Everything
After you pipe the filling, let the eggs rest in the fridge for at least 30 minutes before serving. This isn't just about food safety — this resting time allows the flavors to meld and intensify. The garlic and onion powders hydrate, the salt distributes evenly, and the whole filling firms up to the perfect consistency. I actually prefer making these the night before a party — they taste even better after an overnight rest, and you'll have one less thing to worry about when guests arrive.
The Piping Bag Alternative
Don't have a piping bag? No problem. A zip-top bag works perfectly — just spoon the filling into the bag, squeeze out the air, snip off one corner, and you're ready to pipe. The size of your snip determines the thickness of your piping stream, so start small and make it bigger if needed. For a rustic look, you can also use two spoons to quenelle the filling into the whites — it won't be as fancy, but it has a certain homespun charm that works for casual gatherings.
The Storage Secret
If you're making these ahead, store them in a single layer in an airtight container. To prevent the filling from drying out, press a piece of plastic wrap directly onto the surface of the eggs before sealing the container. They'll keep for up to 3 days in the fridge, though they're best within 48 hours. And here's a pro tip: if you're transporting these to a party, pack the whites and filling separately, then assemble on site. Your deviled eggs will look as fresh as if you made them that morning.
Creative Twists and Variations
This recipe is a playground. Here are some of my favorite ways to switch things up:
The Everything Bagel Edition
Swap out the paprika for Everything Bagel seasoning, add a dollop of whipped cream cheese on top, and garnish with thin slices of smoked salmon. Suddenly your deviled eggs taste like Sunday brunch at your favorite bagel shop. The Everything seasoning adds sesame, poppy seeds, and dried garlic that takes these in a completely different direction.
The Southern Belle
Add a teaspoon of pimento cheese to the filling, top with a tiny piece of crispy bacon, and swap the chives for thin green onion tops. These taste like a sophisticated version of that classic Southern party staple. The pimento cheese adds a subtle tang and beautiful color that makes people ask for the recipe before they've even finished chewing.
The Spicy Devil
Add a teaspoon of Sriracha to the filling, top with a slice of pickled jalapeño, and use smoked paprika instead of regular. These have just enough heat to make things interesting without overwhelming the delicate egg flavor. Perfect for those friends who claim deviled eggs are "too boring" — these will change their tune fast.
The Breakfast-for-Dinner
Add a teaspoon of maple syrup to the filling, top with crumbled breakfast sausage and a tiny drizzle of maple syrup. Sounds weird until you try it — then it becomes your new favorite brunch trick. The sweet-savory combination is absolutely addictive, and they're always the first to disappear at brunch parties.
The Mediterranean Dream
Add a tablespoon of crumbled feta to the filling, swap the chives for fresh dill, and top with a tiny piece of sun-dried tomato. These taste like a Greek island vacation in egg form. The feta adds a salty tang that plays beautifully with the creamy base, while the dill brings that fresh herb flavor that makes everything taste more expensive.
The Truffle Shuffle
Add a few drops of truffle oil to the filling, top with shaved parmesan and a tiny piece of chive. These are for when you want to feel fancy without actually spending a fortune on truffles. The truffle oil is potent, so start with just a drop or two — you can always add more, but you can't take it away once it's in there.
Storing and Bringing It Back to Life
Fridge Storage
Deviled eggs are surprisingly resilient, but they need proper storage to stay their best. Keep them in a single layer in an airtight container, with plastic wrap pressed directly onto the surface to prevent the filling from drying out. They'll stay fresh for up to 3 days, though they're at their peak within the first 48 hours. After that, the whites start to get a bit rubbery and the filling can separate slightly. If you've added any perishable toppings like seafood or avocado, eat those within 24 hours for the best quality.
Freezer Friendly? Not So Much
Here's where I have to deliver some tough news: deviled eggs do not freeze well. The high water content in the whites makes them turn rubbery and weepy when thawed, and the filling can separate into an unappetizing mess. If you must prepare components ahead, you can freeze the egg yolks for up to 3 months, then thaw and mix fresh filling, but honestly, it's not worth the trouble. These are best made fresh or stored in the fridge for a few days maximum.
The Revival Method
If your eggs have been in the fridge and the filling seems a bit dry, you can revive them with a tiny splash of milk or cream. Mix it in gently with a fork until the filling loosens up. For eggs that have been sitting out at a party for a few hours and the filling has started to crust over, you can pipe a tiny bit of fresh filling on top to refresh them. But honestly, if you've made these correctly, they won't last long enough to need reviving — they'll disappear long before they have a chance to dry out.