Picture this: it’s a rainy Saturday afternoon, the kind that makes you want to curl up with a blanket, a good movie, and something sweet enough to convince the clouds to clear. I was rummaging through my pantry, half‑heartedly scrolling through endless dessert ideas, when a daring friend texted me, “Bet you can’t make a bite‑size dessert that tastes like a gourmet bakery and a candy store had a love child.” I laughed, grabbed a handful of graham crackers, and set out to prove them wrong. Little did I know that the kitchen would soon become a battlefield of melted butter, caramel bubbles, and a peanut butter aroma that could make even the toughest diet‑watcher swoon.
The moment the crust hit the pan, the kitchen filled with a buttery scent that reminded me of fresh‑baked cookies cooling on a rack. I could hear the faint crackle as the melted butter met the dry crumbs, a sound that promised a crisp, buttery foundation. The filling, a silky blend of cream cheese and peanut butter, poured like liquid gold, and when the oven door closed, the whole house seemed to hold its breath. As the mini cheesecakes baked, a caramel sauce simmered on the stove, its amber hue deepening with each stir, releasing a sweet, buttery perfume that was nothing short of intoxicating.
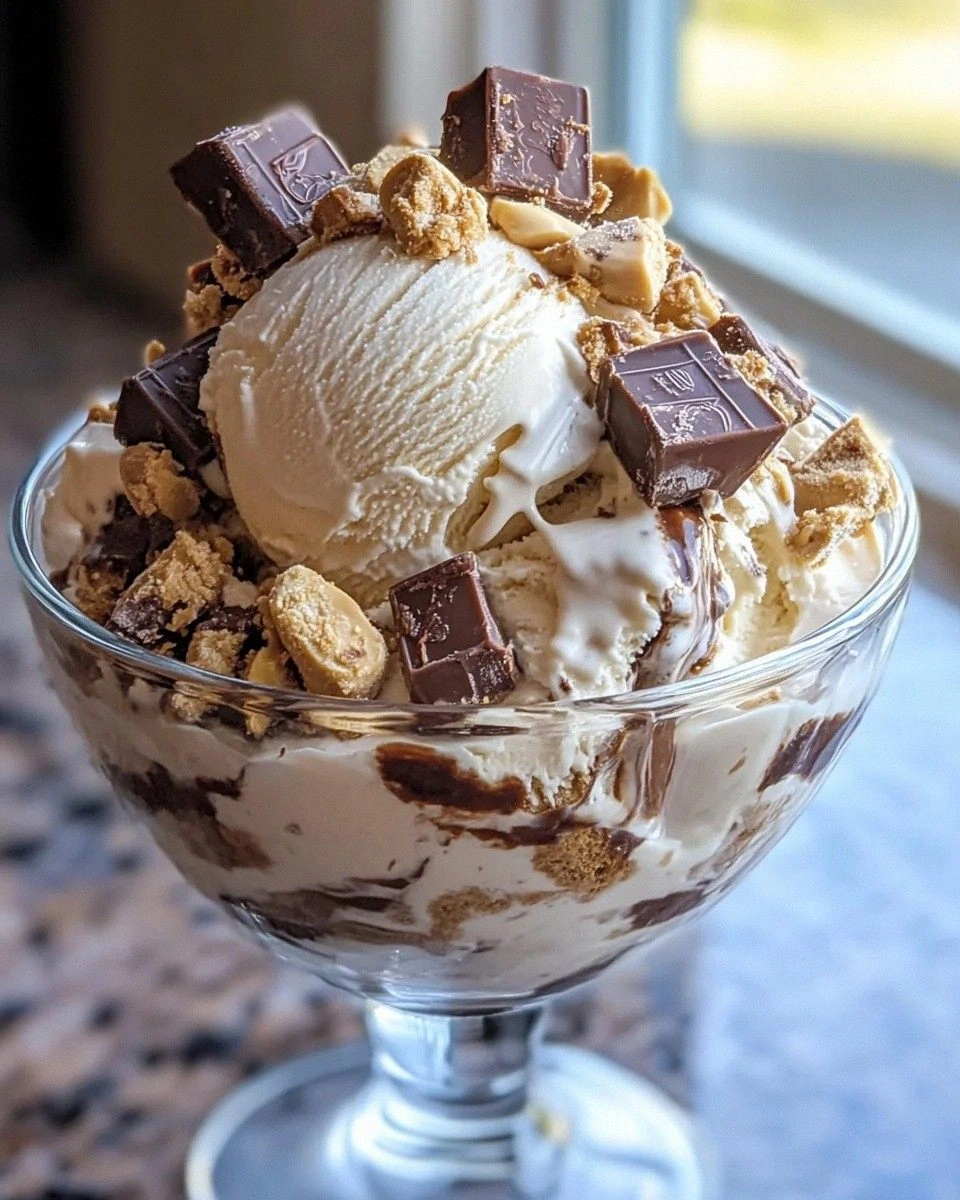
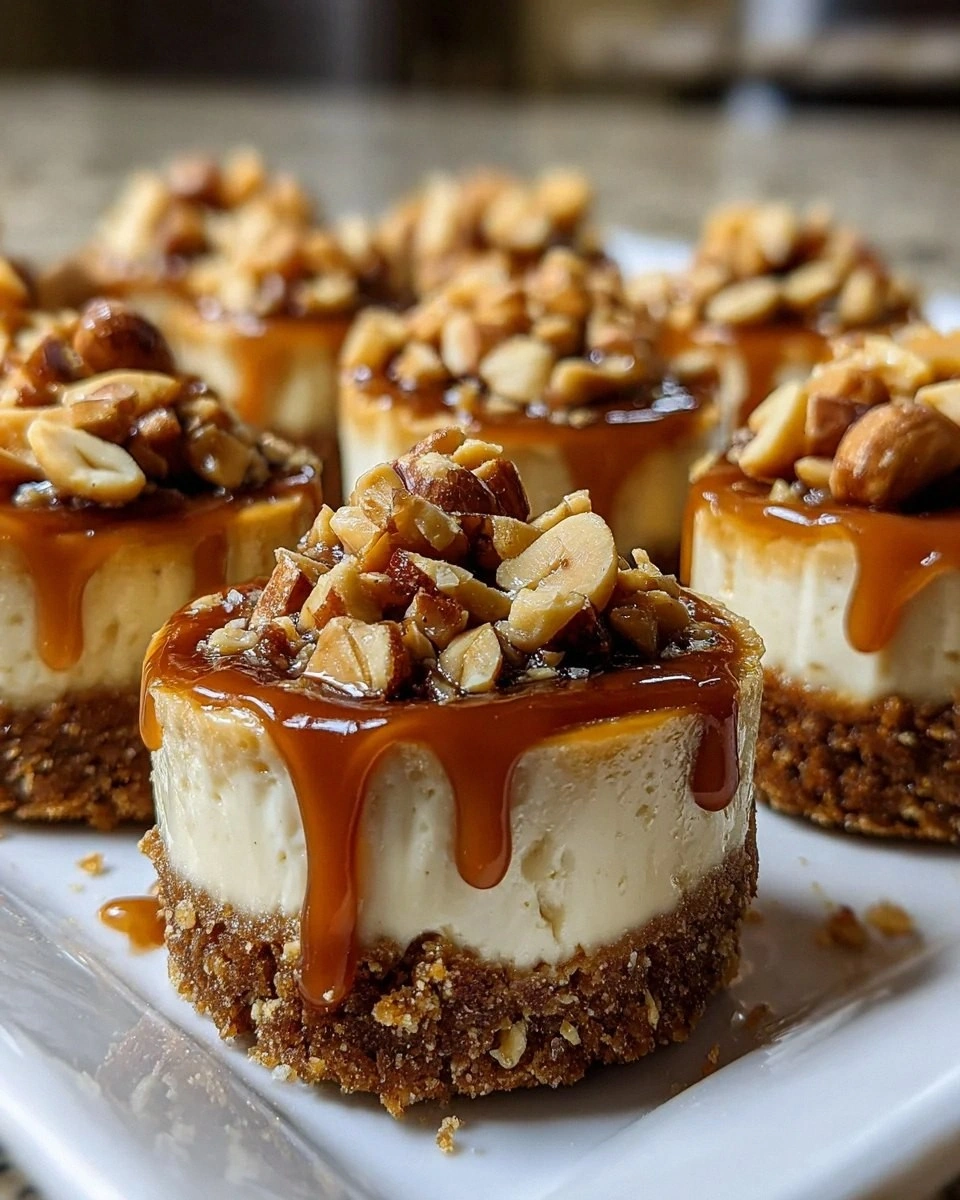
When I finally pulled the first mini out of the oven, the caramel drizzled over it like liquid sunshine, and the chopped peanuts added a crunch that echoed like tiny fireworks in my mouth. I took a bite, and the peanut butter’s creamy richness collided with the caramel’s buttery sweetness, while the graham crust provided a satisfying snap—an experience that felt like a hug from a childhood favorite dessert, but with a sophisticated adult twist. I’ll be honest — I ate half the batch before anyone else got a chance, and that’s exactly why I’m shouting this from the rooftops: this is hands down the best version you’ll ever make at home.
So, are you ready to embark on a culinary adventure that will have you daring anyone to taste this and not go back for seconds? Let me walk you through every single step — by the end, you’ll wonder how you ever made it any other way. Okay, ready for the game‑changer? This next part? Pure magic.
What Makes This Version Stand Out
- Flavor Explosion: The marriage of creamy peanut butter and silky caramel creates a depth of flavor that outshines any store‑bought mini cheesecake you’ve ever tried. The salty‑sweet balance hits every taste bud with precision.
- Texture Symphony: A crunchy graham crust, a smooth, airy filling, and a glossy caramel drizzle combine for a mouthfeel that’s both comforting and luxurious—like biting into a cloud that’s been toasted.
- Simplicity Meets Sophistication: Despite the gourmet vibe, the ingredient list is short and the steps are straightforward, meaning you don’t need a culinary degree to pull off this masterpiece.
- Ingredient Quality: Using real unsalted butter and high‑quality creamy peanut butter ensures a richness that artificial substitutes simply can’t match.
- Crowd‑Pleaser Factor: Whether it’s a family gathering, a potluck, or a solo indulgence, these minis disappear faster than you can say “one more bite.” I dare you to taste this and not go back for seconds.
- Make‑Ahead Magic: The mini format stores beautifully, and the caramel can be reheated without losing its velvety sheen, making it perfect for busy weeknights or last‑minute dessert cravings.
Inside the Ingredient List
The Flavor Base
Graham cracker crumbs: The foundation of our crust; they add that perfect crunch and buttery flavor. If you skip them, you lose the essential textural contrast that makes each bite exciting. For a gluten‑free version, substitute with crushed gluten‑free graham crackers or even oat cookies.
Melted unsalted butter: This brings richness to the crust, helping it hold together beautifully. Using unsalted butter lets you control the salt level, ensuring the caramel’s salty pop isn’t overpowered. If you only have salted butter, cut back on the sea salt in the caramel.
Granulated sugar: Just a touch sweetens the crust, bringing out its deliciousness. It also helps the crumbs bind when mixed with butter. You could experiment with brown sugar for a deeper caramel note in the base.
The Texture Crew
Cream cheese: The star of the filling, it provides that creamy, dreamy texture we all love. Full‑fat cream cheese yields a richer mouthfeel; low‑fat versions can become grainy. Let it soften at room temperature to avoid lumps.
Creamy peanut butter: Oh, the flavor explosion! This gives our cheesecakes their signature taste. Natural peanut butter works, but stir well to incorporate the oil before mixing. If you’re allergic, try almond butter for a similar nutty profile.
Egg: Essential for binding the filling and giving it structure as it bakes. Over‑beating can incorporate too much air, leading to cracks; a gentle fold is key. For a vegan twist, replace with a flax‑egg (1 tbsp ground flax + 3 tbsp water).
Vanilla extract: A splash of warmth that enhances all the other flavors in the mix. Real vanilla bean seeds can elevate the aroma further, but a good quality extract does the trick.
The Unexpected Star
Unsalted butter (caramel): Used in the caramel sauce; unsalted butter ensures our sweetness stays balanced. The butter should be melted slowly over low heat to prevent scorching.
Brown sugar: For that lovely caramel note, this adds depth and richness to the sauce. Light brown sugar gives a milder flavor, while dark brown sugar intensifies the molasses undertone.
Heavy cream: This helps create a silky caramel sauce that drips effortlessly over each mini cheesecake. Adding the cream too quickly can cause the mixture to seize, so pour in a thin stream while whisking.
Sea salt (optional): A pinch of salt elevates your caramel, balancing the sweetness perfectly. If you love that salted‑caramel vibe, go generous; otherwise, a subtle pinch is enough.
The Final Flourish
Chopped roasted peanuts: A delightful crunch and nutty flavor for topping—because who doesn’t love a bit of extra texture? Toast them lightly for extra aroma, but watch out—they can burn quickly.
Everything's prepped? Good. Let’s get into the real action…
The Method — Step by Step
Preheat your oven to 325°F (165°C) and line a muffin tin with paper liners. While the oven warms, combine the graham cracker crumbs, melted unsalted butter, and granulated sugar in a bowl. Mix until the crumbs are evenly coated and the mixture resembles wet sand. Press about a tablespoon of this mixture firmly into the bottom of each liner, creating a compact crust that will hold its shape after baking.
Kitchen Hack: Use the back of a spoon or a small glass to press the crust down evenly; this ensures every mini has a uniform base for consistent baking.In a large mixing bowl, beat the softened cream cheese until smooth and creamy, about 2 minutes on medium speed. Add the creamy peanut butter and continue beating until fully incorporated, creating a velvety pink‑orange swirl. Scrape down the sides to guarantee a uniform mixture; any pockets of unmixed cheese will cause uneven texture.
Drop in the egg and vanilla extract, then gently fold them into the cheese‑peanut mixture. The goal is to combine without over‑whipping, which would introduce excess air and lead to cracks once baked. The batter should be thick yet pourable, resembling a rich frosting.
Divide the filling evenly among the prepared crusts, filling each liner about three‑quarters full. The batter will rise slightly, so don’t overfill. Smooth the tops with a spatula for a polished look—this is where the caramel will later cascade.
Place the muffin tin on a baking sheet (to catch any drips) and bake for 18‑22 minutes, or until the edges are set and the center still has a slight jiggle. The surface should turn a pale golden hue, and you’ll notice a faint aroma of toasted peanuts. Watch the timer closely—over‑baking will dry out the mini cheesecakes.
While the cheesecakes cool in the tin, melt the unsalted butter for the caramel in a medium saucepan over medium heat. Once bubbling, whisk in the brown sugar until fully dissolved, then bring the mixture to a gentle boil. Let it boil for 2‑3 minutes, stirring constantly; you’ll hear a subtle hiss that signals the caramel is reaching its perfect stage.
Remove the saucepan from heat and slowly drizzle in the heavy cream while whisking vigorously. The mixture will bubble up dramatically—this is normal and indicates a glossy, smooth caramel forming. Stir in the sea salt, if using, for that coveted salted‑caramel pop.
Kitchen Hack: If the caramel looks too thick, warm it gently for another 30 seconds; it will loosen without losing its sheen.Once the cheesecakes have cooled to room temperature (about 20 minutes), drizzle the warm caramel over each mini, letting it pool slightly around the edges. Sprinkle chopped roasted peanuts on top while the caramel is still liquid, so the nuts adhere and stay crunchy.
Transfer the completed mini cheesecakes to a wire rack and let them set for at least 15 minutes before serving. This short chill helps the caramel set and the filling firm up just enough for a clean bite. Serve them warm or at room temperature, and watch your guests' eyes widen in anticipation.
That's it — you did it. But hold on, I've got a few more tricks that'll take this to another level…
Insider Tricks for Flawless Results
The Temperature Rule Nobody Follows
Never bake your mini cheesecakes straight from the fridge. Let the batter sit at room temperature for 10‑15 minutes before pouring it into the crust. This ensures even baking and prevents the edges from setting too quickly, which can cause cracks. I once tried skipping this step, and the result was a batch that looked like a collection of tiny, cracked volcanoes. Trust me, the slight warmth makes all the difference.
Why Your Nose Knows Best
When the caramel reaches that perfect golden amber, your kitchen will fill with a buttery, caramelized scent that’s unmistakable. If you’re unsure, trust your nose—once you smell that sweet, toasted aroma, the sauce is ready. Over‑cooking will turn it bitter, so the sensory cue is a reliable guide.
The 5‑Minute Rest That Changes Everything
After drizzling caramel, let the mini cheesecakes rest for exactly five minutes before serving. This short pause allows the caramel to set just enough to coat the tops without running off, while the filling continues to firm up. Skipping this rest will give you a runny mess that slides off the plate—nothing ruins a dessert faster than a caramel spill.
Preventing Crust Crumbling
If you find the crust crumbling when you lift the mini out of the liner, press the crust a little firmer next time, or add an extra half tablespoon of melted butter to the crumb mixture. The extra fat acts like glue, holding the crumbs together. A friend once told me his crust fell apart; I laughed and gave him this tip, and he’s been a fan ever since.
Freezing for Future Cravings
These mini cheesecakes freeze beautifully. Wrap each in plastic wrap, then place them in a zip‑top bag. When you’re ready to indulge, let them thaw in the fridge for a few hours, then give them a quick microwave zap (10‑15 seconds) and a fresh drizzle of caramel. The texture remains creamy, and the caramel regains its glossy shine.
Creative Twists and Variations
This recipe is a playground. Here are some of my favorite ways to switch things up:
Chocolate‑Swirl Delight
Replace half of the creamy peanut butter with a smooth chocolate hazelnut spread. The result is a mocha‑kissed mini cheesecake that’s perfect for chocolate lovers. Top with shaved dark chocolate instead of peanuts for an elegant finish.
Salted Caramel Pretzel Crunch
Swap the roasted peanuts for crushed pretzel pieces. The salty pretzel adds a contrasting crunch that amplifies the caramel’s salted notes. This variation is a hit at game‑day gatherings.
Berry‑Infused Bliss
Stir in a tablespoon of raspberry jam into the filling before baking. The subtle tartness cuts through the richness, creating a balanced flavor profile. Garnish with fresh raspberries for a pop of color.
Spiced Autumn Version
Add a pinch of cinnamon and nutmeg to the crust mixture, and drizzle a thin layer of pumpkin caramel (pumpkin puree + brown sugar + butter) over the finished minis. This cozy twist is perfect for fall evenings.
Vegan Adaptation
Use a plant‑based cream cheese, almond butter instead of peanut butter, and replace the egg with a flax‑egg. The caramel can be made with coconut cream for a dairy‑free alternative. The texture stays luscious, and the flavor remains indulgent.
Storing and Bringing It Back to Life
Fridge Storage
Place the cooled mini cheesecakes in an airtight container, layering parchment paper between them to prevent sticking. They’ll stay fresh for up to 4 days. Before serving, let them sit at room temperature for 10 minutes to regain their silky texture.
Freezer Friendly
Wrap each mini individually in plastic wrap, then store them in a freezer‑safe zip‑top bag. They’ll keep for up to 2 months. When you’re ready to enjoy, thaw overnight in the fridge, then add a quick splash of water to the caramel before reheating to restore its glossy sheen.
Best Reheating Method
Microwave the mini for 10‑15 seconds on medium power, or warm the caramel in a saucepan over low heat, adding a teaspoon of water if it looks too thick. This gentle re‑heat revives the creamy interior without over‑cooking the crust.