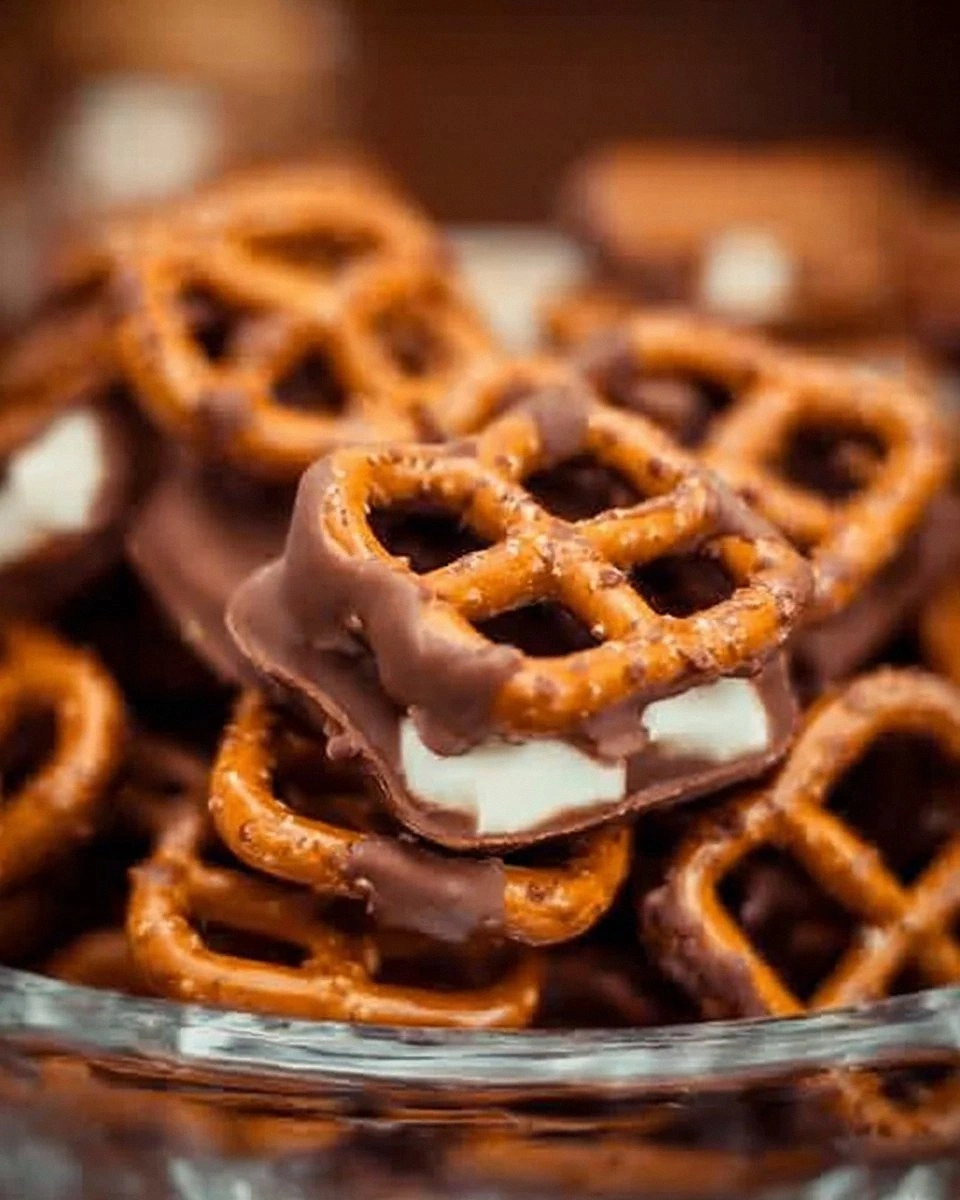
I was halfway through a marathon Netflix binge when my roommate dared me to create the ultimate snack that could survive a movie‑marathon, a road‑trip, and a midnight craving all at once. I stared at a half‑empty bag of pretzel rods, a lonely jar of peanut butter, and a stash of chocolate chips that had been waiting for a purpose. The kitchen was humming with the low‑frequency whirr of the fridge, the occasional clink of a spoon against a glass, and the faint scent of stale popcorn lingering in the air. I imagined the perfect bite: salty pretzel crunch, creamy peanut butter silk, and chocolate that melted like a warm sunrise over a mountain of peanuts. That moment sparked a culinary fire that led me to the recipe you’re about to read, and trust me, it’s the kind of discovery that makes you want to hug the oven mitts.
Picture this: the first time you pull a batch out of the oven, the whole kitchen smells like a carnival of caramel and toasted peanuts, and the pretzel rods are glistening with a glossy chocolate coat that catches the light like tiny mirrors. The first bite delivers a thunderous crunch that instantly gives way to a buttery, nutty center that coats your tongue in a velvety embrace. It’s a texture orchestra—crunch, melt, chew—each note playing in perfect harmony. I dare you to taste this and not go back for seconds; the combination is so addictive that even the most disciplined snack‑eaters end up sneaking a few extra pieces behind the pantry door.
Most recipes for chocolate‑covered pretzels either drown the pretzel in a sugary swamp or forget the magic of peanuts entirely. I’ve tried those, and they left me feeling like I’d eaten a candy bar that had lost its soul. This version stands out because it respects each component: the pretzel stays crisp, the peanut butter is never overheated, and the chocolate is tempered just enough to give a satisfying snap without turning brittle. I’ll be honest — I ate half the batch before anyone else got to try it, and the rest of the day felt like a celebration of flavor in my mouth.
Okay, ready for the game‑changer? The secret isn’t a hidden ingredient; it’s a technique that involves a quick “peanut butter glaze” that locks in moisture and prevents the chocolate from sliding off. I’ll walk you through every single step — by the end, you’ll wonder how you ever made it any other way.
What Makes This Version Stand Out
- Flavor Harmony: The sweet‑salty balance hits every taste bud, thanks to the perfect ratio of peanut butter to chocolate.
- Texture Layers: You get a triple‑textured experience—crunchy pretzel, creamy peanut butter, and smooth chocolate.
- Simplicity: Only six ingredients, all pantry‑friendly, and no fancy equipment required.
- Unique Peanut Butter Glaze: A thin, glossy coating that keeps the pretzel from getting soggy while adding a buttery richness.
- Crowd Reaction: Guests often ask for the recipe before they finish their first handful, and they’ll keep coming back for more.
- Ingredient Quality: Using creamy peanut butter and real chocolate chips elevates the snack from “just okay” to “legendary.”
- One‑Pan Method: All steps happen on the same baking sheet, which means less cleanup and more time enjoying the snack.
- Make‑Ahead Potential: These pretzels keep for weeks if stored properly, making them perfect for gift‑giving or stocking the office pantry.
Inside the Ingredient List
The Flavor Base
The star of this recipe is the creamy peanut butter, which brings a nutty depth that plain chocolate could never achieve on its own. Using a smooth, fully emulsified peanut butter ensures that the glaze spreads evenly without clumping. If you opt for a natural peanut butter with oil separation, give it a quick stir before measuring; otherwise you’ll end up with pockets of oil that ruin the texture. For a twist, try almond butter for a slightly sweeter, less earthy profile, but remember that the flavor balance will shift, so you may want to reduce the confectioners’ sugar by a tablespoon.
The Sweetening Agent
Confectioners’ sugar is the silent hero that sweetens the peanut butter without adding grit. It dissolves completely when mixed with the butter, creating a silky coating that adheres to the pretzel rods like a second skin. Skipping it or substituting with granulated sugar will leave a grainy texture that feels like sandpaper on your tongue. If you’re looking for a lower‑calorie option, you can use a sugar substitute that measures cup‑for‑cup, but be aware that some alternatives may affect the glossy finish.
The Texture Crew
Pretzel rods provide the structural backbone—sturdy enough to hold the glaze but porous enough to let the flavors seep in. Choose thick‑cut pretzels; they’ll stay crunchy even after the chocolate sets. If you only have pretzel twists, break them into bite‑size pieces, but expect a slightly softer bite. The chopped peanuts add a surprise crunch that contrasts beautifully with the smooth chocolate, and they also lend a buttery aroma that intensifies as the pretzels cool.
The Unexpected Star
Chocolate chips are the finishing touch, delivering that melt‑in‑your‑mouth snap that makes the whole snack feel indulgent. Use high‑quality semi‑sweet or milk chocolate chips; the cocoa butter content ensures a glossy sheen after tempering. If you’re feeling adventurous, swap half of the chips for dark chocolate chunks for a bittersweet edge. A pinch of salt at the end amplifies the sweet‑salty dance and prevents the flavors from becoming flat.
Everything's prepped? Good. Let's get into the real action…
The Method — Step by Step
Preheat your oven to 350°F (175°C) and line a large baking sheet with parchment paper. The heat will gently toast the pretzel rods, giving them a subtle caramelized aroma that foreshadows the final flavor. As the oven warms, you’ll hear the faint hum of the fan, a comforting reminder that you’re about to create something special. Let the sheet sit while you prepare the glaze; a warm surface helps the chocolate set evenly later.
In a medium saucepan over low heat, combine the creamy peanut butter and confectioners’ sugar. Stir constantly with a silicone spatula until the mixture becomes a smooth, glossy paste that looks like liquid gold. This is the moment of truth: if you see any lumps, keep stirring—those are sugar crystals that haven’t dissolved yet. Once the glaze is uniform, remove from heat and set aside to cool just enough that it won’t melt the chocolate later.
Kitchen Hack: Transfer the peanut butter glaze to a heat‑proof bowl and place it over a pot of simmering water (double boiler) for a quick temperature boost if it starts to thicken too much.While the glaze rests, arrange the pretzel rods on the prepared baking sheet, leaving about an inch between each piece. This spacing ensures even heat distribution and prevents the pretzels from steaming each other, which would make them soggy. Lightly brush each rod with a thin layer of the peanut butter glaze using a pastry brush; you want just enough to coat the surface without drowning the pretzel.
Place the glazed pretzels in the oven for 8‑10 minutes. You’ll notice a faint toasty scent filling the kitchen, and the pretzels will start to puff slightly as the glaze sets. Keep a close eye; you want a golden‑brown edge, not a burnt one. When the timer dings, pull the sheet out and let the pretzels cool for two minutes before moving to the next step.
Meanwhile, melt the chocolate chips in a microwave‑safe bowl in 30‑second bursts, stirring between each burst. The chocolate should become a silky river, smooth enough to coat the pretzels with a thin, even layer. If you prefer a stovetop method, use a double boiler and keep the temperature below 115°F (46°C) to avoid scorching. Once melted, stir in the pinch of salt; this tiny addition amplifies the overall flavor profile.
Watch Out: Overheating chocolate can cause it to seize, turning it grainy and unworkable. If that happens, add a teaspoon of neutral oil and stir vigorously to rescue the batch.Now the fun part: using a fork or a small offset spatula, dip each pretzel rod into the melted chocolate, letting excess drip back into the bowl. You’ll hear a gentle “plink” as the chocolate coats the pretzel, and the surface will instantly become glossy. Place the chocolate‑drenched pretzels back onto the parchment, still spaced apart. Sprinkle the chopped peanuts over the still‑wet chocolate; they’ll adhere instantly, creating a crunchy crown.
Allow the pretzels to set at room temperature for about 15 minutes, or speed up the process by placing the sheet in the refrigerator for 5‑7 minutes. The chocolate will harden, creating a snap that you can hear when you gently bend a pretzel—like a tiny glass rod breaking. Once fully set, give each pretzel a final dusting of a pinch of salt for that extra flavor pop.
Transfer the finished pretzels to an airtight container, arranging them in a single layer to preserve crunch. Store them in a cool, dark place and they’ll stay fresh for up to two weeks. If you notice any loss of crunch, pop the container in the oven for a quick 2‑minute revival at 300°F (150°C). That’s it — you did it. But hold on, I’ve got a few more tricks that’ll take this to another level…
Insider Tricks for Flawless Results
The Temperature Rule Nobody Follows
Never let your chocolate exceed 115°F (46°C) when melting; staying below this threshold keeps the cocoa butter in a fluid state that yields a glossy finish. I once tried to speed things up by cranking the heat, and the chocolate turned matte and crumbly—a disaster that could have been avoided with a simple thermometer. Keep a candy thermometer handy, and if you don’t have one, pause the microwave every 20 seconds and test the temperature with the back of your hand. The chocolate should feel warm, not hot.
Why Your Nose Knows Best
Your sense of smell is the most reliable indicator of doneness for the pretzel glaze. When the peanut butter glaze starts to emit a faint roasted aroma, you know it’s ready to coat the pretzels without becoming gummy. I’ve watched friends rely on timers alone and end up with a sticky mess; trust the nose, and you’ll achieve that perfect, slightly caramelized edge every time.
The 5‑Minute Rest That Changes Everything
After the pretzels come out of the oven, let them rest on the sheet for exactly five minutes before dipping them in chocolate. This short pause allows the peanut butter glaze to set just enough to act as a barrier, preventing the chocolate from sliding off. Skipping this step results in a sloppy coating that drips all over the pan, and you’ll waste precious chocolate. Set a timer, sip a coffee, and enjoy the anticipation.
The Peanut‑Oil Miracle
If you’re using natural peanut butter that separates, whisk in a teaspoon of neutral oil (like grapeseed) before mixing with the sugar. This creates a stable emulsion that spreads evenly and doesn’t separate during baking. A friend tried to skip this and ended up with a greasy pool on the baking sheet, turning the pretzels into soggy sticks. The oil trick keeps the glaze thin, glossy, and perfectly adherent.
The Cool‑Down Flip
After the chocolate sets, give the pretzels a quick flip with a spatula before storing. This exposes any lingering moisture on the bottom, allowing it to evaporate and preserving the crunch. I once stored them without flipping and found the undersides turned soft after a day. A brief flip is a tiny effort for a lasting texture boost.
Creative Twists and Variations
This recipe is a playground. Here are some of my favorite ways to switch things up:
Caramel Crunch
Swap the chocolate chips for caramel bits and drizzle a thin layer of sea‑salt caramel sauce after the pretzels have set. The result is a buttery, sweet‑salty explosion that feels like a candy store in your mouth.
Spicy Kick
Add a pinch of cayenne pepper to the melted chocolate for a subtle heat that balances the sweetness. This variation is perfect for those who love a little thrill in their snack.
Nut‑Free Delight
Replace the peanuts with toasted sunflower seeds and use a soy‑based “peanut‑free” butter. The texture stays crunchy, and the flavor remains rich without any tree‑nut allergens.
White Chocolate Bliss
Swap the semi‑sweet chocolate chips for white chocolate chips and sprinkle a few pink Himalayan salt crystals on top. The contrast of sweet creaminess and mineral crunch creates an elegant bite.
Coffee Infused
Stir a teaspoon of instant espresso powder into the peanut butter glaze before coating the pretzels. The coffee note deepens the chocolate flavor and adds a sophisticated bitterness.
Storing and Bringing It Back to Life
Fridge Storage
Place the pretzels in an airtight container and store them in the refrigerator for up to two weeks. The cool environment keeps the chocolate firm and prevents the peanuts from going rancid. Before serving, let them sit at room temperature for 10 minutes to regain full flavor.
Freezer Friendly
If you want to keep them for a month or longer, arrange the pretzels on a parchment‑lined tray and freeze them individually. Once solid, transfer them to a zip‑top freezer bag. To thaw, move them to the fridge overnight, then bring to room temperature before enjoying.
Best Reheating Method
When the pretzels lose a bit of their snap, place them on a baking sheet and warm them in a 300°F (150°C) oven for 3‑5 minutes. Add a tiny splash of water (about a teaspoon) to the bottom of the oven tray; the steam revives the chocolate’s sheen and the pretzel’s crunch without making them soggy.