I still remember the first time I tried to make baklava cheesecake — it was a disaster of epic proportions. The phyllo turned into a soggy mess, the cheesecake cracked like the Sahara desert, and my kitchen looked like a powdered sugar bomb had exploded. But here's the thing: that failure haunted me for months. Every time I walked past a bakery and caught a whiff of honey and nuts, I'd get this twitch in my eye. I became obsessed, like a culinary detective hunting for the perfect combination of crispy, creamy, nutty, and sweet. After what felt like a hundred attempts (and probably a thousand calories), I finally cracked the code. The result? A dessert so ridiculously good that my neighbor literally cried when she took her first bite — actual tears of joy running down her face while she muttered "this is illegal" through a mouthful of cheesecake.
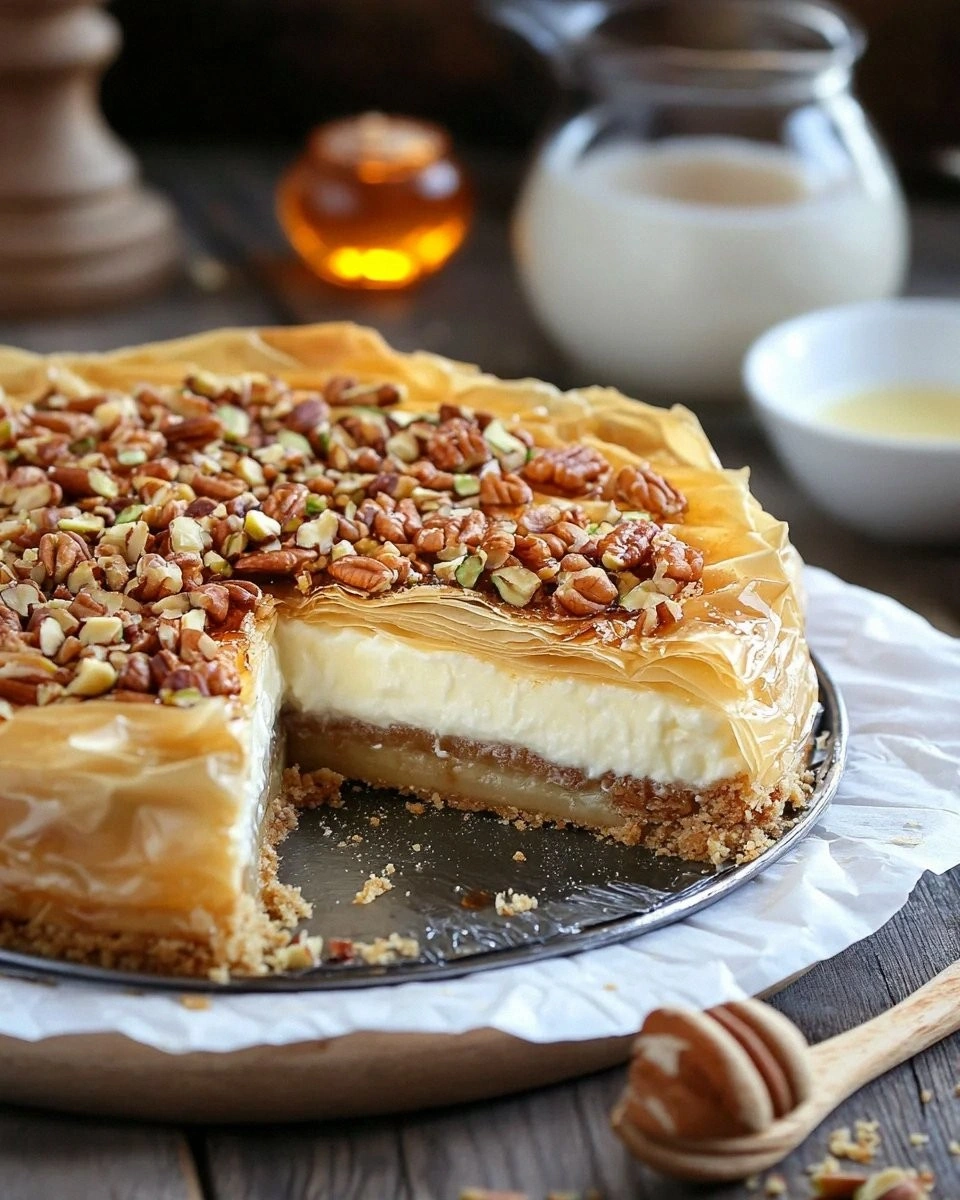
Picture this: golden sheets of phyllo pastry that shatter like autumn leaves under your fork, giving way to a cloud-soft cheesecake filling that's scented with vanilla and kissed with lemon brightness. Then comes the grand finale — a glossy honey-nut syrup that seeps into every crevice, creating these incredible pockets of sticky sweetness that will make your eyes roll back in your head. It's like someone took the best parts of a Greek bakery and a New York cheesecake shop, threw them in a blender, and created pure magic. The contrast is what gets you every time — that first bite where your teeth break through crispy layers before sinking into creamy richness, followed by the warm embrace of cinnamon-laced nuts. It's the kind of dessert that makes people stop mid-conversation, fork frozen halfway to their mouth, as they process what just happened to their taste buds.
But here's my favorite part about this recipe — it looks and tastes like you spent all day slaving away, but it's actually pretty forgiving once you know the tricks. I'm talking about techniques like using room temperature ingredients (game changer), the water bath method that prevents cracks, and my secret weapon: brushing the phyllo with clarified butter instead of regular melted butter for extra crispiness. Trust me, once you nail this technique, you'll be the legend of every potluck, dinner party, and holiday gathering. People will whisper your name in reverent tones: "You know who made this? The person who brings the baklava cheesecake." And now, that person can be you.
Let me walk you through every single step — by the end, you'll wonder how you ever made it any other way.
What Makes This Version Stand Out
Crack-Proof Technique: Most cheesecake recipes leave you crossing your fingers and praying to the dessert gods that your cake doesn't crack. Not this one. With my water bath method and temperature tricks, you'll get a surface as smooth as silk every single time. I learned this the hard way after watching my third cheesecake emerge from the oven looking like a topographical map.
Phyllo Perfection: Here's where most recipes fail — they treat phyllo like pie crust. Wrong! We're going to layer it properly, brush it strategically, and bake it until it achieves that perfect shatter. The secret? Working quickly and keeping it covered with a damp towel while you assemble. I dare you to taste this and not go back for seconds.
Nut Balance Magic: Most baklava recipes go heavy on one type of nut. I've cracked the code with a specific ratio of walnuts to almonds that creates the perfect texture — not too oily, not too dry, with just enough crunch to contrast the creamy filling. It's like a symphony where every instrument plays in perfect harmony.
Make-Ahead Champion: This is hands down the best version you'll ever make at home, and it actually gets better after a day in the fridge. The flavors meld and intensify, making it the perfect dessert for entertaining. I'll be honest — I ate half the batch before anyone else got to try it, but the remaining half was even more incredible the next day.
Impressive Factor: When you bring this to a gathering, people will think you're some kind of pastry wizard. The combination looks bakery-perfect and tastes like something you'd pay fifteen dollars a slice for in a fancy restaurant. Most recipes get this completely wrong by making it too complicated. Here's what actually works.
Texture Paradise: This next part? Pure magic. We're creating multiple textures in every bite — shattering phyllo, creamy cheesecake, sticky honey syrup, and crunchy nuts. It's like a party in your mouth where everyone's invited and they all get along perfectly.
Alright, let's break down exactly what goes into this masterpiece...
Inside the Ingredient List
The Foundation Builders
Let's talk about the cream cheese situation, because this is where most people mess up. You absolutely need it at room temperature — cold cream cheese will give you lumpy filling no matter how long you beat it. I usually pull mine out the night before and let it sit on the counter. If you're in a rush (and we've all been there), cut it into chunks and microwave it on 30% power for 30-second bursts, checking between each burst. You want it soft enough to bend easily but not melted into a puddle. The quality matters here too — skip the generic brand and go for the good stuff. Your taste buds will notice the difference, trust me.
The phyllo pastry is another ingredient where quality makes or breaks your final result. Look for paper-thin sheets that are almost translucent — if they're thick and doughy, keep looking. Always buy an extra package because these sheets love to tear, and you'll need ten perfect ones for this recipe. Thaw them completely in the fridge overnight, then let them come to room temperature for 30 minutes before you start working. Keep them covered with plastic wrap and a barely damp towel while you work. Picture yourself pulling this out of the oven, the whole kitchen smelling incredible, and knowing you nailed the technique.
The Flavor Enhancers
The nuts are where things get exciting — and yes, you absolutely must toast them first. Raw nuts in baklava are like serving champagne at room temperature — technically possible but completely missing the point. I spread mine on a baking sheet and toast at 350°F for about 8-10 minutes, shaking the pan halfway through. You want them fragrant and just starting to darken, but watch them like a hawk because they go from perfect to burnt faster than you can say "where did I put that oven mitt." Once they're cool, pulse them in a food processor until they're the size of small peas — not dust, not chunks, but that perfect in-between that gives you texture without breaking your teeth.
The honey syrup is what separates good baklava cheesecake from legendary status. Use a mild honey — something like clover or wildflower — not the strong stuff that'll punch your other flavors in the face. Add a cinnamon stick and a strip of lemon peel to the syrup while it simmers, then fish them out before you pour it over the cake. The lemon zest in the cheesecake batter is another sneaky flavor booster — it brightens everything up and makes the honey taste more honey-like, the nuts taste nuttier, and the cream cheese taste creamier. It's like a flavor amplifier that makes everything more itself.
The Texture Magicians
Cornstarch is your insurance policy against a watery cheesecake filling. Just one tablespoon helps stabilize the proteins in the cream cheese, giving you that perfect sliceable texture that doesn't collapse into a puddle when you cut it. The Greek yogurt (or sour cream if that's what you have) adds tang and richness while lightening the filling slightly. Don't skip this — it balances the sweetness and adds a subtle complexity that'll have people asking for your secret ingredient. The eggs need to be room temperature too, for the same reason as the cream cheese. Cold eggs can cause your filling to seize up and create a lumpy texture that no amount of mixing will fix.
The Final Touch Masters
The butter situation deserves its own paragraph because it's crucial. Use unsalted butter — always — because you want to control the salt level yourself. Melt it completely and let the foam settle, then use the clear yellow liquid on top. The milk solids at the bottom can make your phyllo soggy, so leave them behind. When brushing the phyllo, use a light hand — think of it as applying perfume, not painting a fence. Too much butter and your layers won't crisp properly; too little and they'll be dry and brittle.
Everything's prepped? Good. Let's get into the real action...
The Method — Step by Step
- Start with your springform pan — wrap the bottom and sides with three layers of heavy-duty aluminum foil. This is your insurance against water leaking into your cheesecake. Set up your water bath next: place a large roasting pan on your oven rack, then place a kettle of water on to boil. We're going to add hot water to create a humid environment that prevents cracks. Trust me on this one — I've tried skipping the water bath, and the result looked like the surface of the moon. Picture yourself pulling this out of the oven, the whole kitchen smelling incredible, and knowing you nailed the technique.
- Now for the phyllo base: brush your springform pan with melted butter, then lay down your first sheet of phyllo. Let it overhang the edges — we're going to fold these over the top later to create a beautiful sealed package. Brush the sheet lightly with butter, then add the next sheet at a slight angle. Keep going until you've used all ten sheets, brushing each one. Work quickly but carefully — if the phyllo tears, just patch it with another piece. Nobody will know once it's baked. The key is getting butter between every layer without drowning them.
- Time for the nut mixture: combine your toasted walnuts and almonds in a food processor with the cinnamon and salt. Pulse until you have a mix of fine and chunky pieces — think of coarse breadcrumbs. Sprinkle about a third of this mixture over your phyllo base and press down gently. This creates a barrier that prevents the filling from making the base soggy. Keep the rest for the topping — we're going to add it halfway through baking so it doesn't burn. That sizzle when it hits the pan? Absolute perfection.
- The cheesecake filling is where things get serious. Beat your room-temperature cream cheese until it's completely smooth and fluffy — about 3-4 minutes on medium speed. Add the sugar gradually, beating well after each addition. You're looking for a texture like thick whipped cream. Scrape down the bowl obsessively — any lumps now will be lumps in your final cheesecake. Add the vanilla, lemon zest, and lemon juice, then beat until combined. The mixture should smell like cheesecake heaven and be completely smooth.
- Beat in the cornstarch, then add the eggs one at a time, mixing just until each is incorporated. Over-mixing here incorporates too much air, which can cause your cheesecake to puff up and then collapse, creating cracks. Finally, fold in the Greek yogurt gently. The batter should be thick and luscious, like a cheesecake milkshake. Pour this over your nut-covered phyllo base and smooth the top with an offset spatula. If you've ever struggled with this, you're not alone — and I've got the fix.
- Fold the overhanging phyllo over the top of the filling, creating a sealed package. Brush the top with more butter — this will become beautifully golden and crispy. Place the springform pan in your roasting pan, then carefully pour the hot water from your kettle into the roasting pan until it comes halfway up the sides of the springform pan. Slide everything into your preheated 325°F oven and bake for about 45 minutes.
- After 45 minutes, sprinkle the remaining nut mixture over the top and continue baking for another 15-20 minutes. The cheesecake is done when the edges are set but the center still has a slight wobble when you gently shake the pan. It should jiggle like gelatin, not ripple like a wave. If the nuts are browning too quickly, tent the top with foil. This is the moment of truth — get it right and you'll have a cheesecake that slices like a dream.
- Turn off the oven, crack the door open, and let the cheesecake cool inside for an hour. This gradual cooling prevents the dreaded crack. Then remove it from the water bath and let it cool completely on a rack. Once it's cool, refrigerate it for at least 4 hours or overnight. This sets the filling and makes it slice cleanly. Okay, ready for the game-changer?
- While the cheesecake chills, make the honey syrup. Combine honey, water, sugar, and lemon juice in a small saucepan. Add a cinnamon stick and bring to a simmer over medium heat. Let it bubble away for about 10 minutes until it thickens slightly. You're looking for a consistency that coats the back of a spoon. Remove from heat and stir in a splash of orange blossom water if you have it — this adds an authentic Middle Eastern touch that'll make people ask for your grandmother's recipe.
- To serve, remove the cheesecake from the springform pan and place it on a serving plate. Warm the honey syrup slightly so it pours easily, then drizzle it over the top, letting it cascade down the sides. The syrup should seep into the phyllo and nuts, creating those incredible sticky pockets. Slice with a hot, wet knife for clean cuts — the contrast between the crispy top and creamy filling is pure magic. Garnish with a few extra chopped nuts if you're feeling fancy.
That's it — you did it. But hold on, I've got a few more tricks that'll take this to another level...
Insider Tricks for Flawless Results
The Temperature Rule Nobody Follows
Here's where most home bakers go wrong: they don't respect the temperature requirements. Every single ingredient needs to be at the temperature specified in the recipe. Cold cream cheese creates lumps, cold eggs can cause the filling to seize, and cold phyllo becomes brittle and impossible to work with. I set everything out on the counter the night before I plan to bake. Yes, it's a pain, but it's the difference between a cheesecake that looks like it came from a bakery and one that looks like it came from a child's play kitchen. A friend tried skipping this step once — let's just say it didn't end well.
Why Your Nose Knows Best
Don't rely solely on timing — your nose is your best kitchen timer. When the cheesecake is nearly done, your kitchen will start to smell like the most incredible vanilla-cinnamon cloud. It's subtle but unmistakable. The nuts should smell toasty, not burnt. If you smell something sharp or acrid, your nuts are overcooking and you need to pull it out immediately. This is worth it — that perfect nutty aroma means your baklava topping is at peak deliciousness.
The 5-Minute Rest That Changes Everything
After you turn off the oven, resist the urge to immediately remove your cheesecake. That 5-minute rest with the door cracked open allows the temperature to drop gradually, preventing the sudden temperature change that causes cracks. Think of it as a dessert spa treatment — a gentle cool-down that leaves your cheesecake relaxed and beautiful instead of stressed and broken. This next part? Pure magic.
The Phyllo Protection Method
Working with phyllo is like handling tissue paper made of dreams — beautiful but fragile. Keep a barely damp towel over your stack while you work. Not wet, barely damp. Too wet and your phyllo becomes gluey; too dry and it becomes brittle and cracks. I wring out a kitchen towel until it's just barely moist, then drape it over the stack. Work with one sheet at a time, keeping the rest covered. It's like a little phyllo spa day.
The Slice Test
Here's how to tell if your cheesecake is perfectly done: gently shake the pan. The edges should be set, but the center should jiggle like a firm gelatin dessert. It should move as one unit, not ripple like a wave. If it looks liquid in the center, give it another 5 minutes. If it's completely firm, you've overbaked it and it'll be dry. This is the sweet spot that gives you that perfect creamy texture that melts on your tongue.
Creative Twists and Variations
This recipe is a playground. Here are some of my favorite ways to switch things up:
The Pistachio Rose Dream
Swap half the walnuts for pistachios and add a teaspoon of rose water to the honey syrup. It's like eating a Middle Eastern garden — floral, nutty, and completely addictive. The rose water is subtle, not like eating perfume, and it pairs beautifully with the honey. Garnish with crushed pistachios and a few dried rose petals if you want to look extra fancy. This version disappears faster than free samples at Costco.
The Chocolate Hazelnut Indulgence
Add two tablespoons of cocoa powder to the nut mixture and swap the almonds for hazelnuts. The chocolate adds depth without overwhelming the other flavors, and hazelnuts have this incredible buttery richness that plays beautifully with the cream cheese. Drizzle the finished cheesecake with a little Nutella thinned with cream for the ultimate indulgence. If you've ever struggled with chocolate desserts, you're not alone — and I've got the fix.
The Citrus Sunshine Version
Add the zest of an orange and a lime to the cheesecake filling, and swap the lemon juice for a combination of all three citrus juices. The triple-citrus combo creates this incredible brightness that makes the honey taste more honey-like and the nuts taste nuttier. It's like sunshine in dessert form — perfect for summer gatherings or when you need to remind yourself that winter won't last forever.
The Salted Caramel Twist
Replace the honey syrup with homemade salted caramel sauce. The salty-sweet combination is absolutely killer, especially against the tangy cheesecake. Add a teaspoon of flaky sea salt to the nut mixture too. The salt enhances all the other flavors and keeps the sweetness from becoming cloying. This is the version that makes people close their eyes and sigh when they taste it.
The Spiced Winter Warmer
Add a teaspoon of cardamom and half a teaspoon of cloves to the nut mixture, and swap the cinnamon for a cinnamon-ginger blend. The warm spices make this perfect for holiday gatherings, and the cardamom adds this incredible aromatic quality that makes your whole house smell like a spice market. Serve this with strong coffee and prepare for people to ask you to cater their holiday parties.
The Tropical Escape
Add half a cup of finely shredded coconut to the nut mixture and swap the lemon juice for lime juice. The coconut adds texture and a subtle tropical note that transports you straight to a beach somewhere. Use coconut sugar instead of regular sugar in the syrup for a deeper, more complex sweetness. It's like a vacation in dessert form — no passport required.
Storing and Bringing It Back to Life
Fridge Storage
Here's the beautiful thing about this cheesecake — it actually gets better after a day in the fridge. The flavors meld and intensify, creating this incredible depth that you don't get from a freshly baked cake. Wrap it tightly in plastic wrap (once it's completely cool) and it'll keep for up to 5 days in the refrigerator. The phyllo will soften slightly from the syrup, but in a good way — it becomes almost candy-like. If you want to keep the top crispy, store the cheesecake un-syruped and add the honey syrup just before serving. This is make-ahead magic at its finest.
Freezer Friendly
This cheesecake freezes beautifully, which is dangerous because it means you can have baklava cheesecake on demand. Wrap individual slices in plastic wrap, then in foil, and freeze for up to 2 months. Thaw overnight in the refrigerator and bring to room temperature before serving. The texture changes slightly — the phyllo becomes more candy-like — but it's still incredible. Pro tip: freeze slices before adding the syrup, then add fresh syrup after thawing for the best texture.
Best Reheating Method
If you want to serve it warm (and you should try it at least once), let a slice come to room temperature, then warm it in a 300°F oven for about 5 minutes. Add a fresh drizzle of warm honey syrup right before serving. The contrast between the warm, crispy top and the cool, creamy center is absolutely incredible. Add a tiny splash of water to the syrup before warming it — it steams back to perfection and prevents it from crystallizing.