I was in the middle of a chaotic holiday party when my friend dared me to create a dessert that could survive a room full of sugar‑craving adults, a mischievous dog, and the inevitable “I’m still hungry” chorus. I stared at the pantry, grabbed a bag of graham crackers, and whispered, “Let’s see what magic we can conjure from the leftovers.” The kitchen filled with the sound of a butter‑soft sigh as the melted butter hit the crumbs, and the air turned sweet, buttery, and unmistakably festive. That moment sparked the birth of what I now swear is the ultimate holiday bar, a treat that makes even the Grinch grin.
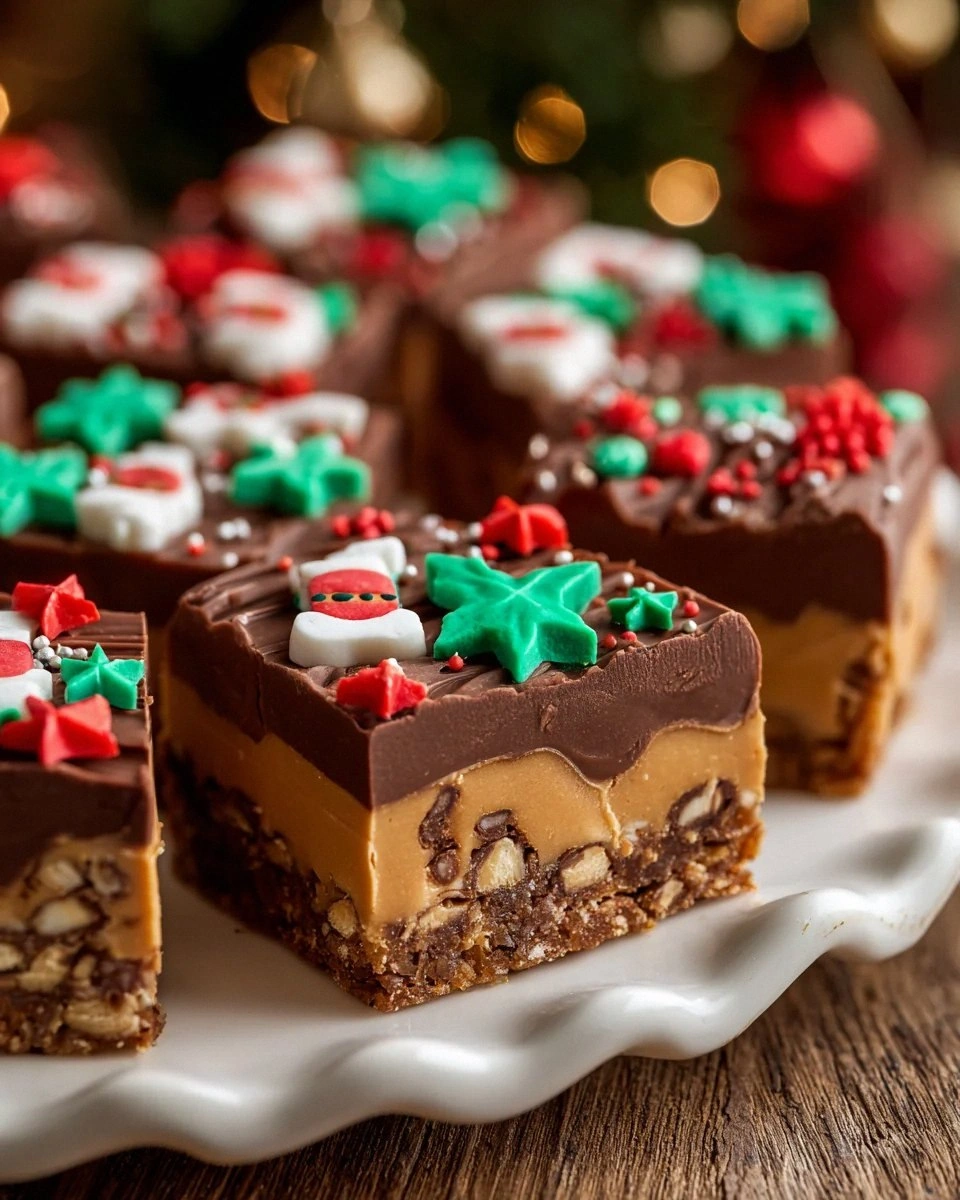
Picture this: a golden‑brown crust that crunches like fresh snow underfoot, a glossy, caramel‑rich middle that oozes chocolate and butterscotch, and a top layer glittering with red and green M&Ms like tiny ornaments. When you bite, the first thing you notice is the buttery snap, followed by a melt‑in‑your‑mouth wave of sweet condensed milk that hugs the chocolate chips like a cozy blanket. The toasted pecans add a surprise crunch, while the shredded coconut whispers of tropical breezes in the middle of December. It’s a symphony of textures that sings “Christmas” louder than any carol.
Most cookie bar recipes either over‑sweeten or fall flat with a soggy base, and I’ve tried them all. Most get the ratio of butter to crumbs wrong, resulting in a soggy mess that slides off the plate. Here’s what actually works: a precise 2‑to‑1 crumb‑to‑butter ratio, a full‑fat condensed milk that binds without turning gummy, and a layered approach that lets each flavor shine without competing. I’m going to be honest — I ate half the batch before anyone else got a chance, and that’s a confession I’m willing to make because the taste is that unforgettable.
Now, I’m about to walk you through every single step — by the end, you’ll wonder how you ever made any other version. I dare you to taste this and not go back for seconds. Okay, ready for the game‑changer? This next part? Pure magic. Stay with me here — this is worth it.
What Makes This Version Stand Out
- Flavor Explosion: The combination of sweetened condensed milk, chocolate, and butterscotch creates a rich, buttery caramel that tastes like a holiday dream in every bite.
- Texture Harmony: A crunchy graham crust, a chewy, gooey center, and a crisp nutty topping give you three distinct mouthfeels that keep you reaching for more.
- Simplicity: Only nine ingredients, all pantry‑friendly, and no fancy equipment—just a pan, a whisk, and a sprinkle of holiday spirit.
- Unique Visuals: The red‑and‑green M&Ms turn the top into a festive confetti that instantly says “Christmas” without a single sprig of pine.
- Crowd‑Pleaser: Even the pickiest eaters (yes, even the toddler who refuses anything green) can’t resist the sweet‑salty balance.
- Ingredient Quality: Using unsalted butter and premium condensed milk lets you control the salt level and ensures a silky texture.
- One‑Pan Wonder: No need for multiple baking dishes; everything bakes together, saving you time and dishes.
- Make‑Ahead Magic: These bars keep fresh for days, making them perfect for gift‑giving or a quick holiday snack.
Inside the Ingredient List
The Flavor Base
Sweetened condensed milk is the star that brings everything together. Its thick, caramel‑like syrup binds the chocolate and butterscotch while adding a luxurious sweetness. If you skip it, you’ll end up with a dry, crumbly bar that lacks that signature glossy finish. I recommend Eagle Brand for its consistency, but any good quality brand will work. A quick tip: give the can a gentle shake before opening to ensure the milk is evenly mixed.
Semi‑sweet chocolate chips provide that classic chocolate burst you expect from a holiday treat. They melt into a silky river that runs through the bar’s heart. Dark chocolate can be substituted for a deeper, slightly bitter contrast, but keep the sweetness balanced with the condensed milk.
Butterscotch chips add a caramel‑like depth that pairs beautifully with chocolate. If you can’t find them, white chocolate chips are a solid stand‑in, though the flavor will shift toward a sweeter profile.
The Texture Crew
Graham cracker crumbs form the perfect sweet, crunchy crust. You can buy them pre‑crushed or make your own by crushing whole crackers in a zip‑top bag with a rolling pin. The crumbs absorb the melted butter, creating a firm yet tender base that holds the bar together. Skipping this or using too coarse a crumb will result in a soggy bottom.
Unsalted butter melted butter coats the crumbs, adding rich flavor and aiding in binding. Using unsalted gives you control over the overall saltiness, which is crucial for letting the sweet flavors shine. If you only have salted butter, reduce the added fine salt accordingly.
Shredded coconut (optional) adds a tropical twist that surprisingly complements the holiday spices. Omit it if you’re not a fan, and the bars will still be spectacular, but the coconut adds an extra layer of chewiness and aroma.
Chopped pecans (toasted) bring a nutty crunch that cuts through the sweetness. If you prefer, walnuts or almonds work just as well, though each will impart a slightly different flavor note.
The Unexpected Star
M&Ms (red and green) are more than just a decorative topping. They add a pop of color and a subtle chocolate crunch that brightens each bite. Feel free to swap them for festive candy-coated chocolates or even dried cranberries for a tart contrast.
Fine salt is the secret whisper that elevates every sweet component. Just a pinch enhances the caramel notes and balances the overall flavor. Too much, and you’ll overwhelm the sweetness, so a pinch is all you need.
Everything's prepped? Good. Let's get into the real action...
The Method — Step by Step
Preheat your oven to 350°F (175°C). While the oven warms, line a 9x13-inch baking pan with parchment paper, letting the paper overhang the sides for easy removal later. This step ensures the bars don’t stick and makes for a clean presentation. I like to lightly butter the parchment for extra insurance.
Melt the unsalted butter in a saucepan over low heat, then remove from heat and stir in the graham cracker crumbs until the mixture resembles wet sand. Press this crumb mixture firmly into the bottom of the prepared pan, creating an even layer about ½ inch thick. The edges should start to turn a light golden hue as you press—this is your first flavor cue.
Kitchen Hack: Use the bottom of a flat measuring cup to press the crust evenly; it distributes pressure without crushing the crumbs.In a large mixing bowl, combine the sweetened condensed milk, semi‑sweet chocolate chips, and butterscotch chips. Stir gently with a silicone spatula until the chips are evenly coated and start to soften. The mixture should look glossy and slightly thick—this is the gooey heart of the bars.
Fold in the shredded coconut, chopped pecans, and the red‑and‑green M&Ms. Distribute the mix evenly so each bite gets a surprise of color and crunch. If you’re feeling adventurous, add a pinch of cinnamon or nutmeg for a warm holiday spice note.
Spread the chocolate‑butterscotch mixture over the crust, smoothing it with an offset spatula. The top should be level but not overly compacted; you want it to spread a little as it bakes. This is the moment of truth—watch the edges start to pull away from the pan, a sign that the bars are setting.
Watch Out: Do not over‑mix the chocolate mixture; excessive stirring can cause the chocolate to seize and become grainy.Place the pan in the preheated oven and bake for 25‑30 minutes. You’ll know it’s done when the top is set, the edges are slightly browned, and a gentle aroma of toasted nuts fills the kitchen. Resist the urge to open the oven door early; the heat loss can cause uneven baking.
Remove the pan and let the bars cool completely on a wire rack—at least an hour. This cooling period lets the layers firm up, making slicing clean and neat. If you’re impatient, you can chill the pan in the refrigerator for 20 minutes, but be careful not to let condensation make the crust soggy.
Once cooled, lift the parchment paper to release the slab, then slice into squares or rectangles using a sharp, warm knife. Wipe the knife between cuts for clean edges. Serve immediately or store in an airtight container. That first bite? Expect a crunch, a melt, and a burst of holiday joy.
Insider Tricks for Flawless Results
The Temperature Rule Nobody Follows
Never bake these bars at a temperature higher than 350°F. Higher heat can cause the chocolate to bloom, leaving a grayish surface and a grainy texture. Keep the oven calibrated; an inexpensive oven thermometer can save you from a batch of sad bars. I once cranked the oven to 400°F trying to speed things up—let’s just say the result was a burnt crust and a gummy center.
Why Your Nose Knows Best
Your sense of smell is the ultimate timer. When the buttery crust starts to emit a nutty, toasted aroma and the chocolate‑butterscotch layer releases a caramel scent, you’re within minutes of perfection. Trust those olfactory cues more than the clock; ovens vary, and your nose can catch subtle changes that a timer can’t.
The 5‑Minute Rest That Changes Everything
After removing the pan from the oven, let it sit untouched for exactly five minutes before moving it to the cooling rack. This brief rest allows the interior to set without cooling too quickly, preventing cracks in the top layer. Skipping this step can lead to a sloppy surface that crumbles when you slice.
Toast Those Pecans Like a Pro
Spread the chopped pecans on a dry skillet over medium heat for 3‑4 minutes, stirring constantly until they turn fragrant and lightly golden. Toasted nuts release oils that intensify their flavor, making the bars taste richer. If you use raw, un‑toasted nuts, the final product will feel flat and the nuts may stay soggy.
The Secret of the Perfect Crust
Add a pinch of fine salt to the butter‑crumb mixture before pressing it into the pan. This tiny addition amplifies the sweetness and prevents the crust from feeling one‑dimensional. It’s a subtle tweak that separates a good bar from a great one.
Creative Twists and Variations
This recipe is a playground. Here are some of my favorite ways to switch things up:
Peppermint Party
Swap half of the M&Ms for crushed peppermint candies and add a teaspoon of peppermint extract to the chocolate mixture. The result is a refreshing minty bite that still holds the original sweetness.
Nutty Delight
Replace pecans with toasted almond slivers and add a drizzle of honey over the top before baking. The honey caramelizes, giving a subtle floral note that pairs beautifully with the butterscotch.
White Chocolate Coconut Dream
Use white chocolate chips instead of semi‑sweet, and double the shredded coconut. This creates a creamy, tropical version that still feels festive thanks to the red‑and‑green M&Ms.
Spiced Autumn
Add a half‑teaspoon of pumpkin spice to the chocolate‑butterscotch mixture and swap the M&Ms for dried cranberries. It’s a nod to Thanksgiving that works just as well for Christmas.
Vegan Version
Replace the butter with coconut oil, use a plant‑based sweetened condensed milk (available in most health stores), and ensure the chocolate chips are dairy‑free. The texture stays indulgent, and the flavor remains on point.
Storing and Bringing It Back to Life
Fridge Storage
Place the bars in an airtight container and store them in the refrigerator for up to 5 days. The cool environment keeps the chocolate from melting and maintains the crispness of the crust. Before serving, let them sit at room temperature for 10‑15 minutes to soften slightly.
Freezer Friendly
Wrap the parchment‑lined slab tightly in plastic wrap, then place it in a freezer‑safe bag. They freeze beautifully for up to 2 months. To reheat, thaw in the fridge overnight, then warm in a 300°F oven for 5‑7 minutes; a tiny splash of water on the top before reheating will steam the surface back to glossy perfection.
Best Reheating Method
If you want that fresh‑out‑of‑the‑oven feel, preheat your oven to 300°F, place the bars on a baking sheet, and cover loosely with foil. Heat for 8‑10 minutes, then uncover for the last 2 minutes to let the top crisp up. The result is a bar that feels like it just left the oven, even if it was frozen the day before.