I was in the middle of a chaotic Friday night dinner prep when my phone buzzed with a frantic text from my best friend. “I’m craving something crunchy, but I need to keep it healthy. I’m running out of snack ideas.” The kitchen smelled of stale chips, and the pantry looked like a desert. I stared at the empty shelf, then remembered the can of chickpeas that had been sitting in the back of my fridge for weeks, gathering dust. That moment, the idea sparked like a lightning bolt: a quick, crispy, herb‑infused chickpea snack that would satisfy the craving and make my friend’s taste buds dance.
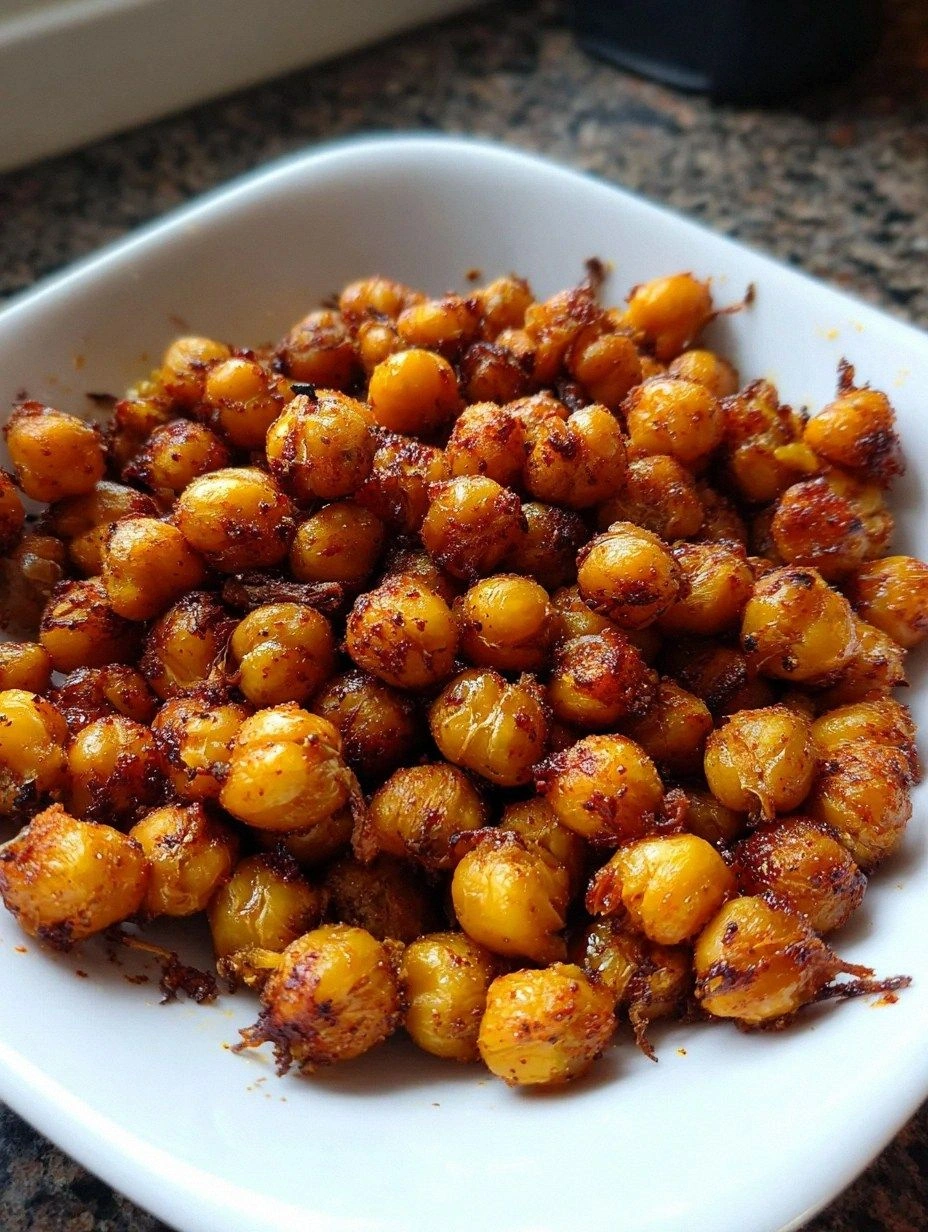
Picture this: a golden, puffy bite that crackles when you bite it, releasing a burst of smoky paprika and cumin, followed by a bright, citrusy zing from fresh lemon zest. The aroma that fills the kitchen is a warm, earthy scent mingled with bright herbs, like a garden after a summer rain. The texture is a satisfying crunch on the outside, with a slightly chewy interior that keeps you coming back for more. It’s that kind of snack that feels indulgent yet guilt‑free, a little celebration of simple ingredients doing their best work.
I’m telling you, this version is hands down the best you’ll ever make at home. Most recipes get this completely wrong, either leaving the chickpeas soggy or over‑seasoning them until they taste like a spice rack exploded. Here, the balance is precise: the olive oil coats each bean with a thin, even layer that crisps up beautifully, the cumin and smoked paprika create depth, and the fresh herbs add a burst of color and freshness that makes the whole dish feel alive. I dare you to taste this and not go back for seconds.
If you’ve ever struggled with making a snack that’s both quick and satisfying, you’re not alone. I’ve tried countless store‑bought options that left me feeling guilty, and I’ve experimented with homemade versions that fell flat. But this recipe is a game‑changer. By the end, you’ll wonder how you ever made it any other way, because the combination of crunch, flavor, and aroma will have you shouting, “I need more!”
What Makes This Version Stand Out
- Crunch: The baking process turns each chickpea into a crisp, airy bite that satisfies the craving for a crunchy snack without the oiliness of deep‑frying.
- Flavor Depth: Ground cumin and smoked paprika create a smoky, earthy base that pairs perfectly with fresh herbs and lemon zest.
- Freshness: Adding parsley, cilantro, and lemon zest at the finish gives a bright, herbaceous lift that keeps the dish from feeling flat.
- Simplicity: Only nine ingredients, all pantry staples, plus fresh herbs. No need for complicated sauces or multi‑step preparations.
- Make‑Ahead Friendly: The baked chickpeas keep crisp for up to five days in an airtight container, making them perfect for meal prep or a quick snack on the go.
- Low‑Calorie, High‑Protein: Chickpeas are a plant‑based protein source that keeps you full while delivering a satisfying crunch.
Alright, let’s break down exactly what goes into this masterpiece…
Inside the Ingredient List
The Flavor Base
Ground cumin and smoked paprika are the backbone of this snack, giving it a warm, earthy, and slightly smoky character. Cumin, with its nutty undertone, works in tandem with paprika’s sweet, peppery bite to create a flavor profile that’s both comforting and exciting. If you skip these spices, the chickpeas will taste flat and uninspired, turning a potentially stellar snack into a bland affair. For a subtle twist, try using ground coriander instead of cumin for a citrusy note, or add a pinch of cayenne for a spicy kick.
The Texture Crew
Olive oil is the unsung hero that ensures each chickpea gets a silky, even coating, which is essential for crispness. The oil also helps the spices adhere, creating a flavorful crust. If you prefer a lower‑fat version, a light spray of olive oil will still work, but the crunch may not be as pronounced. When in doubt, use a good quality extra‑virgin olive oil; its robust flavor adds an extra layer of depth to the final product.
The Unexpected Star
Fresh herbs—parsley and cilantro—bring a burst of color and a bright, green freshness that balances the smoky base. They also provide a subtle peppery note that elevates the snack from simple to sophisticated. If you’re not a fan of cilantro’s distinct flavor, replace it with basil or mint for a different aromatic experience. The key is to add the herbs after baking to preserve their delicate flavors.
The Final Flourish
Fresh lemon zest and a splash of lemon juice add a zesty brightness that cuts through the richness of the chickpeas. The zest’s essential oils provide a fragrant, citrusy aroma, while the juice adds a tangy finish that keeps the snack from feeling heavy. If you’re looking for a sweeter version, sprinkle a pinch of sugar or honey on the baked chickpeas before serving. The combination of herbs, spices, and citrus makes this snack a well‑balanced, flavorful treat.

The Method — Step by Step
- Preheat your oven to 400°F (200°C) and line a large baking sheet with parchment paper. The high heat is essential for achieving that coveted golden crunch. While the oven warms up, set a colander on the stove top and bring a pot of salted water to a gentle boil. This quick pre‑boil step helps loosen the chickpeas’ skins, making them easier to dry.
- Drain the canned chickpeas and transfer them to the boiling water. Let them sit for 30 seconds, then drain again and pat them dry with a clean kitchen towel or paper towels. Removing as much moisture as possible is key to a crisp texture. While the chickpeas are drying, measure out the spices and herbs to keep everything ready.
- In a large bowl, combine the chickpeas with 2 tablespoons of olive oil, 1 teaspoon of ground cumin, 1 teaspoon of smoked paprika, and ½ teaspoon of salt. Toss until every chickpea is evenly coated. The oil not only helps the spices cling but also creates a golden crust as they bake.
- Spread the coated chickpeas in a single layer on the prepared baking sheet. Make sure they’re not crowded; overcrowding can lead to steaming instead of crisping. Place the sheet in the preheated oven and bake for 20 minutes, then stir the chickpeas to ensure even cooking. Keep an eye on them—if they start to burn, reduce the temperature slightly.
- Continue baking for another 10–15 minutes, or until the chickpeas are golden brown and crispy. They should emit a nutty, toasted aroma that’s impossible to resist. The edges will begin to pull away from the parchment, indicating that they’re ready.
- Remove the baking sheet from the oven and let the chickpeas cool for a few minutes. While they’re still warm, sprinkle ¼ cup each of chopped fresh parsley and cilantro over them. The heat will release the herbs’ aromas, creating a fragrant finish.
- Add 1 teaspoon of fresh lemon zest to the warm chickpeas and give them one final gentle toss. The zest’s essential oils will coat each bite, adding a bright, citrusy lift that balances the smoky base.
- Transfer the chickpeas to a bowl or airtight container and let them cool completely before storing. The crispness will hold for up to five days in an airtight container at room temperature, making them ideal for meal prep or a quick snack on the go.
- If you prefer a slightly sweet version, drizzle a light mist of honey or sprinkle a pinch of sugar over the chickpeas before serving. The sweet and savory combination creates an unexpected flavor profile that many snack lovers adore.
- Serve immediately, or store them in a sealed container for later. When you’re ready to enjoy them again, give them a quick reheat in a preheated 350°F oven for 5 minutes to revive the crunch. That’s it— you did it. But hold on, I’ve got a few more tricks that will take this to another level.
Insider Tricks for Flawless Results
The Temperature Rule Nobody Follows
Most people bake at 375°F, but 400°F is the sweet spot for crispy chickpeas. The higher temperature ensures that the water inside the beans evaporates quickly, leaving a dry surface that crisps up. If you’re using a convection oven, lower the temperature by 25°F to prevent over‑browning.
Why Your Nose Knows Best
Your nose is the best indicator of doneness. When the chickpeas smell toasted and slightly nutty, they’re ready. If they still smell raw or earthy, give them a few more minutes. Trust your senses, and you’ll avoid the dreaded “over‑baked” snack.
The 5‑Minute Rest That Changes Everything
Letting the chickpeas rest for five minutes after baking allows the steam to escape, keeping the edges crisp. This short pause also lets the spices settle, creating a more cohesive flavor. Skipping this step can result in a soggy texture that ruins the crunch.
Use a Wire Rack for Even Crisping
If you have a wire cooling rack, place the baked chickpeas on it after baking. The airflow underneath keeps the bottom from becoming soggy. This trick is especially useful when you’re making large batches that need to cool quickly.
Add a Touch of Sweetness
A light drizzle of honey or a sprinkle of brown sugar can transform the snack into a sweet‑savory treat. The sugar caramelizes slightly in the oven, adding a caramelized crust that pairs beautifully with the herbs. Just a pinch is enough; you don’t want to overpower the spices.
Store in an Airtight Container
Once the chickpeas are completely cooled, transfer them to a sealed container. This keeps the moisture out and preserves the crunch. If you’re storing them for more than a day, add a small paper towel to absorb any excess humidity.
Creative Twists and Variations
This recipe is a playground. Here are some of my favorite ways to switch things up:
Spicy Sriracha Version
Replace smoked paprika with a tablespoon of sriracha for a fiery kick. Add a pinch of cayenne pepper to deepen the heat. Serve with a squeeze of lime for a bright contrast. This version is perfect for those who love a spicy snack that still feels fresh.
Mediterranean Herb Mix
Swap parsley and cilantro for a blend of oregano, thyme, and dill. Add a teaspoon of dried rosemary for an earthy undertone. Finish with a sprinkle of feta cheese after baking for a salty, creamy touch. This twist brings a Mediterranean vibe that pairs well with a glass of white wine.
Sweet Cinnamon‑Sugar Crunch
After baking, drizzle a light honey glaze and sprinkle ¼ teaspoon of ground cinnamon and a pinch of sugar. The sweet and spicy combo creates a snack reminiscent of autumn desserts. Serve with a dollop of Greek yogurt for a protein boost.
Garlic Parmesan Delight
Add 1 tablespoon of grated Parmesan to the spice mix before baking. After the chickpeas are done, sprinkle extra Parmesan on top for a cheesy finish. The garlic powder in the original recipe pairs beautifully with the cheese, creating a savory, comforting snack.
Citrus‑Herb Fusion
Replace lemon zest with orange zest and add a tablespoon of fresh mint. The sweet citrus notes contrast with the herbaceous mint, creating a refreshing snack that’s perfect for summer gatherings. A splash of orange juice after baking adds an extra burst of flavor.
Storing and Bringing It Back to Life
Fridge Storage
Store the cooled chickpeas in an airtight container at room temperature for up to five days. If you notice any moisture, add a small paper towel to absorb excess dampness. The crunchy texture will remain intact as long as the container is sealed.
Freezer Friendly
For longer storage, place the chickpeas in a freezer‑safe bag or container and freeze for up to two months. When you’re ready to enjoy them, thaw at room temperature for 20 minutes. The crunch will be preserved, making it a convenient snack for busy days.
Best Reheating Method
To revive the crispness, preheat your oven to 350°F and spread the chickpeas on a parchment‑lined sheet. Bake for 5 minutes or until heated through. For a quick microwave option, place them in a microwave‑safe bowl and heat on high for 30 seconds, then transfer to the oven to crisp.