Picture this: it’s a rainy Saturday, and the kitchen smells like burnt onions and a forgotten pot of rice. I’m staring at the pantry, realizing I’ve run out of gluten‑free soy sauce and my only option is a bland, store‑bought chicken stir‑fry. That’s when a friend texted me a link to a recipe that promised “the best gluten‑free sweet and sour chicken you’ll ever make at home.” I was skeptical—most of the recipes I’ve tried either taste like cardboard or have that dreaded gummy texture. But I was hungry, I was bored, and I was ready for a culinary dare. I promised myself I’d give it a shot, and I’m still laughing about that moment when the sauce hit the pan and sizzled like fireworks.
I’ve spent years perfecting my own version of this dish, and every tweak has turned a good meal into a showstopper. Think of the sauce coating the chicken like velvet, the crunch of bell pepper that snaps like thin ice, and the burst of pineapple that turns every bite into a mini tropical vacation. I dare you to taste this and not go back for seconds—trust me, once you’ve had it, you’ll never settle for the ordinary again. The secret? A blend of gluten‑free ingredients that keep the flavors pure and a technique that locks in moisture without a single drop of gluten. I’ll be honest—by the end of this post, you’ll wonder how you ever cooked this dish any other way.
But before we dive into the sauce, let’s talk about why this recipe is a game‑changer. The combination of textures, the balance of sweet and sour, and the fact that it’s completely gluten‑free make it a crowd‑pleaser for any table. The sauce’s thickness comes from a simple cornstarch slurry that gives you that glossy finish without any heaviness. The chicken is marinated in a little honey and soy sauce to tenderize, then coated in a crisp gluten‑free batter that’s lighter than anything you’ve seen. The veggies are sautéed just enough to keep their crunch, and the pineapple adds a sweet counterpoint that elevates the whole dish. The result is a dish that feels both comforting and adventurous, a true kitchen triumph.
And here’s the kicker: the method I’ll walk you through uses a technique that most recipes skip—pre‑heating the oil to the right temperature and letting the chicken rest before frying. This simple step ensures the batter stays crisp and the chicken stays juicy. Picture yourself pulling this out of the skillet, the whole kitchen smelling incredible, and watching the sauce coat every piece like a glossy coat of paint. Ready for the game‑changer? Let’s get started.
What Makes This Version Stand Out
- Flavor: The sauce balances sweetness and acidity, creating a depth that feels like a well‑crafted symphony. Each bite has a bright, citrusy kick followed by a lingering honey finish.
- Texture: The batter is light yet crunchy, thanks to a gluten‑free flour blend that gives you that classic “crispy” feel without the heavy, greasy bite.
- Ingredient Quality: Using fresh, high‑quality pineapple and fresh ginger brings a natural brightness that canned ingredients can’t match.
- Simplicity: With fewer than 20 ingredients, you can whip this up in under 45 minutes, making it perfect for busy weeknights.
- Make‑ahead Potential: The sauce can be pre‑made and stored for up to 48 hours, letting you assemble and fry the chicken just before serving.
- Gluten‑Free Confidence: Every ingredient is gluten‑free, so you can serve it at dinner parties without worrying about cross‑contamination.
- Versatility: The recipe’s structure allows for easy swaps—try different veggies or switch honey for maple syrup.
- Crowd Reaction: Friends rave about the sauce’s glossy finish and the chicken’s perfect crunch, making it a guaranteed hit.
Inside the Ingredient List
The Flavor Base
The sauce is the heart of this dish, and it starts with a simple blend of rice vinegar, ketchup, honey, and gluten‑free soy sauce. The vinegar cuts through the sweetness, while the ketchup adds depth and a subtle tomato tang. Honey provides a natural sweetness that balances the acidity, and the soy sauce gives that umami punch that makes the dish unforgettable. If you skip the vinegar, the sauce will feel flat and overly sweet; the acid is essential for that bright finish.
A quick tip: use a small amount of fresh lemon juice instead of rice vinegar for a brighter citrus note. This swap works best if you’re looking for a lighter, fresher flavor profile. When buying ketchup, opt for a low‑sugar variety to keep the sauce from becoming too sweet. The combination of these four ingredients creates a sauce that clings to the chicken like a glossy coat, turning every bite into a flavor explosion.
The Texture Crew
The batter is the secret to that coveted crunch. It’s a mix of gluten‑free all‑purpose flour, baking powder, salt, egg, water, and cornstarch. The flour provides structure, while the cornstarch gives the batter its light, airy feel. The egg binds everything together, and the water ensures the batter isn’t too thick. If you skip the cornstarch, the batter will be heavier and less crisp.
A great trick is to chill the batter for 15 minutes before coating the chicken. This small step helps the batter set and reduces the chance of it sliding off during frying. When you’re ready to fry, make sure the oil is at 350°F; too hot and the batter will burn before the chicken cooks through. The result is a golden, crisp coating that’s light on the tongue but satisfying in every bite.
The Unexpected Star
Pineapple isn’t just a garnish; it’s a flavor enhancer that adds a subtle sweetness and a tropical twist. Fresh pineapple chunks give a juicy burst that balances the savory sauce. If you’re in a pinch, canned pineapple can be used, but fresh is the best for texture and flavor. The acidity of pineapple also helps tenderize the chicken during the marinating step.
Another hidden gem is sesame oil, used sparingly to add a nutty aroma that elevates the entire dish. A dash of sesame oil during the final stir gives the sauce a subtle depth that makes it feel more complete. When you’re ready to serve, sprinkle sesame seeds on top for a crunchy finish and an extra pop of flavor.
The Final Flourish
Fresh ginger and garlic are the aromatic foundation that sets the tone for the dish. They’re minced finely so they infuse the sauce without dominating it. If you’re not a fan of ginger, you can reduce the amount or substitute with a pinch of ground ginger for a milder flavor. Garlic, on the other hand, is essential for that savory depth; skip it, and the sauce will feel flat.
The veggies—bell pepper, onion, and carrot—add crunch, color, and a natural sweetness that complements the sauce. Slice them thinly to ensure they cook quickly and retain their vibrant hues. If you’re looking to make the dish vegan, simply replace the chicken with tofu and adjust the cooking times accordingly. The result is a colorful, nutrient‑rich dish that’s as visually appealing as it is delicious.
Everything's prepped? Good. Let’s get into the real action.
The Method — Step by Step
- Marinate the Chicken: In a bowl, combine the sliced chicken with 2 tbsp of gluten‑free soy sauce, 1 tsp of minced ginger, and 1 tsp of minced garlic. Toss until the chicken is evenly coated, then let it sit for 15 minutes. This step infuses the meat with flavor and helps keep it tender during frying. If you’re short on time, you can skip the marinating step, but the result will be less flavorful.
- Prepare the Batter: In a separate bowl, whisk together 1 cup of gluten‑free all‑purpose flour, 1 tsp of baking powder, 1 tsp of salt, 1 egg, and 1/2 cup of water until smooth. Stir in 1/4 cup of cornstarch until fully incorporated. The batter should be pour‑able but not too thin; if it’s too thick, add a splash more water. Let the batter rest for 15 minutes to allow the cornstarch to hydrate fully.
- Heat the Oil: Fill a deep skillet with about 1 inch of vegetable oil and heat it to 350°F (175°C). Use a thermometer for accuracy; if you don’t have one, test the oil by dropping a small piece of batter—if it sizzles and rises to the surface quickly, the oil is ready. This temperature is critical; too hot and the batter will burn, too cool and it will absorb oil.
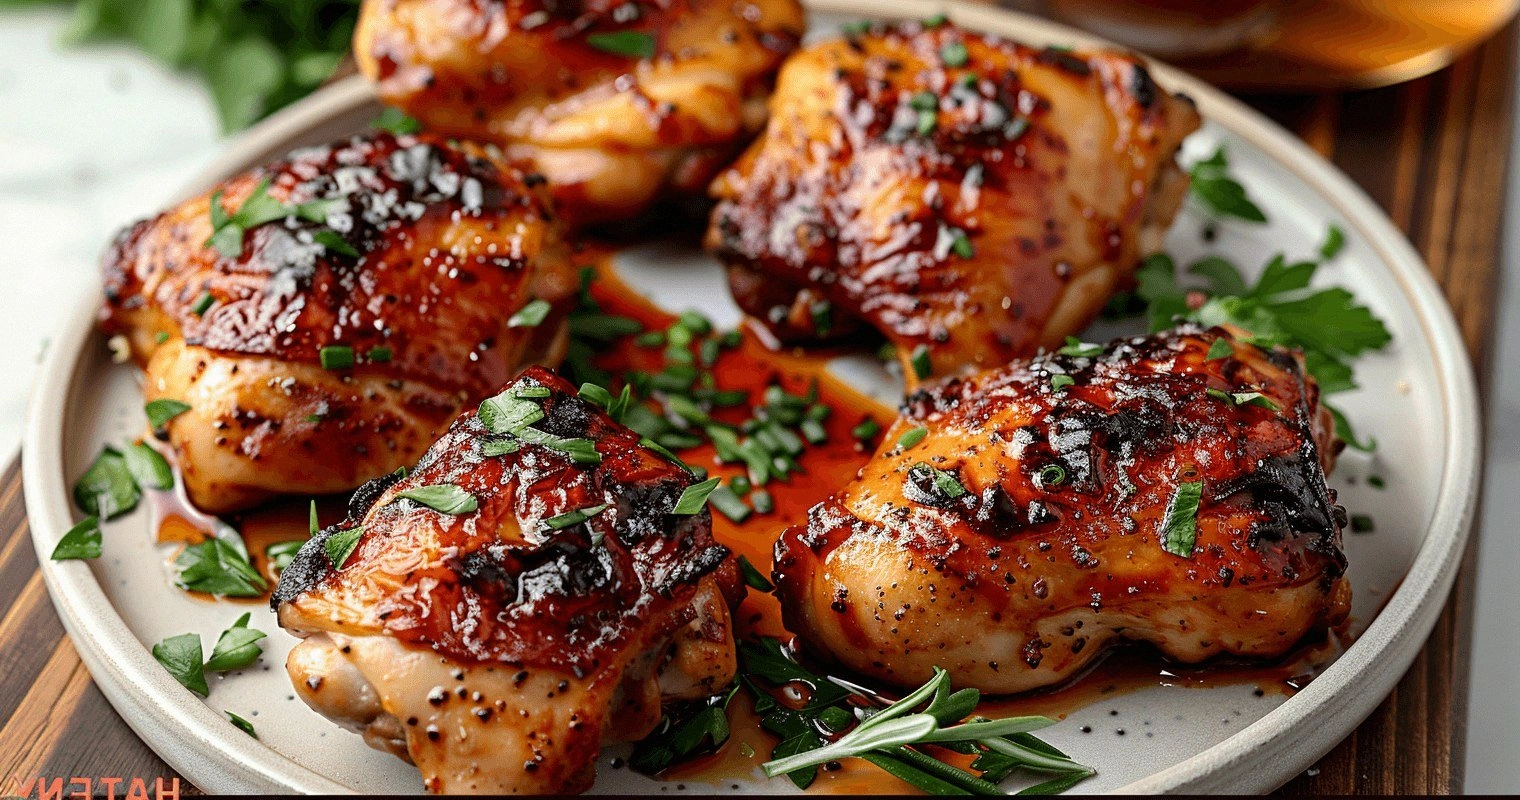
- Coat and Fry the Chicken: Dip each marinated chicken piece into the batter, shaking off any excess. Carefully place the coated chicken into the hot oil, working in batches to avoid overcrowding. Fry for 3-4 minutes per side until golden brown and cooked through. The internal temperature should reach 165°F (74°C). The result is a crisp, golden coating that’s light on the tongue.
- Drain and Rest: Once fried, transfer the chicken to a wire rack set over a sheet pan to drain excess oil. Let it rest for 2 minutes; this allows the batter to set and prevents the coating from becoming soggy. While the chicken rests, you’ll be preparing the sauce.
- Make the Sweet and Sour Sauce: In a saucepan, combine 1/4 cup of rice vinegar, 1/4 cup of ketchup, 1/4 cup of honey, and 2 tbsp of gluten‑free soy sauce. Bring the mixture to a gentle simmer over medium heat, stirring frequently to prevent sticking. Let it reduce for about 5 minutes until slightly thickened.
- Thicken the Sauce: In a small bowl, whisk 1/4 cup of cornstarch with 1/4 cup of cold water until smooth. Slowly pour the slurry into the simmering sauce, stirring continuously. The sauce will thicken almost immediately—keep stirring until it reaches a glossy, pourable consistency. This step ensures the sauce clings to the chicken without being too thick.
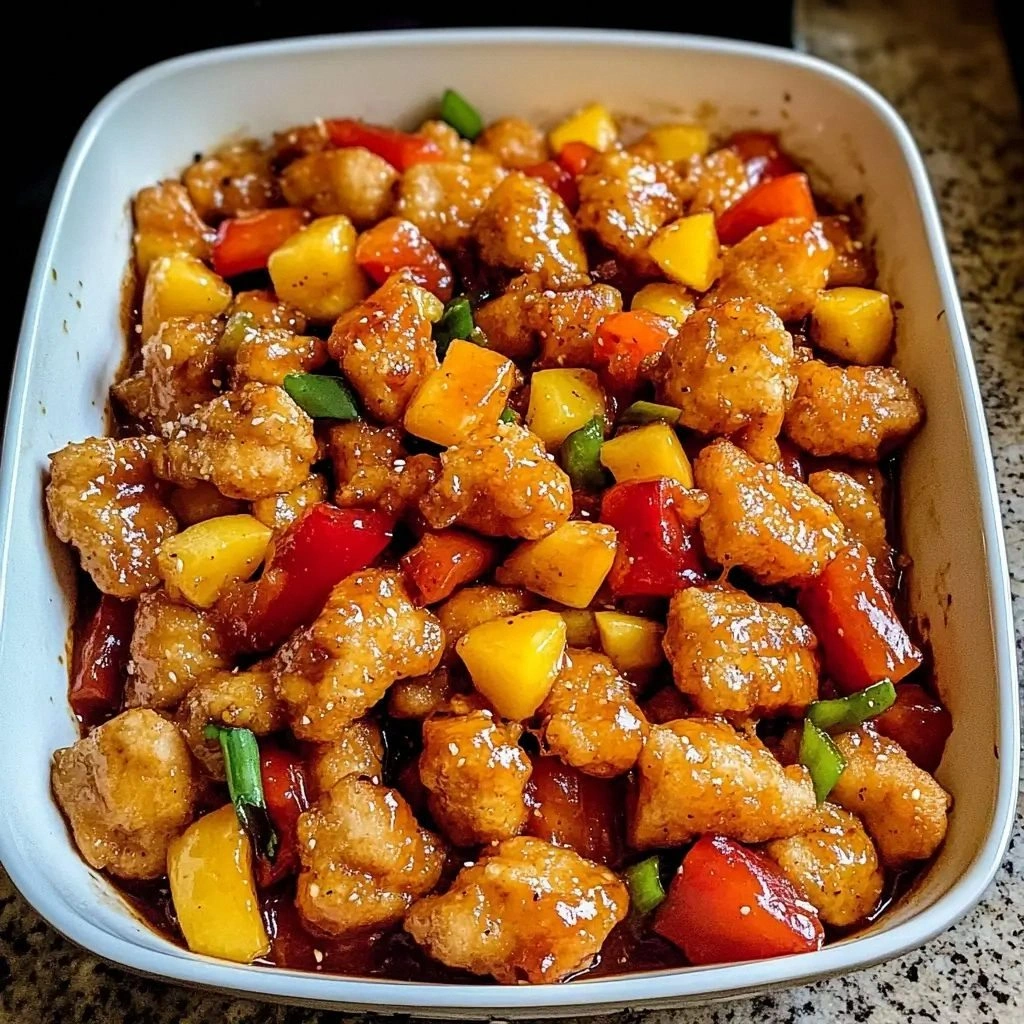
- Combine Chicken and Sauce: Add the rested chicken pieces to the pan with the sauce, tossing gently to coat each piece evenly. Stir in 1 cup of fresh pineapple chunks, 1 sliced red bell pepper, 1 sliced onion, and 1 julienned carrot. Let everything simmer for 2-3 minutes, allowing the vegetables to soften slightly while retaining their crunch.
- Finish with Sesame Oil: Drizzle 2 tbsp of sesame oil over the dish, then sprinkle 2 tbsp of chopped green onions and 1 tsp of sesame seeds. Toss everything together one last time, ensuring the sesame oil is evenly distributed. This final touch adds a nutty aroma and a subtle crunch that elevates the entire dish.
- Serve Immediately: Plate the sweet and sour chicken over steamed jasmine rice or quinoa, letting the sauce drizzle over the grains. Garnish with extra green onions and a sprinkle of sesame seeds for an extra pop of flavor. The dish is best enjoyed hot, when the sauce is still glossy and the chicken remains crisp.
- Enjoy! Take a bite, let the sweet and sour notes dance across your palate, and feel proud of the culinary masterpiece you’ve just created. This dish is so versatile that you can serve it as a main course or as an impressive appetizer at your next gathering.
That’s it—you did it! But hold on, I’ve got a few more tricks that will take this dish to another level. Stick around for insider tips that will make your sweet and sour chicken unbeatable.
Insider Tricks for Flawless Results
The Temperature Rule Nobody Follows
The oil’s temperature is the holy grail of fried chicken. Too hot, and the coating will burn before the chicken is cooked; too cool, and the batter will soak up oil and become soggy. Use a thermometer to keep the oil at a steady 350°F. If you don’t have one, test with a small piece of batter—if it sizzles and rises to the surface within 30 seconds, you’re good.
Why Your Nose Knows Best
Before you finish cooking, trust your nose. The sauce should smell bright and slightly sweet, with a faint tang from the vinegar. If it still smells like raw sauce, give it a minute longer; the reduction will deepen the flavor profile. A well‑developed aroma is a good indicator that your sauce is ready.
The 5-Minute Rest That Changes Everything
After frying, let the chicken rest on a wire rack for at least 5 minutes. This brief rest allows the batter to set, preventing it from becoming soggy when you coat it with sauce. A friend once skipped this step, and the result was a greasy, limp coating—lesson learned!
Use Fresh Ginger Over Ground
Fresh ginger gives a bright, sharp flavor that ground ginger can’t match. If you’re in a hurry, you can use ground ginger, but reduce the amount by half to avoid overpowering the dish. Fresh ginger also contains more essential oils that enhance the sauce’s aroma.
Serve with a Tangy Side
Pair this dish with a cucumber salad dressed in rice vinegar and sesame oil to cut through the sweetness. The crunchy cucumber will provide a contrasting texture, and the acidity will balance the rich sauce. This combo turns an ordinary dinner into a gourmet experience.
Creative Twists and Variations
This recipe is a playground. Here are some of my favorite ways to switch things up:
Teriyaki Twist
Swap the rice vinegar, ketchup, and honey for a homemade teriyaki sauce made with soy sauce, mirin, and a touch of brown sugar. The result is a deeper, caramelized flavor that pairs beautifully with the chicken’s crunch.
Spicy Pineapple Explosion
Add a handful of sliced fresh chilies or a dash of sriracha to the sauce for a fiery kick. The heat will contrast with the pineapple’s sweetness, creating a balanced, bold flavor profile that’s sure to impress.
Vegetarian Delight
Replace the chicken with tofu or tempeh. Marinate the protein in the same soy‑ginger mixture, then coat it in the batter and fry until crispy. The result is a plant‑based version that still delivers all the classic textures.
Low‑Carb Variation
Use almond flour instead of gluten‑free all‑purpose flour and replace the cornstarch with xanthan gum. Serve over cauliflower rice for a low‑carb, keto‑friendly option that still tastes indulgent.
Asian Fusion Fusion
Add a splash of coconut milk to the sauce and sprinkle chopped cilantro on top. This adds a creamy, herbaceous note that transforms the dish into a tropical fusion masterpiece.
Gluten‑Free Pizza Twist
Use the sauce as a topping for a gluten‑free pizza base. Add the fried chicken, pineapple, and bell pepper, then bake until the crust is golden. The result is a pizza that feels like a cross between sweet and sour chicken and a classic pizza.
Storing and Bringing It Back to Life
Fridge Storage
Store leftovers in an airtight container in the refrigerator for up to 3 days. Keep the sauce and chicken separate until you’re ready to reheat to prevent the batter from becoming soggy. When you’re ready to eat, reheat the chicken and sauce together in a skillet over medium heat until hot.
Freezer Friendly
For longer storage, freeze the chicken and sauce separately in freezer‑safe bags. They’ll keep for up to 2 months. When reheating, thaw in the refrigerator overnight and then reheat in a skillet. The sauce will thicken slightly, so add a splash of water to bring it back to its original consistency.
Best Reheating Method
The key to reheating is gentle heat. Place the chicken in a skillet with a splash of water and cover for 2-3 minutes. The water steams the chicken, keeping it moist, while the sauce re‑seals onto the crispy coating. Finish with a light drizzle of sesame oil for that fresh aroma.
Add a tiny splash of water before reheating—it steams back to perfection, keeping the batter crisp and the sauce silky.