I was standing in my kitchen on a rainy Tuesday, staring at a half‑cooked chicken breast that looked more like a sad, rubbery pancake than anything worth bragging about. The pantry was full of rice, the fridge held a lonely broccoli crown, and my stomach was growling louder than a freight train. I tossed a dare to myself: “Make something that tastes like a restaurant’s secret sauce but won’t wreck my diet or my wallet.” After a few frantic Googles and a couple of kitchen mishaps involving a splatter of honey on the ceiling, I finally landed on a version that turned the whole disaster into a triumph. This is the recipe that rescued my dinner and, frankly, my pride.
Picture this: the kitchen fills with a sweet‑spicy aroma that makes the whole house feel like a street market in Bangkok, the rice steaming like a cloud of comfort, and the chicken glistening with a glossy, sticky glaze that clings to each bite like velvet. The broccoli florets stay crisp, offering a bright green contrast that snaps when you bite into them, while a drizzle of sriracha mayo adds a creamy heat that makes you want to lick the spoon. The whole bowl is a symphony of textures—soft rice, juicy chicken, crunchy veg, and a nutty crunch from sesame seeds that pop like tiny fireworks. And the best part? It’s completely meal‑prep friendly, so you can grab a bowl for lunch, dinner, or a post‑gym refuel without any second‑guessing.
What makes this version stand out? Most recipes either drown the chicken in a sugary glaze that turns gummy, or they skimp on flavor and leave you with bland, dry meat. I’ve cracked the code by balancing the soy‑honey base with a splash of rice vinegar, a dash of smoked paprika, and a secret arrowroot slurry that gives the sauce that perfect, glossy cling without any cloying stickiness. The result is a bowl that feels indulgent yet stays light enough to keep you feeling energized. I dare you to taste this and not go back for seconds—because once you’ve tried it, every other chicken bowl will taste like a sad, soggy afterthought.
Okay, ready for the game‑changer? The trick that most people overlook is the quick sear of the chicken in a hot pan before it meets the sauce. That initial caramelization creates a flavor foundation that the sauce can’t steal from, giving each bite a depth you’ll swear was achieved with a sous‑vide machine. I’ll be honest — I ate half the batch before anyone else got to try it, and that’s a testament to how addictive this combo truly is. Let me walk you through every single step — by the end, you’ll wonder how you ever made it any other way.
What Makes This Version Stand Out
- Taste: The sweet‑heat balance hits your palate like a perfectly timed drum solo—honey’s mellow sweetness, sriracha’s punch, and soy sauce’s umami all dance together.
- Texture: A glossy glaze coats the chicken while the rice stays fluffy, and the broccoli retains a satisfying crunch that never turns mushy.
- Simplicity: Fewer than fifteen ingredients, most of which you already have on hand, mean you won’t need a trip to the specialty store.
- Uniqueness: The arrowroot slurry is the secret weapon that gives the sauce that restaurant‑level sheen without any artificial thickeners.
- Crowd Reaction: Friends and family call it “the best chicken bowl ever” and ask for the recipe within minutes of the first bite.
- Ingredient Quality: Using fresh garlic, real honey, and good‑quality soy sauce elevates the whole dish from “meh” to “wow.”
- Cooking Method: A quick sear followed by a brief simmer locks in juices and prevents the dreaded dry chicken syndrome.
- Make‑Ahead Potential: The bowl stores beautifully in the fridge, and the sauce even thickens a bit more, making each reheated portion taste even richer.
Alright, let's break down exactly what goes into this masterpiece...
Inside the Ingredient List
The Flavor Base
Soy sauce is the backbone of the glaze, delivering that deep umami punch you crave in any Asian‑inspired dish. If you swap it for tamari, you’ll keep it gluten‑free without sacrificing flavor. Honey isn’t just a sweetener; it also helps the sauce caramelize, giving the chicken those gorgeous golden edges. A splash of rice vinegar adds a bright acidity that cuts through the richness, preventing the bowl from feeling heavy. If you ever run out of rice vinegar, a squeeze of lime works in a pinch, though the flavor profile shifts slightly toward citrus.
The Heat & Aroma Crew
Sriracha brings the heat, but it also adds a subtle fermented depth that pairs beautifully with the honey. Chili powder and smoked paprika layer on a smoky, earthy heat that feels like a campfire in your mouth. Ground ginger and garlic provide that aromatic foundation, making the sauce smell like a bustling street stall. If you’re not a fan of too much spice, reduce the sriracha to one tablespoon and increase the honey by a tablespoon to keep the balance.
The Texture Crew
Arrowroot powder is the unsung hero that thickens the sauce without clouding it, unlike cornstarch which can turn the glaze opaque. The 2 tsp of arrowroot plus 2 tbsp of water create a slurry that, when added at the end, gives the sauce that glossy finish. The broccoli heads provide a crisp contrast; steam them just enough to keep that snap, because overcooking turns them into a limp mush. The sesame oil adds a nutty finish that rounds out the flavor, while sesame seeds sprinkle on top for a delicate crunch.
The Final Flourish
The mayo‑sriracha drizzle is the creamy kicker that makes each bite feel indulgent without adding too many calories. It’s essentially a quick aioli that you can whip up in seconds. The rice, cooked to fluffy perfection, acts as the neutral canvas that lets the sauce shine. If you prefer brown rice or quinoa for extra fiber, just adjust the cooking time accordingly. Finally, a pinch of salt (or to taste) ensures all the flavors sing in harmony.
Everything's prepped? Good. Let's get into the real action...
The Method — Step by Step
Start by rinsing the 2 cups of uncooked rice under cold water until the water runs clear; this removes excess starch and prevents gummy grains. Transfer the rice to a pot, add 4 cups of water, a pinch of salt, and bring to a boil. Once boiling, reduce to a simmer, cover, and let it cook for 15‑18 minutes. When the timer dings, remove from heat and let it sit, covered, for another five minutes. Fluff with a fork and set aside—this is the fluffy foundation you’ll be building on.
While the rice cooks, slice the 3 large chicken breasts into bite‑size strips. In a large bowl, toss the chicken with 2 tbsp olive oil, 1 tsp salt, ½ tsp black pepper, 1 tsp chili powder, 1 tsp smoked paprika, 1 tsp onion powder, and 1 tsp oregano. Make sure each piece is evenly coated; the spices will create a flavor crust once seared. Let the seasoned chicken rest for 5 minutes while you prep the sauce—this short rest allows the spices to penetrate the meat.
Now for the sauce: combine ½ cup soy sauce, ½ cup honey, ¼ cup rice vinegar, 3 cloves minced garlic, 2 tbsp sriracha, 2 tsp sesame oil, and 1 tsp ground ginger in a medium saucepan. Bring the mixture to a gentle boil over medium‑high heat, stirring constantly. You’ll hear a faint hiss as the honey starts to caramelize—That sizzle when it hits the pan? Absolute perfection. Reduce the heat to low and let it simmer for 3‑4 minutes, allowing the flavors to meld.
While the sauce simmers, heat a large skillet over medium‑high heat. Add a drizzle of olive oil, then spread the chicken strips in a single layer. Let them sear undisturbed for about 2‑3 minutes; you’ll see the edges start to pull away and turn golden. Flip the pieces and sear the other side for another 2‑3 minutes. This quick sear locks in juices and creates those coveted caramelized bits that make the bowl feel restaurant‑grade.
When the chicken is beautifully browned, pour the hot sauce directly over the pan. Stir to coat every piece, then let it bubble for another 2‑3 minutes so the chicken absorbs the glaze. At this point, the sauce will thicken slightly, but we need that final glossy finish.
Kitchen Hack: Add the arrowroot slurry (2 tsp arrowroot + 2 tbsp water) slowly while whisking; this prevents clumps and gives the sauce that mirror‑like shine.Create the slurry in a small bowl: whisk together 2 tsp arrowroot powder with 2 tbsp water until completely smooth. Pour the slurry into the pan, stirring continuously. Within seconds, the sauce will thicken to a syrupy consistency that clings to the chicken like a second skin. Taste and adjust—if you need a touch more salt, add a pinch; if you crave extra heat, drizzle another half‑tbsp sriracha.
While the sauce reaches its final thickness, steam the 2 small heads of broccoli. Use a steamer basket over boiling water for 4‑5 minutes; you want the florets bright green and still crisp. Over‑cooking will make them soggy and lose that satisfying snap.
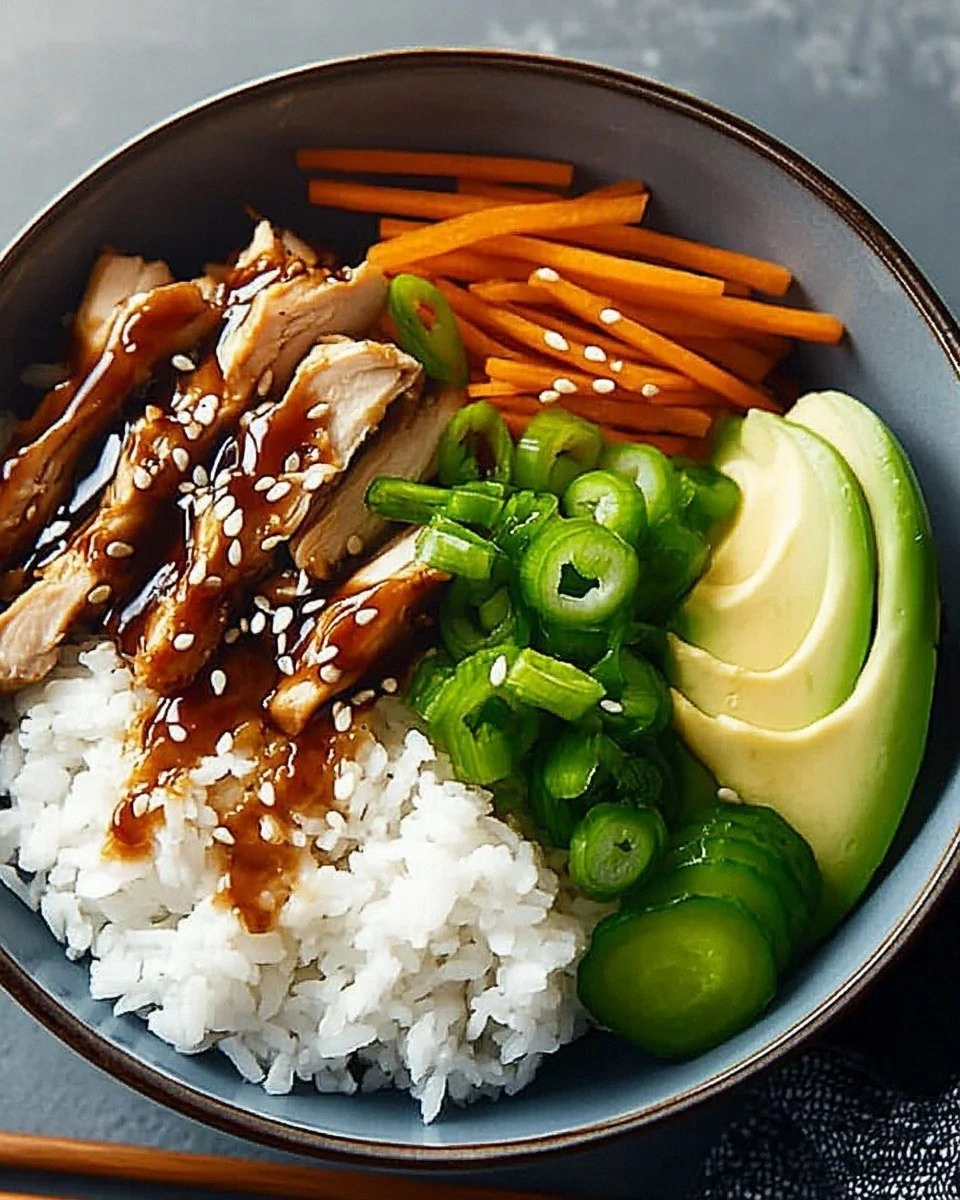
Watch Out: If you add the broccoli directly into the sauce, it will over‑absorb the glaze and become mushy—keep them separate until assembly.Now assemble the bowls: start with a generous scoop of fluffy rice, add a mound of sticky chicken, then arrange the broccoli florets beside it. Drizzle the sriracha mayo (½ cup mayo mixed with 1 tbsp sriracha and 2.5 tbsp water) in a zig‑zag pattern over the top. Finish with a sprinkle of sesame seeds and, if you like, a dash of extra sriracha for that final kick. The visual contrast of the glossy chicken against the white rice and green broccoli is as satisfying as the flavors themselves.
That’s it — you did it. But hold on, I've got a few more tricks that'll take this to another level. The next sections reveal insider tips, creative twists, and storage hacks that will keep this bowl fresh and exciting for days.
Insider Tricks for Flawless Results
The Temperature Rule Nobody Follows
Never let the pan get too hot before adding the chicken; a medium‑high heat is perfect. If the pan is scorching, the chicken will scorch on the outside while staying raw inside. I once turned the heat up to “max” because I was in a rush—result? A burnt crust and a dry interior that tasted like cardboard. Keep a thermometer handy; the ideal searing temperature hovers around 375°F (190°C). This ensures a golden crust without sacrificing juiciness.
Why Your Nose Knows Best
Your sense of smell is the most reliable indicator of doneness for the sauce. When the sauce starts to emit a sweet‑spicy aroma with a faint caramel note, you’re close. If you can smell the raw garlic, give it another 30 seconds. Trusting your nose saves you from over‑reducing the glaze, which can turn it bitter.
The 5‑Minute Rest That Changes Everything
After the chicken has been tossed in the sauce, remove the pan from heat and let it rest for five minutes. This short pause allows the glaze to settle and the chicken fibers to re‑absorb moisture, making each bite incredibly juicy. Skipping this step is a common mistake; the result is a slightly dry texture that feels like you missed the secret.
Seasoning the Rice Like a Pro
While the rice is cooking, add a pinch of salt and a drizzle of sesame oil to the water. This subtle seasoning infuses the grains from the inside out, so they’re not just a bland base. If you want extra flavor, stir in a teaspoon of toasted sesame seeds once the rice is done.
The Final Drizzle Decision
When mixing the sriracha mayo, adjust the water amount based on your desired consistency. Too thick and it will sit on top; too thin and it will drown the bowl. I recommend starting with 2 tbsp water, tasting, then adding the remaining 0.5 tbsp if you need a silkier texture. This level of control ensures the mayo integrates perfectly with the other components.
Creative Twists and Variations
This recipe is a playground. Here are some of my favorite ways to switch things up:
Tropical Twist
Swap the soy sauce for coconut aminos and add a handful of diced pineapple. The fruit’s acidity balances the honey, creating a sweet‑savory combo that feels like a beach vacation in a bowl.
Nutty Crunch
Replace the broccoli with roasted cauliflower and sprinkle toasted peanuts on top. The peanuts add a buttery crunch that pairs beautifully with the sesame notes.
Spicy Peanut Fusion
Mix a tablespoon of peanut butter into the sauce before adding the arrowroot slurry. The result is a creamy, nutty depth that turns the glaze into a Thai‑inspired peanut sauce.
Low‑Carb Version
Swap the rice for cauliflower rice, and use a low‑sugar honey substitute or a drizzle of agave. The flavor profile stays intact while cutting the carbs in half.
Herb‑Infused Delight
Add a handful of fresh cilantro and a squeeze of lime right before serving. The herbaceous lift brightens the dish and makes it feel fresh even after a few days in the fridge.
Storing and Bringing It Back to Life
Fridge Storage
Divide the bowls into airtight containers, keeping the sauce separate if you plan to reheat later. The chicken and sauce stay fresh for up to four days. Before eating, give the container a quick shake to re‑coat the chicken.
Freezer Friendly
The bowl freezes beautifully for up to two months. Freeze the rice, chicken, and broccoli in separate bags to avoid sogginess. When you’re ready to eat, thaw overnight in the fridge, then reheat the chicken with a splash of water to restore the glaze’s shine.
Best Reheating Method
Microwave the bowl on high for 1‑2 minutes, then stir in a teaspoon of water and cover for another 30 seconds. The added moisture steams the rice and chicken back to fluffy perfection, while the sauce regains its glossy texture. If you have a skillet, re‑sauté the chicken for a minute to revive the caramelized edges.