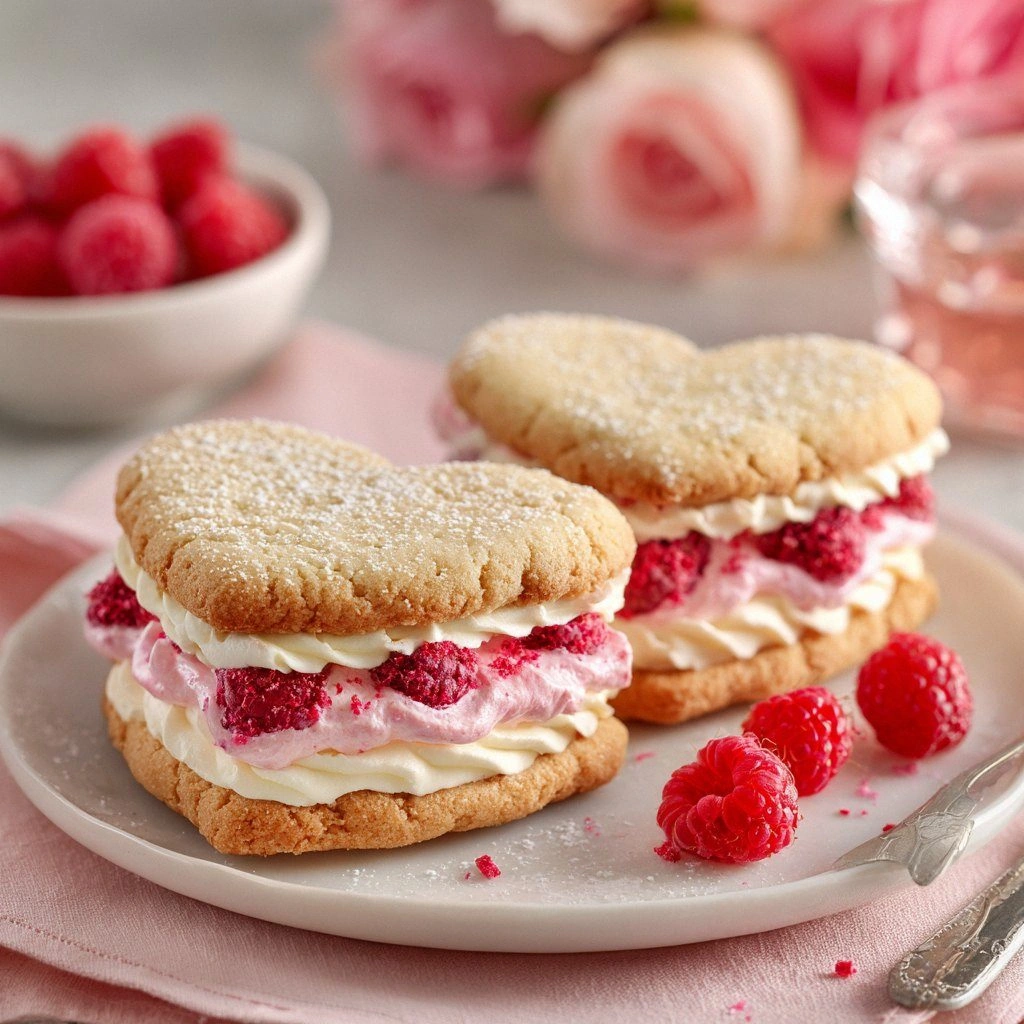
When you first open the dough, you’ll notice a faint, sweet scent that feels like a promise of indulgence. The dough itself is silky smooth, with a subtle sheen that hints at the butter’s richness. As it bakes, the edges darken to a caramelized golden, while the center remains airy and light. The raspberries, fresh and plump, are nestled inside like juicy jewels, their tartness cutting through the sweetness with precision. The glaze, a thin layer of powdered sugar and lemon juice, gives a glossy finish that catches the light just right. And the final touch — a dusting of crushed pistachios or a drizzle of white chocolate — elevates the cookie from simple to spectacular.
I’ve spent countless hours tweaking the ratio of butter to flour, experimenting with different types of raspberries, and even testing a few glaze variations. The result is a cookie that balances crunch and chew, sweetness and tartness, with a buttery richness that’s unmistakably comforting. The secret? A precise blend of ingredients that work together in harmony, and a method that ensures every cookie is perfect. I’ll walk you through each step, from the initial dough to the final glaze, and I’ll share the little tricks that make this recipe a kitchen staple. This isn’t just a cookie; it’s a celebration, a sweet little love letter you can share with friends, family, or anyone who appreciates a well-crafted treat. Ready to dive in? Let’s get started.
What Makes This Version Stand Out
- Flavor: The combination of fresh raspberries and a buttery base creates a taste that’s both bright and indulgent. The subtle tartness of the berries cuts through the richness, leaving a lingering sweetness.
- Texture: Crisp edges that shatter like thin ice give way to a pillowy center that melts in your mouth. The contrast is a sensory delight that keeps you coming back for more.
- Visual Appeal: The heart shape, glossy glaze, and pop of deep red make each cookie a work of art. It’s perfect for special occasions or just to brighten a regular day.
- Simplicity: With only a handful of ingredients, this recipe is straightforward to follow, yet the results are far from ordinary.
- Uniqueness: The raspberry jam layer adds depth, while the optional white chocolate chips or pistachios introduce a surprising twist.
- Make‑Ahead: The cookies can be stored for up to a week, and they even taste better the next day as the flavors meld.
- Ingredient Quality: Using fresh, seasonal berries and high‑quality butter elevates the entire experience.
- Audience Reaction: Friends and family rave about the flavor profile and the playful shape, making it a hit at gatherings.
Alright, let’s break down exactly what goes into this masterpiece. Everything’s prepped? Good. Let’s get into the real action.
Inside the Ingredient List
The Flour Foundation
All‑purpose flour provides the structure that holds the cookie together while still allowing a tender crumb. Too much flour and the cookie becomes dry; too little and it will spread. If you can’t find all‑purpose flour, a 1:1 blend of cake flour and bread flour works well. For a gluten‑free version, swap for a high‑protein gluten‑free blend but keep the ratio the same.
The Butter Brilliance
Unsalted butter is the heart of this recipe, giving it that buttery richness that makes every bite feel indulgent. Use room‑temperature butter so it blends smoothly with the sugar. If you’re short on butter, substitute with coconut oil for a tropical twist, but be aware it will alter the flavor profile slightly.
The Sweet Symphony
Granulated sugar and brown sugar create a balance of sweetness and molasses depth. Brown sugar adds moisture and a hint of caramel. If you prefer a lighter cookie, reduce the brown sugar by half and increase the granulated sugar slightly.
The Egg Anchor
Eggs bind the dough, adding structure and a subtle richness. If you’re vegan, replace each egg with 1/4 cup unsweetened applesauce or a flaxseed egg. The texture will be slightly different but still delicious.
The Vanilla Whisper
Pure vanilla extract adds a warm, aromatic note that complements the berries. A splash of almond or lemon extract can add a new dimension, but vanilla remains the classic choice.
The Raspberry Core
Fresh raspberries are the star of the show, bursting with tartness and a bright color. If fresh berries are out of season, frozen berries work but thaw and drain them first to avoid excess moisture. For a sweeter version, use raspberry jam as a filling.
The Optional Extras
White chocolate chips or chopped pistachios add a creamy, crunchy contrast. They’re optional but highly recommended for that extra wow factor. If you’re avoiding nuts, sprinkle a few dried cranberries instead.
Everything’s prepped? Good. Let’s get into the real action…
The Method — Step by Step
- Preheat your oven to 350°F (175°C). Line a baking sheet with parchment paper to prevent sticking. In a large bowl, sift together flour, baking powder, baking soda, and salt. The dry mix ensures even distribution of leavening agents.
- Beat the butter and both sugars together until the mixture is light and fluffy. This takes about 3–4 minutes with an electric mixer on medium speed. The goal is to incorporate air, giving the cookies a tender crumb.
- Add the eggs one at a time, beating well after each addition. Then stir in vanilla extract. The eggs bind everything together, while vanilla adds that warm aromatic layer.
- Gradually fold in the dry ingredients until just combined. Overmixing can make the cookies tough. The dough should be soft but not sticky; if it’s too wet, add a splash of milk.
- Divide the dough into two equal portions. On a lightly floured surface, roll each portion into a rectangle about 1/4 inch thick. The thickness matters; too thin and the cookies will burn, too thick and they won’t bake evenly.
- Use a heart‑shaped cookie cutter to cut out shapes from each rectangle. Press firmly to ensure clean edges. Place the hearts on the prepared baking sheet, spacing them about 2 inches apart.
- Bake for 12–14 minutes, or until the edges are golden brown and the centers feel set. The cookies should still look slightly pale in the middle; they’ll firm up as they cool.
- While the cookies cool, prepare the raspberry filling. In a small saucepan, gently warm raspberry jam and fresh raspberries until the mixture thickens. If you prefer a smoother filling, strain through a fine sieve.
- Once the cookies are cool, spread a generous amount of the raspberry mixture onto the flat side of one heart. Top with another heart, pressing gently to adhere. The filling should be visible through the gaps, creating a delightful burst of color.
- Finish with a light dusting of powdered sugar or a drizzle of melted white chocolate. Let the cookies rest for 5 minutes before serving to allow the glaze to set.
That’s it — you did it. But hold on, I've got a few more tricks that'll take this to another level. If you want to impress, keep reading for the insider tricks that turn an already great cookie into a showstopper.
Insider Tricks for Flawless Results
The Temperature Rule Nobody Follows
Many bakers bake at 375°F, but that can scorch the edges before the center cooks. By baking at 350°F, you give the cookies time to rise slowly, ensuring even doneness. I’ve found that a slight temperature dip can make the difference between a perfect cookie and a burnt one. The trick is to preheat the oven for a full 10 minutes to ensure a stable temperature.
Why Your Nose Knows Best
The first hint of a cookie’s readiness is its aroma. As soon as the buttery scent hits the air, the cookies are almost done. Don’t rely solely on the timer; trust your nose. The smell should be sweet, buttery, and slightly caramelized. If you’re unsure, press a finger into the center; it should feel firm.
The 5‑Minute Rest That Changes Everything
Letting the cookies rest on the sheet for 5 minutes before transferring to a rack allows the structure to set. This prevents the cookies from cracking when they cool. After the rest, move them to a rack to finish cooling. The result is a cookie that holds its shape perfectly.
The Secret Ingredient Swap
Swap out the fresh raspberries for frozen ones if the season is out of sync. Just thaw, pat dry, and use as directed. The flavor remains bright, and the texture stays intact. Some bakers even add a splash of lemon zest for an extra zing.
The Finish Line
A light dusting of powdered sugar or a glaze of melted white chocolate not only adds flavor but also gives the cookies a glossy finish. For a more decadent version, drizzle melted dark chocolate over the top. The contrast of dark and bright color is visually stunning.
Creative Twists and Variations
This recipe is a playground. Here are some of my favorite ways to switch things up:
Chocolate‑Infused Love
Add 1/4 cup of dark chocolate chips to the dough for a rich, bittersweet undertone. The chocolate melts into the cookie, creating pockets of molten flavor. Perfect for chocolate lovers.
Nutty Crunch
Fold 1/3 cup of chopped pistachios into the dough. The nuts add a satisfying crunch and a subtle earthy note. They also provide a pop of green color that complements the raspberries.
Citrus Burst
Add 1 tablespoon of lemon zest to the batter. The citrus brightens the flavor profile and pairs wonderfully with the raspberries. The result is a fresh, vibrant cookie.
Spiced Delight
Stir in 1/2 teaspoon of ground cinnamon or a pinch of nutmeg. The warm spices add depth and complexity, especially during cooler months. It’s a subtle but effective twist.
Almond‑Infused Sweetness
Replace the vanilla with almond extract for a nutty undertone. Add 2 tablespoons of almond flour to the dough for added texture. The almond flavor pairs beautifully with the raspberries.
Gluten‑Free Version
Swap all‑purpose flour for a high‑protein gluten‑free blend. Add 1 tablespoon of xanthan gum to maintain structure. The cookies will still be tender and delicious.
Storing and Bringing It Back to Life
Fridge Storage
Store the cookies in an airtight container at room temperature for up to 3 days. If you’ve made them ahead of time, keep them in the fridge to preserve freshness. The butter will stay firm, and the raspberries will maintain their vibrant color.
Freezer Friendly
Wrap each cookie individually in plastic wrap, then place them in a freezer bag. Freeze for up to 2 months. When ready to enjoy, let them thaw at room temperature for 30 minutes.
Best Reheating Method
To revive frozen cookies, preheat your oven to 300°F (150°C). Place the cookies on a parchment‑lined sheet and bake for 5–7 minutes. Add a tiny splash of water before reheating to keep the cookies from drying out. The result is a warm, freshly baked cookie that feels like a brand‑new treat.