Picture this: a midnight kitchen raid, the fridge humming, a craving that feels like a dare. I was staring at a bag of frozen chicken, thinking I'd just make a plain stir‑fry. Then a friend texted, “Try hot honey chicken cutlets, they’re insane.” I laughed, but the idea stuck. I know the moment when a simple dish turns into a culinary revelation.
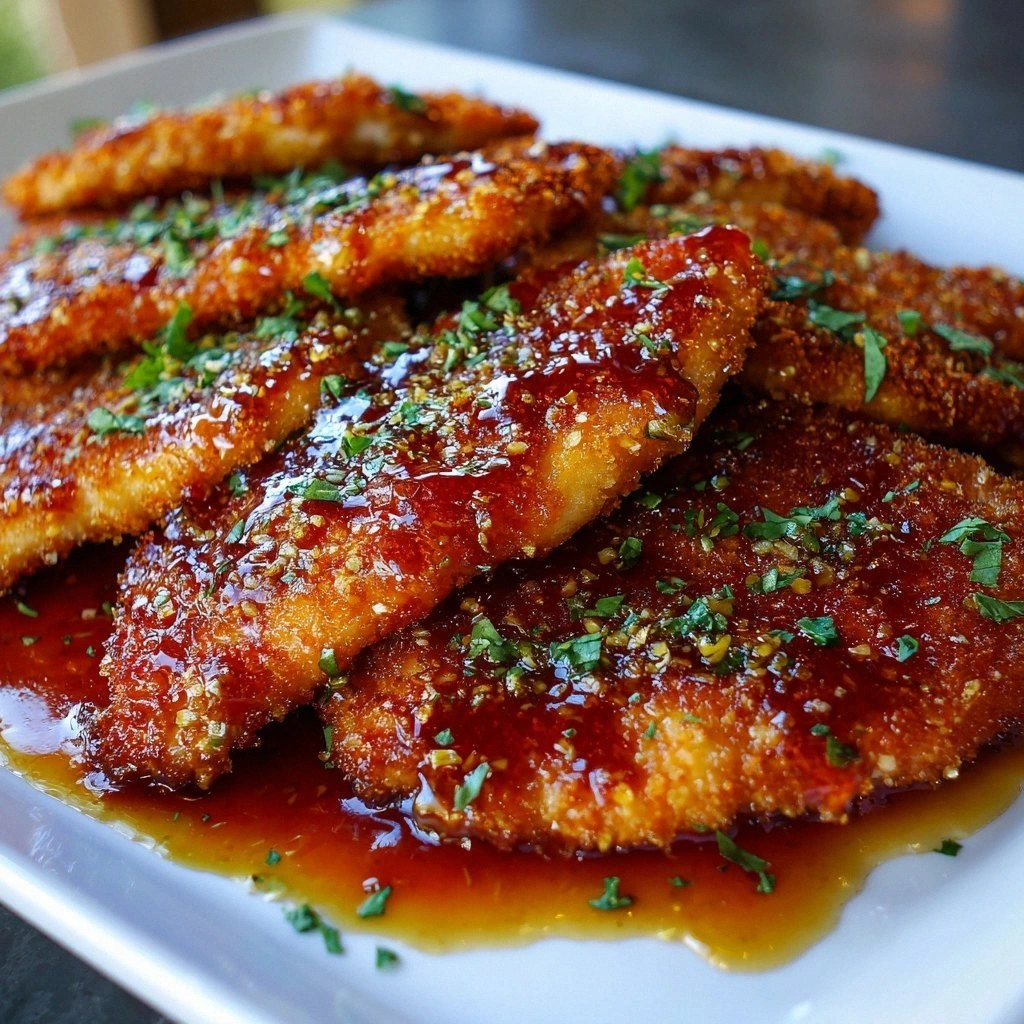
The first bite was a symphony of textures: the golden crust crackled like a thin ice sheet, the tender meat inside released a burst of juicy sweetness, and the honey‑hot sauce clung to every nook like velvet. The aroma hit the air instantly—sweet honey, smoky paprika, and a hint of apple cider vinegar that made my mouth water. I could almost hear the sizzle in the skillet as the oil kissed the coating, sending a warm, comforting hiss that promised flavor. That instant sensory overload was the spark that turned a boring dinner into a daring experiment.
I dare you to taste this and not go back for seconds. Most recipes get this completely wrong by over‑browning the coating or under‑seasoning the sauce. The secret lies in that simple yet powerful combination of hot honey and panko, which together create a glaze that’s sticky, sweet, and blisteringly hot. I’ll be honest— I ate half the batch before anyone else got to try it. The second plate was a revelation, and the third was a confession that I was about to become a hot honey addict.
This version stands out because it’s hands down the best iteration I’ve ever made at home, and it’s so easy you’ll wonder why you didn’t try it sooner. Picture yourself pulling this out of the pan, the whole kitchen smelling incredible, and your guests reaching for their phones to capture the golden crust. The sauce isn’t just a glaze; it’s a bold statement that balances sweet, spicy, and tangy notes into one unforgettable bite. Okay, ready for the game‑changer? Let me walk you through every single step—by the end, you’ll wonder how you ever made it any other way.
What Makes This Version Stand Out
- Flavor: The honey and hot sauce create a sweet‑spicy glaze that coats the chicken like a silky coat of armor, turning every bite into a flavor explosion.
- Texture: Panko breadcrumbs give a light, airy crunch that shatters like thin ice, while the flour and egg binder lock in moisture.
- Visual Appeal: The golden crust glistens under a thin sheen of honey, making the dish as Instagram‑worthy as it is delicious.
- Time Efficiency: Prep in 15 minutes, cook in 30—no more than 45 minutes total, perfect for busy weeknights.
- Versatility: Works as a hearty dinner or an impressive appetizer, and it scales easily for parties.
- Ingredient Quality: Uses fresh, high‑quality chicken and real honey, ensuring that every element shines.
- Make‑ahead Potential: The sauce can be prepared in advance, and the cutlets can be re‑fired to maintain crispness.
- Heat Control: The hot sauce can be dialed up or down, giving you the flexibility to cater to all heat levels.
Alright, let’s break down exactly what goes into this masterpiece…
Inside the Ingredient List
The Flavor Base
The chicken is the heart of this dish, and I’m using boneless, skinless breasts for their clean, lean profile. Pounding them to an even thickness ensures they cook uniformly, preventing the dreaded over‑cooked edges and under‑cooked center. If you skip this step, you’ll end up with a lumpy, uneven bite that feels like a culinary misstep. A good tip is to place the breasts between two sheets of parchment and gently flatten with a mallet or rolling pin.
The Texture Crew
All‑purpose flour creates a barrier that locks in moisture, while beaten eggs act as a binder that helps breadcrumbs cling to the chicken. Panko breadcrumbs are the star of the texture crew; their airy, crisp nature delivers that satisfying crunch that shatters like thin ice. If you can’t find panko, regular breadcrumbs will still work, but you’ll miss that extra lightness. A quick swap: use crushed crackers for a different crunch profile.
The Unexpected Star
Honey is the sweet glue that gives this dish its signature glaze. It’s sticky, thick, and adds a subtle floral note that balances the heat. Hot sauce is the heat engine—choose your favorite brand, but a moderate amount is enough to give the dish a fiery kick without overwhelming the honey. Apple cider vinegar cuts through the sweetness, adding a bright, tangy bite that keeps the sauce from becoming cloying. If you’re a vinegar aficionado, try a splash of balsamic for a deeper flavor twist.
The Final Flourish
Seasoning is the secret sauce that ties everything together. Garlic powder, onion powder, paprika, salt, and pepper are blended to create a flavor profile that sings in every bite. Skipping the seasoning is a recipe faux pas—your chicken will taste flat and uninspired. For a subtle twist, add a pinch of cayenne or smoked paprika to deepen the heat and aroma. A buying tip: look for fresh‑ground spices; they’ll elevate the dish beyond the ordinary.
Everything's prepped? Good. Let's get into the real action…
The Method — Step by Step
- Step 1: Prep the Chicken—Start by laying the chicken breasts on a cutting board and patting them dry with paper towels. Using a meat mallet or the flat side of a skillet, pound each breast to an even thickness of about 1/2 inch. Season both sides generously with salt, pepper, garlic powder, onion powder, and paprika. This seasoning will permeate the meat during the cooking process, ensuring every bite is flavorful. I dare you to taste a seasoned piece before you coat it—trust me, the flavor is already dancing on your tongue.
- Step 2: Set Up the Breading Station—Place the flour in one shallow dish, beaten eggs in a second, and panko breadcrumbs in a third. This tri‑layer station is the foundation of that perfect crust. If you’re in a hurry, you can combine the flour and breadcrumbs, but the separate layers give you better control over the coating. Remember: the flour creates a barrier, the egg bonds the crumbs, and the panko delivers crunch. Here’s a kitchen hack: add a pinch of paprika to the breadcrumbs for an extra pop of color and flavor.
- Step 3: Coat the Cutlets—First, dredge each breast in flour, tapping off excess. Then dip it into the beaten eggs, letting any excess drip back into the bowl. Finally, roll the chicken in panko, pressing lightly to ensure the crumbs cling. The coating should be even and thick enough to hold together during frying. If you’re a pro, you can double‑coat for an even crunchier result. Watch out: too much flour can make the coating dry—keep it light.
- Step 4: Heat the Oil—Fill a large skillet with about 1/4 inch of neutral oil (vegetable or canola). Heat the oil over medium‑high until it shimmers and a drop of water sizzles to a tiny pop. You should hear a gentle hiss when the first cutlet hits the pan. Keep the temperature steady; if the oil is too hot, the coating will burn before the chicken cooks through. If it’s too cool, the coating will soak up oil and become greasy. This is the moment of truth—stay close to the stove.
- Step 5: Fry Until Golden—Place the coated chicken in the hot oil, ensuring the pieces are not touching. Cook for 3–4 minutes on each side, or until a deep golden brown crust forms and the internal temperature reaches 165°F (74°C). Flip only once to preserve the crunch. The sizzle you hear is the sound of a crispy masterpiece forming. Keep an eye on the oil; if it starts smoking, reduce the heat. This step is critical—don’t walk away from the stove here.
- Step 6: Make the Hot Honey Sauce—While the chicken is frying, combine honey, hot sauce, apple cider vinegar, a pinch of salt, and a splash of water in a small saucepan. Warm over medium heat, stirring constantly, until the mixture thickens slightly and the flavors meld. The sauce should be glossy and pourable, not too thick. If you prefer a sweeter glaze, add a teaspoon of honey; for more heat, stir in an extra splash of hot sauce. This sauce is the final touch that elevates the dish to legendary status. Here’s a hack: keep the sauce warm in a small pot on low heat so it stays silky when you toss the chicken.
- Step 7: Toss in the Glaze—Remove the chicken from the skillet and let it drain on a rack or paper towels. Immediately pour the hot honey sauce over the cutlets, tossing gently to coat each piece evenly. The sauce will cling to the crispy coating, forming a sticky, caramelized glaze that’s almost impossible to resist. Let the chicken rest for a minute so the glaze sets; this prevents it from sliding off when you plate. The aroma at this point is irresistible—sweet, spicy, and utterly mouthwatering.
- Step 8: Plate and Serve—Arrange the glazed cutlets on a warm platter, drizzle a little extra sauce over the top, and sprinkle fresh parsley or chives for a pop of color. Serve immediately with a side of roasted vegetables, a fresh salad, or a simple rice pilaf. If you’re hosting, consider plating a few on a charred slate for dramatic effect. The final presentation should look as good as it tastes—golden, glossy, and ready to devour. That’s it—you did it. But hold on, I’ve got a few more tricks that’ll take this to another level…
Insider Tricks for Flawless Results
The Temperature Rule Nobody Follows
Many cooks lower the heat after the first batch, thinking they’re preventing over‑browning. In reality, a steady medium‑high heat keeps the coating crisp while ensuring the chicken cooks evenly. Test the oil with a small breadcrumb; if it sizzles immediately, the oil is ready. If it drips and sputters, dial back a notch. Consistency is key—your cutlets will be golden, not greasy.
Why Your Nose Knows Best
When the coating starts to turn a deep amber, you’ll notice a sweet, caramelized scent. That’s the cue to flip. If you wait until the crust darkens further, you risk a burnt exterior that masks the tender interior. Trust your senses: aroma, color, and the sound of the sizzle all tell you when to turn. This trick saves you from overcooked chicken and under‑seasoned sauce.
The 5‑Minute Rest That Changes Everything
After frying, let the chicken rest on a rack for 5 minutes before glazing. This allows the juices to redistribute and the coating to firm up, preventing the glaze from sliding off. During this brief pause, the sauce thickens slightly, creating a more cohesive glaze. A quick rest also makes the chicken easier to handle and less likely to fall apart. Don’t skip this step; it’s the difference between a mess and a masterpiece.
Use a Splatter Guard
Oil can leap when the cutlets hit the pan, and splatter can ruin a clean kitchen. A splatter guard or a wide lid keeps the mess contained, allowing you to focus on cooking rather than cleanup. It also reduces the risk of hot oil burns. I’ve used this trick at every dinner party—no more sticky floors or burnt fingers.
Add a Dash of Citrus Zest
A sprinkle of lemon or lime zest in the sauce brightens the flavor profile and adds a subtle freshness that cuts through the richness. This is especially effective if you’re serving the dish with a creamy side. Just a teaspoon of zest is enough to lift the entire plate. I love using lime zest for a tropical twist.
Creative Twists and Variations
This recipe is a playground. Here are some of my favorite ways to switch things up:
Spicy Cajun Kick
Swap the paprika and garlic powder for a Cajun seasoning blend, and double the hot sauce. The result is a bold, smoky heat that pairs wonderfully with a creamy remoulade. Your guests will swear they’re in the South, even if they’re in your living room.
Maple Bourbon Glaze
Replace half the honey with maple syrup and add a splash of bourbon to the sauce. The caramel notes from the maple complement the bourbon’s vanilla undertones, creating a dessert‑like glaze that’s surprisingly savory. Serve it over a bed of mashed sweet potatoes for a comforting twist.
Herb‑Infused Crunch
Add fresh thyme or rosemary to the breadcrumb coating for an aromatic lift. The herbs infuse the coating as it fries, giving each bite a fragrant, herbaceous note that pairs well with a simple green salad.
Coconut‑Crusted Delight
Swap panko for shredded coconut and add a pinch of curry powder to the coating. The coconut gives a tropical sweetness, while the curry adds warmth. Pair with a coconut‑rice pilaf for a beach‑in‑your‑kitchen vibe.
Mediterranean Twist
Use a mixture of feta and sun‑dried tomato in the breadcrumb coating, and replace the hot sauce with a drizzle of olive oil and lemon zest. The salty, tangy flavors echo a Mediterranean feast, and the honey glaze adds a sweet counterpoint.
Storing and Bringing It Back to Life
Fridge Storage
Store cooked cutlets in an airtight container in the refrigerator for up to 3 days. Keep the sauce in a separate small jar to preserve its consistency. When ready to eat, reheat in a skillet over medium heat until warmed through. The coating will regain its crispness, especially if you add a splash of water to the pan to create steam.
Freezer Friendly
Freeze the cutlets in a single layer on a parchment‑lined tray, then transfer to a freezer bag. They’ll keep for up to 2 months. When reheating, thaw in the refrigerator overnight, then re‑fry for 2–3 minutes on each side. The sauce can be reheated in a small saucepan over low heat, then tossed with the chicken.
Best Reheating Method
The secret to reheated chicken is to keep it moist but not soggy. Add a splash of water or broth to the pan, cover, and heat until steaming. Then remove the lid and finish on high heat to crisp the coating. If you’re short on time, microwave for 30 seconds, then finish in a hot skillet for a minute to restore crunch.