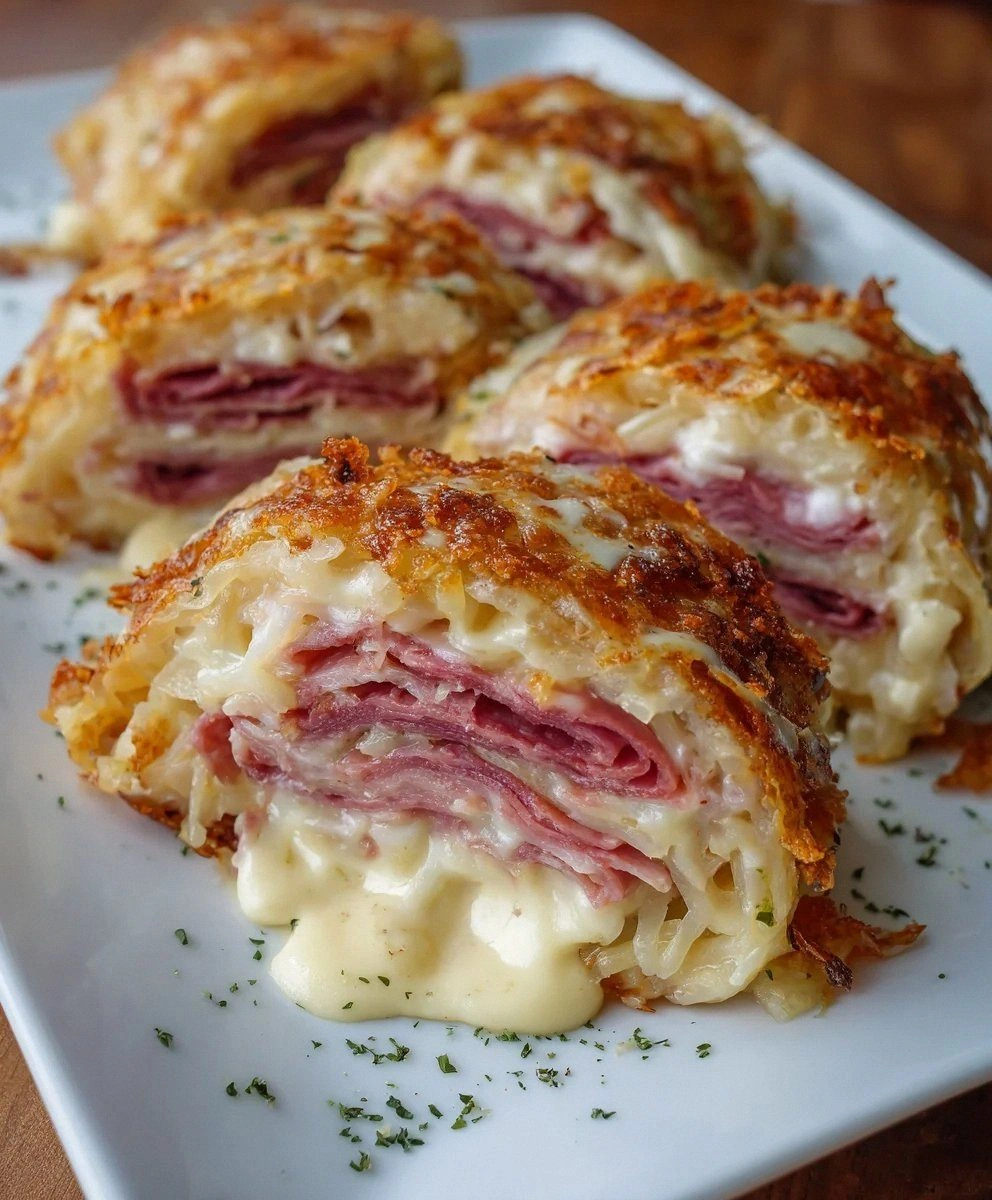
I burned my tongue three times testing this recipe, and honestly? I regret nothing. The first time I attempted these Keto Crispy Reuben Roll-Ups, I was chasing a craving that hit like a freight train at 2 AM — that perfect marriage of melty Swiss, tangy sauerkraut, and salty corned beef, but without the carb-bomb of traditional rye bread. What started as a desperate midnight snack turned into the kind of kitchen alchemy that makes you question every other "low-carb" recipe you've ever tried. Picture this: cheese that transforms into a shatteringly crisp shell, cradling ribbons of warm corned beef and sauerkraut that taste like they were kissed by a thousand Russian dressing angels. That first bite? Pure lightning. The edges crackled like thin ice underfoot, releasing a puff of steam scented with horseradish and paprika that made my neighbor's cat start yowling at my kitchen window.
Most keto recipes taste like sad substitutions — cardboard impersonators of real food that leave you chewing longer than a cow with cud. But these roll-ups? They don't just mimic the classic Reuben experience, they become something better. The Swiss cheese doesn't just melt; it metamorphoses into a golden lace that's simultaneously delicate and indestructible. When you roll that first cylinder of beef and kraut inside its cheesy cocoon, you're not just assembling ingredients — you're conducting a symphony where every note hits perfectly. The sauerkraut retains its crunch despite the heat, the corned beef develops these caramelized edges that taste like they spent hours in a smoker, and the dressing? Oh, the dressing becomes this velvety ribbon that ties everything together like the world's most delicious present.
I've served these at game nights where die-hard carb lovers demolished the entire platter while arguing over who got the last one. I've packed them for beach picnics where they stayed crisp despite humid ocean air. I've even made a batch for my mother-in-law who claims to hate sauerkraut — she asked for the recipe twice. The magic isn't just in the ingredients list (though we'll get to that genius combination in a moment); it's in the technique that transforms humble components into something that makes grown adults close their eyes and sigh when they bite in.
Stay with me here — this is worth it. Because what I'm about to show you isn't just another keto recipe to add to your Pinterest board. This is the recipe that'll make your non-keto friends beg for invitations, the one you'll memorize because you make it so often, the one that'll ruin restaurant Reubens for you forever. Let me walk you through every single step — by the end, you'll wonder how you ever made it any other way.
What Makes This Version Stand Out
Cheese Armor: Instead of limp lettuce wraps or fragile low-carb tortillas, we're building a crispy shell from melted Swiss that holds its shape like a champ. This isn't just melted cheese — it's transformed into a structural element that crackles when you bite it but flexes enough to roll without breaking.
Flavor Bomb Dressing: Most keto dressings taste like diet food sadness. Our version uses sugar-free ketchup with a touch of Swerve to recreate that sweet-tangy Russian dressing that makes a Reuben sing. The Worcestershire adds depth that makes people ask "what's your secret?"
Texture Heaven: Every bite delivers three distinct textures — the shattering cheese shell, the tender beef, and the kraut that somehow stays crunchy even after cooking. It's like eating a crispy taco, a deli sandwich, and a grilled cheese had a beautiful baby.
Zero Carb Creep: Many keto recipes sneak in carbs through "healthy" additions. Not here. Every ingredient is chosen for maximum flavor with minimum carbs. Even the paprika is strategic — adding visual appeal and subtle smokiness without any hidden sugars.
Crowd Control: These disappear faster than chips at a Super Bowl party. I've watched people who "don't do keto" hover by the platter like vultures. The individual portions mean no awkward cutting or sharing — everyone gets their own perfect roll-up.
Make-Ahead Magic: Prep the components separately and assemble in minutes. The cheese shells can be made ahead and stay crispy for hours. Game day just got a whole lot easier, and your future self will thank you when you're not stuck in the kitchen while everyone's watching the game.
Alright, let's break down exactly what goes into this masterpiece...
Inside the Ingredient List
The Flavor Base
Shredded Swiss cheese isn't just here for tradition — it's the architectural backbone of this entire operation. When you spread it thin and let it melt, the proteins reorganize into a lacy network that becomes our edible wrapper. Skip the pre-shredded stuff though; those anti-caking agents prevent the smooth melting we need. Buy a block and shred it yourself, or better yet, have your deli slice it paper-thin. The difference between good Swiss and great Swiss here is like the difference between a flashlight and a lighthouse — both provide light, but only one guides ships home.
Sliced corned beef brings the soul of the Reuben to our party, but not all corned beef is created equal. Look for slices that are cut against the grain — they'll be more tender and less likely to fight back when you bite. If your deli has house-made corned beef, splurge. The difference between commercial and artisanal here is like comparing a hotel painting to a masterpiece. Thicker slices work better than paper-thin; they provide substance and don't disappear into the roll.
The Texture Crew
Sauerkraut is where most recipes go wrong — they either drown the dish in brine or use the canned stuff that tastes like punishment. Fresh sauerkraut from the refrigerated section has life and crunch. Drain it well, but don't rinse; you want that tangy punch. Press it between paper towels to remove excess moisture because nobody likes soggy roll-ups. The fermentation brings probiotics and a complexity that makes your taste buds do a happy dance.
The Unexpected Star
Mayonnaise forms the creamy backbone of our dressing, but here's the twist — use the real stuff, not low-fat. Fat equals flavor, and since we're keeping carbs low, we need all the flavor ammunition we can get. The emulsion helps bind our dressing while adding richness that makes the final result taste indulgent rather than diet-deprived.
The Final Flourish
Worcestershire sauce is the umami bomb that makes people ask "what's in this?" It's got anchovies, tamarind, garlic, and about a dozen other ingredients that add impossible depth. Just a splash transforms our dressing from simple to sophisticated. Sugar-free ketchup provides that familiar sweetness without the carb load — look for brands sweetened with allulose or monk fruit for the cleanest flavor. Swerve confectioners dissolves instantly and gives that traditional Russian dressing sweetness without the blood sugar spike.
Prepared horseradish sauce brings the heat, but not the kind that burns your tongue. It's a clean, bright heat that clears your sinuses and makes the other flavors pop. Start with less and add more — you can always turn up the volume, but you can't turn it down. That final pinch of paprika isn't just for color; it adds a subtle warmth and rounds out all the flavors like the period at the end of a perfect sentence.
Everything's prepped? Good. Let's get into the real action...
The Method — Step by Step
- Start with a cold non-stick skillet — this is crucial. Cold pan, cold heart, perfect start. Sprinkle your shredded Swiss in a thin, even layer about 6 inches across. Think lace, not blanket. The cheese should look like a delicate snow flurry settled on your pan, with tiny gaps where you can see the silver underneath. This isn't the time for heavy-handed cheese dumps — restraint here means crispy perfection later.
- Turn the heat to medium-low and walk away for exactly 4 minutes. Don't poke, don't prod, don't even look at it sideways. This is when the magic happens — the fat renders out, the proteins reorganize, and your kitchen starts smelling like a Swiss chalet. You'll hear a gentle sizzling that sounds like applause from a very small audience. When the edges turn golden brown and the center looks like stained glass, you're ready for the next move.
- Slide a thin spatula under your cheese disc and flip it like you're handling a butterfly wing. It should move as one piece, no tearing or stretching. Cook for just 30 seconds on the second side — we're not trying to brown both sides, just setting the shape. Transfer to a paper towel-lined plate and repeat until you have 8 shells. They'll look like golden doilies and feel like you're holding sunshine.
- Now for the assembly line symphony. Lay your cheese shell flat and add 2 slices of corned beef, overlapping slightly. The meat should cover the center third — too much and it'll burst like an overexcited burrito. Add a tablespoon of well-drained sauerkraut in a line down the center. Channel your inner sushi chef here — neat and tidy wins the race.
- Whisk together your dressing: 2 tablespoons mayo, 1 teaspoon Worcestershire, 1 tablespoon sugar-free ketchup, 1 teaspoon Swerve, 1 teaspoon horseradish sauce, and that crucial pinch of paprika. The color should remind you of sunset on a tropical beach. Taste and adjust — it should make your tongue dance with tangy-sweet-spicy flavors that complement rather than compete.
- Drizzle exactly 1 teaspoon of dressing over each roll-up. I know you want to add more — resist. The dressing is there to enhance, not drown. Think of it as perfume, not marinade. Too much and your roll-up becomes a slippery mess that refuses to cooperate. Trust the process here; restraint equals results.
- Roll them up like you're swaddling the world's most delicious baby. Start from the bottom and roll tightly, but not so tight that the filling squeezes out. The cheese shell will crack slightly — this is good! Those cracks become crispy edges that shatter beautifully when you bite in. Place seam-side down on your serving platter.
- The final flourish: heat a clean skillet over medium-high heat. Add your roll-ups seam-side down for 90 seconds. This seals the deal — literally. The seam fuses, the exterior gets extra crispy, and you develop those gorgeous golden spots that make people think you're a culinary wizard. Serve immediately while the cheese is still singing.
That's it — you did it. But hold on, I've got a few more tricks that'll take this to another level...
Insider Tricks for Flawless Results
The Temperature Rule Nobody Follows
Here's what separates the pros from the pretenders: cheese temperature matters more than you think. Cold cheese straight from the fridge won't melt evenly — it seizes and creates bald spots in your shells. Let your Swiss sit on the counter for 20 minutes before you start. Room temperature cheese melts like a dream, creating that perfect lacy pattern that looks like it belongs in a museum. But don't let it get warm — warm cheese gets greasy and won't hold its shape. It's like Goldilocks: not too cold, not too hot, just right.
Why Your Nose Knows Best
That moment when the cheese hits the pan? Stick around and sniff. Seriously. Your nose is the most underutilized tool in your kitchen. When the cheese starts releasing its nutty aroma — somewhere between toasted bread and caramel — that's your cue to peek underneath. Too early and it's pale and flabby. Too late and it tastes like burnt milk. This isn't culinary poetry; it's science. The Maillard reaction creates hundreds of flavor compounds that your tongue can't identify but your brain recognizes as "delicious."
The 5-Minute Rest That Changes Everything
I know you're hungry. We're all hungry. But patience here pays dividends like you wouldn't believe. After you form your roll-ups, let them rest for 5 minutes before the final sear. This allows the cheese to set slightly, creating a stronger structure that won't collapse under its own delicious weight. It's like letting a steak rest — the difference between good and legendary. During this time, the flavors meld, the temperature evens out, and you get that perfect bite where everything stays together instead of exploding across your shirt.
The Double-Crisp Technique
Want to blow minds? After your roll-ups are assembled, brush them lightly with melted butter before the final sear. The milk solids in the butter brown beautifully, creating an extra layer of flavor and an even more dramatic crunch. It's like the difference between regular and movie theater popcorn — both good, but one makes you feel like you're treating yourself to something special.
Storage That Actually Works
Here's the thing about crispy cheese — it wants to stay crispy, but humidity is its enemy. If you must store leftovers (though I've never seen it happen), use a paper towel-lined container with the lid slightly ajar. The paper towel absorbs moisture while the open lid prevents condensation. Reheat in a dry skillet for 2 minutes, never the microwave. The microwave turns your crispy dreams into rubbery nightmares faster than you can say "keto regret."
Creative Twists and Variations
This recipe is a playground. Here are some of my favorite ways to switch things up:
The Turkey Club Remix
Swap corned beef for thick-sliced turkey and add a strip of crispy bacon inside each roll-up. The smoky bacon plays beautifully with the Swiss, and the turkey makes it feel like a whole new creation. Add a smear of avocado to the dressing for extra richness that keeps it keto-friendly while adding that California club vibe.
The Breakfast Burrito Reinvented
Replace corned beef with breakfast sausage crumbles and add a strip of scrambled egg. The cheese shell becomes your tortilla, creating the ultimate handheld breakfast. Dip it in sugar-free maple syrup mixed with a touch of hot sauce for that sweet-heat combo that makes mornings worth waking up for.
The Italian Job
Use provolone instead of Swiss, swap corned beef for thin-sliced prosciutto, and replace sauerkraut with arugula. The dressing becomes a blend of mayo, pesto, and a touch of balsamic. It's like Italy and Germany had a delicious baby that grew up to be sophisticated and slightly bitter in the best way.
The Buffalo Blue Bomb
Keep the Swiss but add crumbled blue cheese to the dressing. Use shredded chicken tossed in buffalo sauce instead of corned beef. The kraut stays because that tangy crunch is the perfect foil for spicy chicken. Serve with celery sticks and ranch for the full buffalo wing experience without the mess.
The Veggie Lover's Dream
Replace meat with grilled portobello strips and add roasted red peppers. The umami from the mushrooms satisfies that savory craving while keeping it vegetarian. Add some everything bagel seasoning to the cheese shell for extra flavor that makes up for the missing meat.
The Breakfast-for-Dinner Special
Use smoked salmon instead of corned beef, add capers and thin cucumber strips. The dressing becomes a blend of mayo, dill, and lemon zest. It's like your favorite bagel combination but without the carb coma. The cheese shell provides that missing bagel element while keeping everything together.
Storing and Bringing It Back to Life
Fridge Storage
Store assembled roll-ups in a single layer in an airtight container with parchment paper between layers. They'll keep for up to 3 days, though the cheese shell will soften slightly. Place a paper towel on top to absorb excess moisture, and don't seal the container completely — a tiny gap prevents condensation that'll ruin your crispy dreams.
Freezer Friendly
Freeze individual roll-ups on a parchment-lined baking sheet until solid, then transfer to freezer bags with parchment between layers. They'll keep for 2 months. Thaw overnight in the refrigerator, then reheat in a dry skillet over medium heat for 3-4 minutes, turning once. The cheese shell won't be quite as crispy as fresh, but it's still miles better than any other keto option.
Best Reheating Method
Skip the microwave entirely — it's a crime against crispy things. Instead, heat a dry skillet over medium heat and add your roll-ups for 2-3 minutes per side. For extra revival, add a tiny splash of water to the pan and cover for 30 seconds — the steam rehydrates the interior while the dry heat restores the shell's crunch. It's like giving your leftovers a spa day.