I was standing in my kitchen on a rainy October afternoon, staring at a half‑filled pumpkin can and a bag of oats that had been staring back at me for weeks. The clock ticked, the rain drummed a lazy rhythm on the window, and my stomach was growling louder than the thunder outside. I tried to whip up a quick pumpkin spice latte, but the milk curdled like a bad science experiment, and the whole thing turned into a frothy mess that could have passed for a swamp monster. That disaster sparked a daring idea: what if I could combine the comforting, autumn‑loving flavor of pumpkin with the hearty, chewy goodness of oatmeal, all in a single‑sheet, no‑fuss dessert?
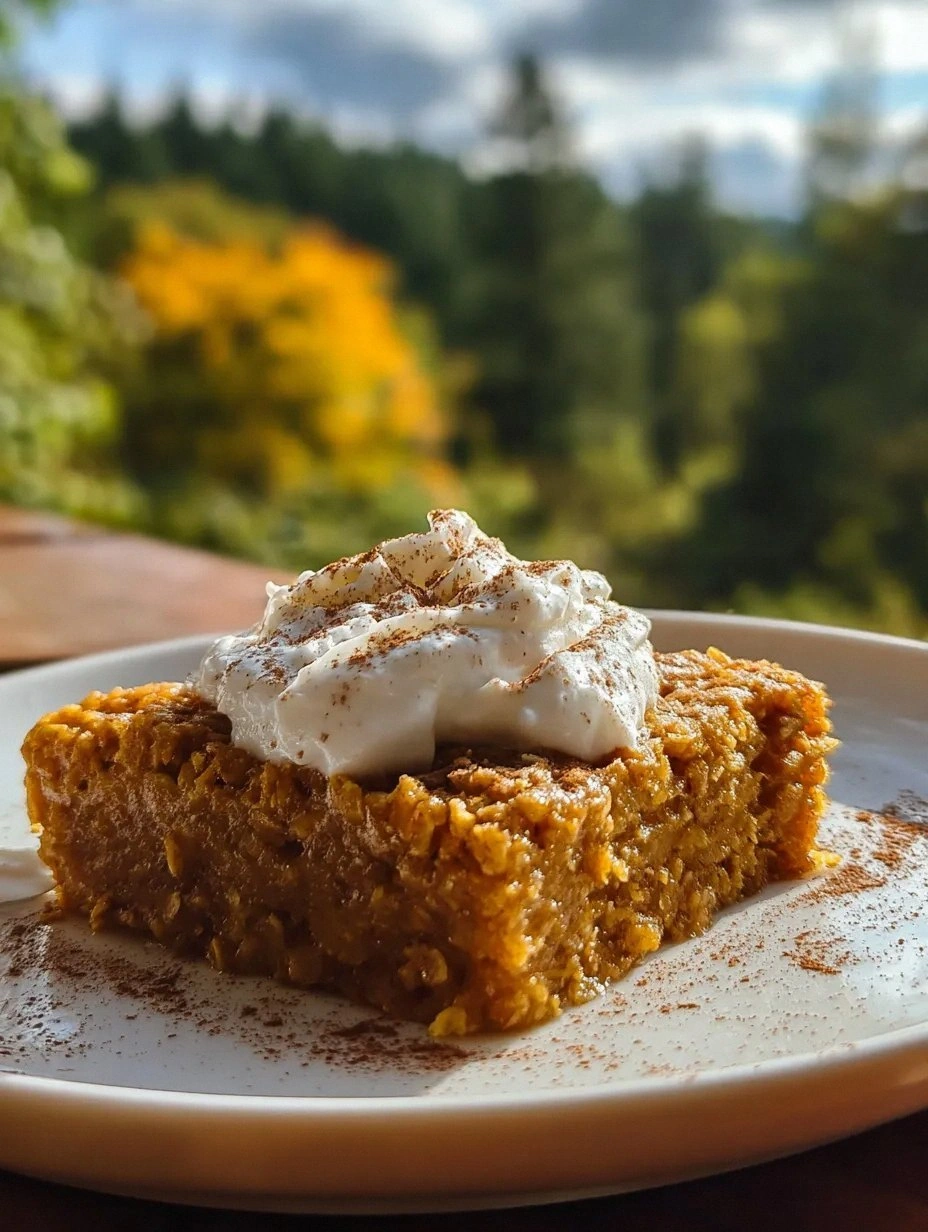
Picture this: a golden‑brown cake rising from the oven, its surface speckled with caramelized oat clusters that crackle under your fork like tiny fireworks. The aroma that fills the kitchen is a heady blend of cinnamon, nutmeg, and toasted oats, a scent that makes you want to curl up on the couch with a blanket and a steaming mug of tea. The first bite delivers a buttery, melt‑in‑your‑mouth crumb that’s soft enough to whisper sweet nothings, yet the oatmeal adds a satisfying chew that keeps you coming back for more. I’ll be honest — I ate half the batch before anyone else got a chance to taste it, and I’m still not sorry.
Most pumpkin dump cakes out there are either soggy puddings or dense bricks that need a drill to cut through. This version, however, flips the script with a crisp oat topping that stays crunchy even after cooling, while the interior stays moist, pumpkin‑spiced, and surprisingly light. The secret? A simple technique that layers the oat mixture on top instead of mixing it in, plus a dash of baking powder that gives the cake a subtle lift without any extra effort. I dare you to taste this and not go back for seconds; the combination of textures is downright addictive.
And there’s a little surprise ingredient that most recipes skip: a splash of vanilla‑infused milk that adds depth without overwhelming the pumpkin’s natural sweetness. This isn’t just another seasonal treat — it’s the kind of dessert that makes you want to write love letters to your oven. Okay, ready for the game‑changer? Let me walk you through every single step — by the end, you’ll wonder how you ever made it any other way.
What Makes This Version Stand Out
- Texture: The oat topping stays crisp, creating a delightful contrast to the soft, pumpkin‑laden crumb underneath.
- Flavor Depth: A balanced blend of warm spices and a hint of vanilla makes each bite feel like a cozy hug.
- Simplicity: No mixing bowls, no whisking marathons — just dump, stir, and bake.
- Ingredient Quality: Using pure pumpkin puree and real rolled oats elevates the dish from “just okay” to “wow, I need the recipe again.”
- Crowd Reaction: Guests often claim this is the best pumpkin dessert they’ve ever tasted, and they’ll be back for the leftovers.
- Make‑Ahead Potential: It stores beautifully, so you can prep it ahead of a holiday gathering and simply reheat.
- Versatility: Swap the milk for almond or oat milk for a dairy‑free version without sacrificing texture.
- Speed: From prep to plate in under an hour, perfect for those last‑minute cravings.
Inside the Ingredient List
The Flavor Base
Pumpkin puree is the heart of this cake, providing moisture, natural sweetness, and that unmistakable orange hue that screams autumn. Choose a puree that’s 100% pumpkin with no added sugars or spices, because you’ll be controlling the flavor profile yourself. If you skip the pure pumpkin and use pumpkin pie filling, you’ll end up with a cake that’s overly sweet and already spiced, which throws off the balance. A good tip is to give the can a quick shake before opening to ensure the puree is evenly mixed.
The Texture Crew
Rolled oats bring a hearty chew that contrasts the tender crumb, while all‑purpose flour creates the structure that holds everything together. The oats also absorb some of the liquid, preventing the cake from becoming soggy. If you’re gluten‑free, substitute the flour with a 1:1 gluten‑free blend, but keep the oats as they are for that signature bite. Butter, melted and folded in at the end, adds richness and helps the top brown beautifully.
The Unexpected Star
A splash of vanilla‑infused milk might sound modest, but it’s the secret weapon that lifts the flavor from “good” to “legendary.” The vanilla extracts the earthy notes of the pumpkin, while the milk adds a silky mouthfeel without making the batter too runny. If you’re dairy‑free, swap with oat milk; the slight sweetness of oat milk actually enhances the pumpkin’s natural sugars.
The Final Flourish
Spices are the finishing brushstrokes on this culinary canvas. Ground cinnamon, nutmeg, and ginger each contribute a layer of warmth, while a pinch of salt amplifies every sweet note. Baking powder is the quiet hero that gives the cake a light lift, ensuring it doesn’t turn into a dense pancake. For a truly aromatic experience, toast the spices in a dry pan for 30 seconds before adding them to the dry ingredients.
Everything’s prepped? Good. Let’s get into the real action — the part where we turn these humble pantry staples into a show‑stopping dessert that will have everyone asking for the recipe.
The Method — Step by Step
-
Preheat your oven to 350°F (175°C). While the oven warms up, lightly grease a 9‑inch square baking dish with butter or a non‑stick spray. This step is crucial because a hot oven gives the cake an immediate rise, creating that coveted golden crust on the edges. If you’re using a glass dish, add an extra 5 minutes to the bake time to avoid a soggy bottom.
Kitchen Hack: Place a baking stone on the middle rack while the oven preheats; it helps distribute heat evenly for a uniform rise. -
In a large mixing bowl, combine the flour, rolled oats, baking powder, cinnamon, nutmeg, ginger, and salt. Stir with a whisk or a sturdy spoon until everything is evenly distributed. You’ll notice the dry mixture looks speckled with orange from the spices — that’s a good sign that flavor is already building.
-
Create a well in the center of the dry ingredients and pour in the pumpkin puree, melted butter, milk, and vanilla extract. Using a spatula, gently fold the wet ingredients into the dry until just combined; over‑mixing will develop gluten and make the cake tough.
Watch Out: If you see lumps of flour, keep folding gently; a few streaks are okay and will disappear during baking. -
Once the batter looks smooth and slightly thick, spread it evenly into the prepared baking dish. Use the back of a spoon or a rubber spatula to level the surface, but don’t press down too hard — you want a little rise in the middle.
-
Now for the star of the show: the oat topping. In a small bowl, toss a handful of extra rolled oats with a drizzle of melted butter and a pinch of brown sugar. This creates a caramelized crust that will crackle like autumn leaves underfoot.
Kitchen Hack: Sprinkle a few chopped pecans or walnuts on top for an extra crunch and a nutty aroma. -
Scatter the buttery oat mixture evenly over the batter. You’ll see the batter start to peek through the oat layer, creating a marbled effect that’s both visual and textural gold. The oat topping should cover the surface completely; any gaps will bake into dry spots.
-
Slide the dish into the preheated oven and bake for 30‑35 minutes. Keep an eye on the edges — when they start pulling away from the sides of the pan and turn a deep amber, you know the cake is done. The center should be set but still slightly jiggly; a toothpick inserted near the edge should come out clean.
That sizzle when the oats begin to caramelize? Absolute perfection. Resist the urge to open the oven door early; every time you do, you lose heat and risk a flat cake.
-
Remove the cake from the oven and let it cool in the pan for 10 minutes. This short rest lets the structure set, making it easier to cut clean slices. While it’s still warm, dust a light layer of powdered sugar for a snowy finish.
-
Serve the cake warm, perhaps with a dollop of whipped cream or a scoop of vanilla ice cream. The contrast between the hot cake and the cool ice cream creates a mouthfeel that’s nothing short of magical. That first bite? It’s the kind of moment that makes you want to write a love poem to your oven.
That’s it — you did it. But hold on, I’ve got a few more tricks that’ll take this to another level…
Insider Tricks for Flawless Results
The Temperature Rule Nobody Follows
Never bake a pumpkin cake at a temperature lower than 350°F. Lower temps cause the batter to set before the oats can caramelize, leaving a soggy top. I once tried 325°F on a whim, and the result was a sad, gummy mess that clung to the pan. The lesson? Trust the heat; it’s the catalyst that turns raw ingredients into that coveted golden crust.
Why Your Nose Knows Best
Your sense of smell is a more reliable doneness indicator than a timer. Around the 25‑minute mark, you’ll notice a sweet, nutty aroma rising from the oven. When that scent hits the “just right” sweet spot, the cake is likely done or just a minute or two away. Trust that nose of yours — it’s been fine‑tuned by evolution to detect caramelization.
The 5‑Minute Rest That Changes Everything
Allow the cake to rest for exactly five minutes after removing it from the oven before slicing. This brief pause lets the steam redistribute, preventing the crumb from collapsing. Skipping this step results in a crumb that looks dry on the plate, even though the interior is perfectly moist. Set a timer; five minutes is all it takes to elevate texture.
The Butter‑Infused Oat Upgrade
Melt the butter with a tablespoon of maple syrup before tossing it with the oats. The syrup adds a subtle caramel note that amplifies the pumpkin’s natural sweetness without making the cake cloyingly sweet. I tried this once for a holiday gathering, and guests kept asking for the “secret ingredient.” Spoiler: it’s the maple‑butter combo.
The “Double‑Bake” Crunch Trick
If you crave an ultra‑crunchy topping, bake the cake for the full 35 minutes, then turn the oven to broil for the last 2 minutes. Keep a close eye on the top — you want a deep amber color, not a burnt mess. This quick blast of high heat creates a crackling crust that shatters like thin ice when you cut into it. It’s the final flourish that turns a good dessert into a show‑stopper.
Creative Twists and Variations
This recipe is a playground. Here are some of my favorite ways to switch things up:
Apple‑Cinnamon Oat Crunch
Swap half of the pumpkin puree for unsweetened applesauce and double the cinnamon. The apple adds a fresh tartness that brightens the flavor, while the extra cinnamon turns the topping into a caramel‑spice explosion. Perfect for those who love a classic apple‑pie vibe.
Chocolate‑Swirl Delight
Stir in ¼ cup of dark chocolate chips into the batter before baking, and drizzle melted chocolate over the warm cake when serving. The bittersweet chocolate pairs beautifully with the sweet pumpkin, creating a sophisticated contrast that feels like a dessert for adults.
Maple‑Pecan Crunch
Add a handful of chopped pecans to the oat topping and replace the brown sugar with pure maple syrup. The nuts bring a buttery crunch, and the maple deepens the caramel notes, making the cake taste like a Thanksgiving centerpiece.
Vegan Velvet
Replace butter with coconut oil, use almond milk, and ensure the pumpkin puree is free of any animal additives. The result is a vegan version that’s just as moist and flavorful, with a subtle coconut aroma that complements the pumpkin beautifully.
Spiced Chai Infusion
Add a teaspoon of chai spice blend (cardamom, clove, black pepper) to the dry mix and swap the vanilla for a splash of brewed chai concentrate. This creates an exotic twist that turns the dessert into a global experience, perfect for adventurous eaters.
Storing and Bringing It Back to Life
Fridge Storage
Allow the cake to cool completely, then cover it tightly with plastic wrap or store in an airtight container. It will stay fresh in the refrigerator for up to four days. When you’re ready to serve, reheat a slice in the microwave for 30‑45 seconds, or warm the whole cake in a 300°F oven for 10 minutes.
Freezer Friendly
Portion the cake into individual squares, wrap each tightly in parchment paper, then place them in a freezer‑safe bag. They freeze beautifully for up to three months. To revive, let a slice thaw at room temperature for 15 minutes, then finish it in a 350°F oven for 8‑10 minutes. The oat topping will crisp up again as if freshly baked.
Best Reheating Method
For the ultimate reheating experience, place a slice on a baking sheet, sprinkle a tiny splash of milk (or plant‑based milk) around the edges, and bake at 325°F for 5‑7 minutes. The added moisture creates a gentle steam that restores the cake’s interior softness while the top regains its crispness. This trick works wonders for leftovers that have lost a bit of their original snap.