Picture this: I’m standing in my kitchen, the counter cluttered with flour‑spattered flour, a half‑empty buttermilk jug, and a rolling pin that looks like it’s seen better days. The air smells of vanilla and cinnamon, but the reality is a disaster—my last attempt at pancakes ended with a rubbery, flavorless slab that could have been a crossword puzzle. I laughed, then cursed, and decided it was time for a culinary revolution. The goal? A pancake that’s fluffy, fragrant, and practically sings when you flip it.
I’ve tried every recipe I could find: the classic buttermilk stack, the banana‑oat blend, the chocolate‑chip version. Each had its charm, but none delivered that buttery, cinnamon‑kissed lift that turns a simple breakfast into a moment of pure joy. This version is a game‑changer because it uses a secret ratio of flour to buttermilk that creates a tender crumb, a dash of baking soda that gives a subtle lift, and a generous swirl of cinnamon that coats each bite like velvet. The vanilla isn’t just a flavor; it’s a bridge that ties the spice and the milk together.
And here’s the kicker: I’ll be using a buttermilk that’s been aged for 48 hours in a glass jar—no kidding. That slow fermentation introduces a mild tang that balances the sweetness and gives the pancakes a depth that you can’t find in store‑bought mixes. It’s a technique I discovered at a farmer’s market, and I’m telling you, it’s worth the extra prep. I dare you to taste this and not go back for seconds; trust me, you’ll want to stack them until the plate is empty.
So if you’re ready to ditch the ordinary and embrace a breakfast that feels like a warm hug, stick with me. Let me walk you through every single step—by the end, you’ll wonder how you ever made it any other way. This isn’t just a recipe; it’s a culinary confession, a kitchen hack, and a delicious secret all rolled into one.
What Makes This Version Stand Out
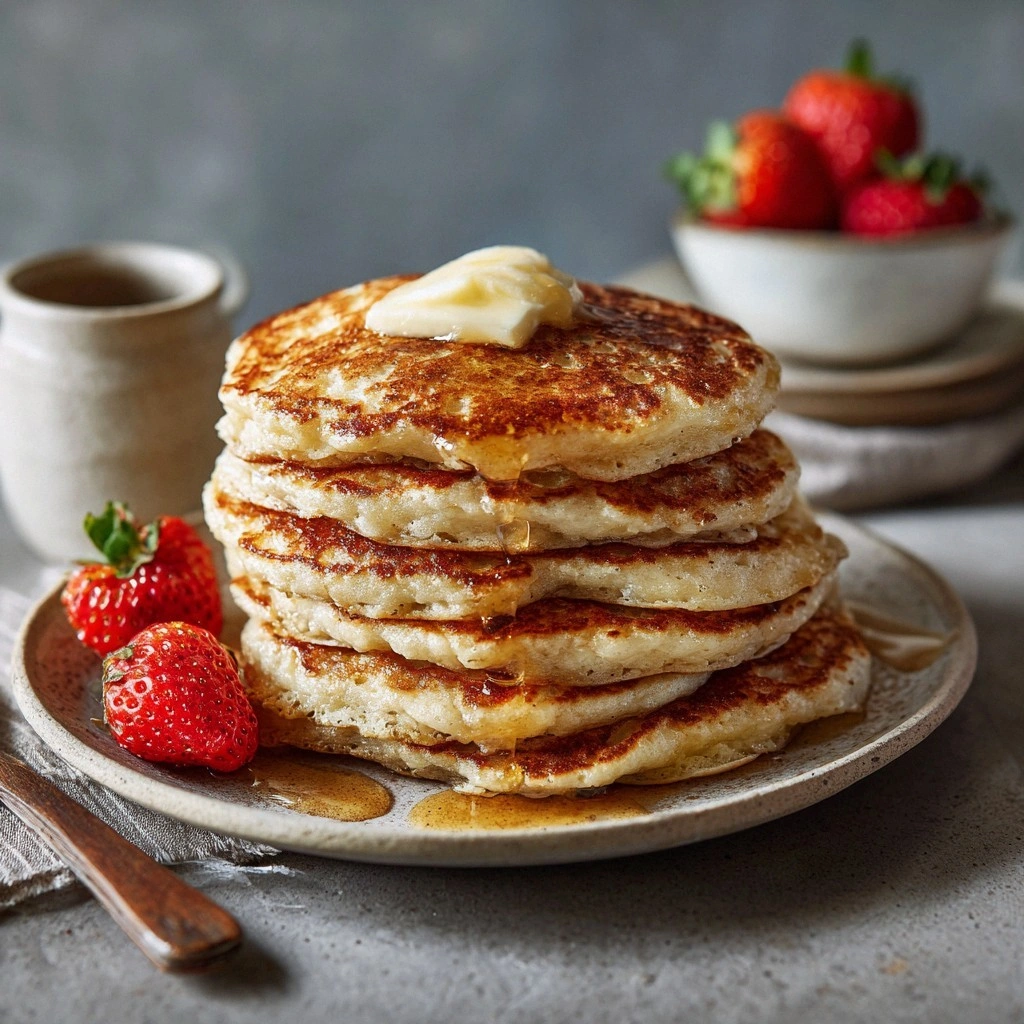
- Flavor Depth: The 48‑hour buttermilk fermentation adds a subtle tang that elevates the vanilla and cinnamon notes, creating a complex flavor profile that lingers on the palate.
- Texture Perfection: A precise balance of flour to buttermilk and the addition of baking soda gives the pancakes a light, airy interior while maintaining a crisp golden edge.
- Visual Appeal: The swirl of cinnamon on top not only looks stunning but also releases a fragrant aroma that makes the kitchen feel like a bakery.
- Ease of Prep: Despite its gourmet credentials, the recipe uses pantry staples and a single bowl for mixing, keeping prep time under 20 minutes.
- Versatility: The base can be adapted for vegan or gluten‑free diets with simple substitutions, making it a go‑to for any household.
- Crowd‑Pleaser: Friends and family rave about the fluffiness and the buttery finish; it’s a guaranteed hit at brunches or lazy Sunday mornings.
- Make‑Ahead Friendly: You can prepare the batter ahead of time and refrigerate it for up to 24 hours, which means you’re ready to flip when the alarm rings.
- Ingredient Quality: Using fresh, high‑quality vanilla extract and real cinnamon sticks (or ground) ensures that every bite is rich and authentic.
Alright, let’s break down exactly what goes into this masterpiece…
Inside the Ingredient List
The Flour Foundation
All-purpose flour is the backbone of our batter, providing structure and the necessary gluten for that tender crumb. Using 2 cups ensures a batter thick enough to hold its shape but thin enough to spread into a beautiful golden circle. If you prefer a lighter texture, swap half the flour for whole‑wheat; the flavor will deepen, and the pancakes will be a bit denser. Skipping the flour entirely will result in a runny batter that spreads into a flat, soggy mess.
The Sweet & Spice Crew
Sugar, cinnamon, and vanilla are the flavor stars. The sugar sweetens the batter just enough to balance the buttermilk’s acidity, while the cinnamon adds warmth and a fragrant aroma that permeates each bite. Vanilla extract is the glue that binds these flavors together, giving the pancakes a subtle floral undertone that enhances the spice. If you’re watching calories, reduce sugar by a third; the result will still be delightful, just slightly less sweet.
The Leavening Agents
Baking powder and baking soda work in tandem to create the lift that makes these pancakes airy. Baking powder ensures a steady rise, while baking soda reacts with the buttermilk’s acidity to produce carbon dioxide, giving the batter a light, airy rise. Omitting either will leave the pancakes dense and heavy. If you’re allergic to gluten, use a gluten‑free baking powder that contains a leavening agent like ammonium bicarbonate.
The Liquid Touch
Buttermilk is the star liquid that gives the pancakes their signature tang and tender crumb. The 48‑hour fermentation allows lactic acid bacteria to develop, which not only adds flavor but also tenderizes the batter. If you can’t find buttermilk, mix 1 cup of milk with 1 tablespoon of lemon juice or vinegar and let it sit for 5 minutes. The acidified milk will mimic the buttermilk’s properties and deliver a comparable result.
Everything's prepped? Good. Let's get into the real action…
The Method — Step by Step
- In a large bowl, whisk together the flour, sugar, baking powder, baking soda, salt, cinnamon, and vanilla extract. This dry mix is the flavor base that will carry the rest of the ingredients. Make sure there are no lumps; a smooth batter starts with a smooth mix.
- In a separate bowl, combine the buttermilk, egg, melted butter, and milk. Beat until the butter is fully incorporated and the mixture is smooth. The wet mix should feel slightly thick but pourable.
- Pour the wet ingredients into the dry mix and stir just until combined. The batter should still have a few small lumps; over‑mixing will activate too much gluten, resulting in tough pancakes. The moment you feel the batter settle into a thick, glossy consistency, you’re ready for the next step.
- Let the batter rest for 5 minutes. This brief pause allows the flour to fully hydrate and the leavening agents to start working. Think of it as giving the batter a quick nap before the big performance.
- Heat a non‑stick skillet or griddle over medium heat and lightly oil it with a paper towel soaked in melted butter. The skillet should be hot but not smoking; a drop of water should sizzle and evaporate immediately. This temperature is key for a golden crust.
- For each pancake, pour 1/4 cup of batter onto the skillet. Let it spread naturally; the edges should start to lift after 2–3 minutes. The batter should have a glossy sheen and a slight puff around the edges. This is the moment of truth—watch the color change from pale to golden.
- Flip gently with a spatula and cook for another 2 minutes until the second side is golden brown. The interior should be soft, with a light, airy rise. If you see a dark spot, lower the heat slightly; you don’t want burnt edges.
- Stack the pancakes on a plate and cover loosely with foil to keep them warm. If you’re making a large batch, keep the finished pancakes warm in a low oven (200°F) while you finish the rest.
- Serve immediately with a drizzle of maple syrup, a pat of butter, or fresh berries. The pancakes are best enjoyed hot, when the butter melts into the warm batter.
That's it — you did it. But hold on, I've got a few more tricks that'll take this to another level…
Insider Tricks for Flawless Results
The Temperature Rule Nobody Follows
Many cooks think high heat is the key to a golden crust, but it’s actually the right medium heat that gives a consistent rise and prevents burning. A quick test: sprinkle a few drops of water on the skillet; if they dance and evaporate, the heat is perfect. If they sizzle and stay, lower the heat. This rule keeps the pancakes tender inside and crisp outside.
Why Your Nose Knows Best
A well‑seasoned cook can tell when a batter is ready by scent alone. When the batter has rested, a faint buttery aroma will rise. If you’re unsure, give it a gentle stir; if the batter feels slightly thick and the smell is sweet and tangy, you’re ready to pour.
The 5‑Minute Rest That Changes Everything
Letting the batter sit for 5 minutes after mixing is often overlooked. This pause allows the flour to absorb liquid fully and the leavening agents to activate. The result is a fluffier, more uniform texture. Skipping this step can lead to uneven rise and a denser pancake.
Use a Non‑Stick Skillet for Effortless Flipping
Even a small amount of butter can make a difference. Use a silicone‑coated spatula to flip; it slides under the pancake without tearing. If you’re flipping a large batch, flip them in groups to keep the skillet from getting crowded.
Keep the Pancakes Warm with a Low Oven
If you’re serving a crowd, set your oven to 200°F (93°C) and place the finished pancakes on a wire rack. The gentle heat keeps them warm and moist without drying them out. This trick is especially useful for brunch parties or when you’re waiting for the last pancake to finish.
Creative Twists and Variations
This recipe is a playground. Here are some of my favorite ways to switch things up:
Maple‑Syrup Swirl
Add a tablespoon of pure maple syrup to the batter for a subtle sweetness that complements the cinnamon. Drizzle maple on top after cooking for an extra glossy finish.
Chocolate‑Chunk Delight
Fold in 1/2 cup of dark chocolate chips just before pouring the batter onto the skillet. The chips melt into pockets of chocolate that burst with each bite, creating a dessert‑like experience.
Citrus‑Zest Twist
Grate a teaspoon of orange zest into the batter for a bright, citrusy note that cuts through the sweetness. Pair with a dollop of lemon yogurt for a refreshing contrast.
Savory Spin
Replace the sugar with 1 teaspoon of salt and add 1 tablespoon of finely chopped fresh herbs (parsley, chives). Serve with smoked salmon and crème fraîche for a brunch‑worthy dish.
Nutty Variation
Stir in 1/4 cup of chopped walnuts or pecans for crunch. Toast the nuts beforehand to enhance their flavor and add a satisfying texture.
Storing and Bringing It Back to Life
Fridge Storage
Cool the pancakes completely, then stack them with parchment paper between each layer. Store in an airtight container for up to 3 days. The pancakes stay moist and flavorful, thanks to the buttermilk’s natural preservative qualities.
Freezer Friendly
Wrap each pancake tightly in foil or parchment and place them in a freezer bag. They can be frozen for up to 2 weeks. When ready, thaw overnight in the fridge and reheat in a skillet.
Best Reheating Method
Reheat frozen or chilled pancakes in a preheated skillet over medium heat. Add a splash of water to the pan and cover for 1 minute to create steam that rehydrates the batter. Finish with a light drizzle of butter; the result is as good as fresh.