Picture this: it’s a rainy Tuesday, you’re stuck at work, and a coworker just dared you to bring the most unforgettable Mexican dish to the office potluck. You stare at the pantry, eyes landing on a lone can of red enchilada sauce and a bag of ground beef, and a wild idea sparks like a kitchen firecracker. I’ll be honest — I ate half the batch before anyone else got to try it, because the aroma was already taking over the entire apartment. That moment of reckless, buttery‑rich anticipation is exactly why I’m writing this; this recipe turned a simple dare into a culinary love affair, and I’m convinced it’s hands down the best version you’ll ever make at home.
The kitchen was a symphony of sizzling sounds, the sizzle when the beef hit the hot pan was like a drumroll announcing the main act. The scent of garlic and onion mingling with cumin and chili powder made the whole house feel like a bustling taquería in the heart of Mexico City. My taste buds were doing the cha‑cha as the sauce thickened, coating each morsel with a velvety, ruby‑red blanket that promised a flavor explosion. When the final cheese‑laden layer melted into a golden‑brown crown, I dared you to taste this and not go back for seconds — I guarantee you’ll be the one bringing the leftovers.
Most enchilada recipes either drown the filling in sauce or leave the tortillas dry and brittle. This version flips the script by treating the sauce like a luxurious spa treatment for the meat, while the corn tortillas get a quick steam‑kiss that keeps them supple yet sturdy. I’ve added a secret weapon: a tablespoon of tomato paste that deepens the sauce’s umami without adding any overt tomato taste, and diced green chiles for a whisper of heat that never overwhelms. The result? A dish that balances comfort and excitement, perfect for a family dinner or a brag‑worthy potluck.
And now, the fun part: I’m going to walk you through every single step — from selecting the perfect ground beef to the exact moment you pull the tray out of the oven, the whole kitchen will be humming with anticipation. Stay with me here — this is worth it. Let me walk you through every single step — by the end, you’ll wonder how you ever made it any other way.
What Makes This Version Stand Out
- Flavor Depth: The combination of taco seasoning, tomato paste, and green chiles creates a sauce that’s rich, slightly sweet, and just the right amount of spicy, coating the beef like velvet.
- Texture Harmony: Soft, melt‑in‑your‑mouth cheese meets the slight chew of corn tortillas that have been gently warmed, preventing cracks and ensuring every bite holds together.
- Simplicity: With just a handful of pantry staples and a 30‑minute cook time, this dish doesn’t demand a culinary degree, yet it feels restaurant‑worthy.
- Unique Twist: The tomato paste adds a subtle depth that most store‑bought sauces lack, turning a simple red sauce into a gourmet experience.
- Crowd Reaction: I dare you to serve this at a gathering and watch the line form — it’s that good.
- Ingredient Quality: Using lean ground beef and fresh garlic ensures the filling stays juicy and aromatic, while the Mexican cheese blend gives that perfect melt.
- Cooking Method: Baking the assembled enchiladas lets the flavors meld together, and the final broil gives a lightly caramelized top that’s irresistible.
- Make‑Ahead Potential: Assemble ahead of time, refrigerate, and bake when you’re ready, making it ideal for busy weeknights.
Inside the Ingredient List
The Flavor Base
Ground beef is the hearty hero of our dish, providing rich flavor and protein. Lean ground beef is my go‑to because it renders just enough fat to keep the filling moist without becoming greasy. If you swap it for ground turkey, you’ll need to add a splash of broth to keep the mixture from drying out. When selecting beef, look for a 90/10 ratio for the perfect balance of flavor and leanness.
Yellow onion, diced, adds a subtle sweetness and depth that underpins the entire sauce. The natural sugars caramelize as they hit the pan, creating that comforting aroma that makes you feel instantly at home. If you’re in a rush, pre‑diced onions are a lifesaver, but fresh dice gives a fresher bite. Skipping the onion altogether would leave the sauce flat, like a song without a bass line.
Garlic, freshly minced, elevates everything with its aromatic kick, bringing warmth and flavor that can’t be replaced by powder. The key is to add it after the onion has softened, allowing it to bloom without burning. A burnt garlic note can turn the whole dish bitter, so keep the heat medium and listen for that soft sizzle.
The Spice Crew
Taco seasoning is the magical little packet that spices up our beef filling. It’s a blend of cumin, chili powder, paprika, and a few secret herbs that give the dish its signature zing. Feel free to create your own mix if you’re feeling adventurous — a dash of smoked paprika and a pinch of cinnamon can add an unexpected depth.
Tomato paste, just a tablespoon, enriches the sauce, giving it a robust taste and a hint of sweetness that balances the spices. It’s the secret behind that glossy, restaurant‑style finish. If you don’t have paste, a splash of ketchup can mimic the sweetness, though you’ll lose some of the deep umami.
Diced green chiles, those charming little cans, add a mild heat and extra texture. They’re the subtle spark that makes you reach for another bite. For a hotter kick, swap them for jalapeños or chipotle peppers in adobo.
The Saucy Star
Red enchilada sauce is the star of the show! This sauce marries everything together, creating a luscious layer of flavor. You can find different brands, but I recommend one with real chilies and no added sugars. If you have time, simmer the sauce with a bit of broth and the tomato paste for an extra layer of depth.
Corn tortillas are perfect for wrapping up the meaty goodness. Warming them first helps prevent cracks and makes rolling easy. If you skip the warming step, you’ll end up with broken tortillas and a messy assembly line. A quick steam in a covered pan for 30 seconds does the trick.
The Final Flourish
Mexican cheese blend, shredded generously, creates that oozy, melty top. The blend of cheddar, Monterey Jack, and a hint of queso fresco gives both sharpness and creaminess. Feel free to mix in Pepper Jack for a subtle heat that complements the green chiles.
Optional toppings like fresh cilantro, sour cream, diced avocado, or a sprinkle of cotija cheese add a fresh finish that brightens the dish. They’re the confetti on a celebration cake — not essential, but they make the party unforgettable.
Everything's prepped? Good. Let’s get into the real action…
The Method — Step by Step
Heat a large skillet over medium‑high heat and add a splash of oil. Once shimmering, crumble in the ground beef, breaking it apart with a wooden spoon. Cook until the meat loses its pink hue and starts to brown, about 5‑7 minutes, letting those caramelized bits form — that’s flavor gold. Drain any excess fat, then set the skillet aside while you prep the aromatics.
In the same pan, reduce the heat to medium and toss in the diced yellow onion. Sauté until the edges turn translucent and the aroma becomes sweet, roughly 3‑4 minutes. Add the minced garlic and let it sizzle for about 30 seconds, just until fragrant; watch out for burning, as burnt garlic turns bitter.
Stir the cooked beef back into the pan with the onions and garlic, then sprinkle the taco seasoning evenly over the mixture. Mix thoroughly so every crumb is coated, and let the spices toast for a minute — you’ll hear a faint pop, the sign that the flavors are waking up. Add the tomato paste, stirring quickly to avoid clumping; it should melt into the mixture, turning a deeper shade of red.
Now, pour in the red enchilada sauce and the diced green chiles, stirring to combine. Reduce the heat to low and let the sauce simmer gently for 10 minutes, uncovered, allowing it to thicken slightly. The sauce should coat the back of a spoon and emit a fragrant, slightly smoky aroma. This is the moment of truth — if it smells amazing, you’re on the right track.
While the sauce simmers, warm the corn tortillas. Stack them on a plate, cover with a damp kitchen towel, and microwave for 30‑45 seconds, or steam them in a skillet for about 10 seconds per side. This step prevents cracks when you roll them later and gives the tortillas a slight elasticity.
Preheat your oven to 375°F (190°C). Lightly grease a 9×13‑inch baking dish with a bit of oil or non‑stick spray. Spoon a thin layer of the red sauce onto the bottom of the dish — this acts as a cushion, ensuring the enchiladas don’t stick and the sauce doesn’t burn.
Now comes the rolling ritual: place about ¼ cup of the beef filling in the center of each tortilla, roll tightly, and place seam‑side down in the prepared baking dish. Keep the tortillas close together; they’ll expand slightly as they bake, creating a cohesive casserole.
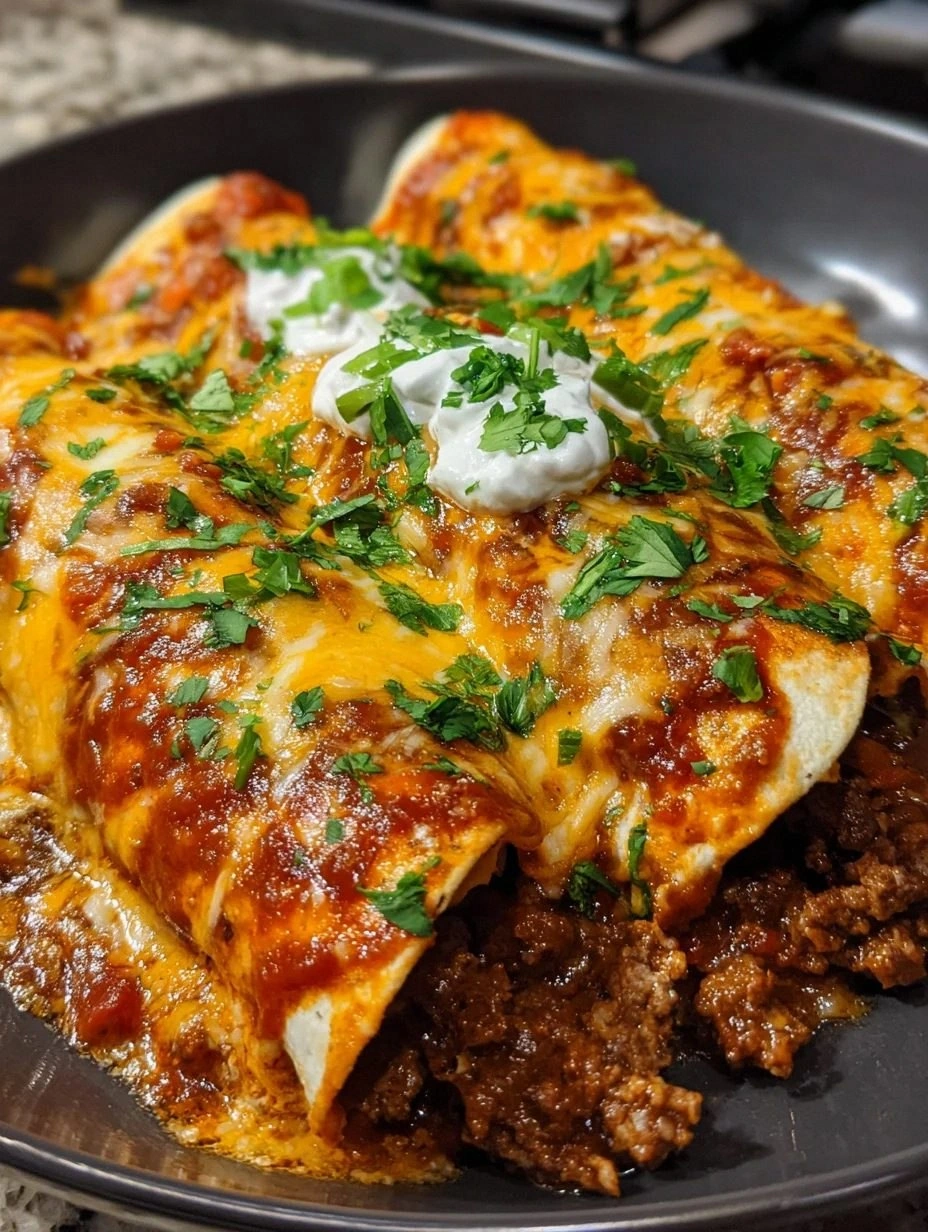
Once all the enchiladas are snug in the dish, pour the remaining sauce evenly over the top, making sure every nook is drenched. Sprinkle the shredded Mexican cheese blend generously, covering the surface like a snowy blanket. The cheese should melt and bubble, forming golden specks that promise a crispy finish.
Slide the dish into the preheated oven and bake for 20‑25 minutes, until the cheese is melted, bubbly, and just beginning to brown. For an extra caramelized top, switch the oven to broil for the last 2‑3 minutes, watching closely so it doesn’t burn. The edges of the cheese should pull away from the sauce, a visual cue that the dish is ready.
Finally, garnish with your optional toppings: a scattering of fresh cilantro, dollops of sour cream, slices of avocado, or a sprinkle of cotija cheese. Picture yourself pulling this out of the oven, the whole kitchen smelling incredible, the cheese glistening like molten gold. Serve hot, and watch the plates disappear faster than you can say “¡Buen provecho!”
That's it — you did it. But hold on, I've got a few more tricks that'll take this to another level...
Insider Tricks for Flawless Results
The Temperature Rule Nobody Follows
Never bake enchiladas on a scorching high heat; a moderate 375°F allows the cheese to melt slowly while the tortillas stay tender. I once cranked the oven to 425°F in a hurry, and the edges turned into a hard crust that cracked when I tried to serve. The secret is patience — low and steady wins the race.
Why Your Nose Knows Best
When the sauce is simmering, trust your sense of smell more than the timer. If you detect a faint caramel note and the sauce clings to the spoon, you’re ready. Over‑cooking can mute those aromatics, leaving the dish flat.
The 5‑Minute Rest That Changes Everything
After baking, let the enchiladas sit uncovered for five minutes. This short rest lets the sauce thicken slightly, preventing it from flooding the plate when you cut. I’ve seen impatient cooks cut immediately and end up with a soggy mess — don’t be that person.
Cheese Layering Mastery
Instead of dumping all the cheese at once, try a two‑step approach: sprinkle a thin layer before baking, then add a second generous layer halfway through. The first layer melts into the sauce, while the second forms that coveted golden crust.
Spice Balance Check
If you’re sensitive to heat, add the green chiles after the sauce has simmered, tasting as you go. Conversely, if you love heat, toss in an extra jalapeño or a dash of hot sauce right before the final bake. This flexibility ensures every palate is satisfied.
Creative Twists and Variations
This recipe is a playground. Here are some of my favorite ways to switch things up:
Southwest Chicken Enchiladas
Swap the ground beef for shredded rotisserie chicken, add black beans and corn, and use a smoky chipotle sauce. The result is lighter but still hearty, perfect for those who prefer poultry.
Vegetarian Black Bean Delight
Replace the meat with a mixture of black beans, diced zucchini, and roasted red peppers. Use the same red sauce; the beans absorb the flavors beautifully, making a protein‑packed vegetarian option.
Cheesy Four‑Cheese Fusion
Combine cheddar, Monterey Jack, mozzarella, and a pinch of blue cheese for a bold, melty experience. The blue cheese adds a tang that cuts through the richness, ideal for cheese lovers.
Spicy Chipotle Inferno
Swap the green chiles for chipotle peppers in adobo, and add a dash of smoked paprika. This version brings a smoky heat that lingers pleasantly on the palate.
Breakfast Enchiladas
Use scrambled eggs, breakfast sausage, and a drizzle of salsa verde instead of beef. Top with a sprinkle of crumbled chorizo and serve with fresh pico de gallo for a brunch twist.
Sweet‑And‑Savory Mole Twist
Replace the red enchilada sauce with a dark mole sauce, add a spoonful of raisins, and finish with toasted pumpkin seeds. This complex flavor profile is a nod to Oaxacan cuisine.
Storing and Bringing It Back to Life
Fridge Storage
Place leftover enchiladas in an airtight container and store them in the refrigerator for up to 3 days. Reheat gently in a covered oven‑safe dish at 350°F, adding a splash of water to keep the sauce from drying out.
Freezer Friendly
Unbaked enchiladas freeze beautifully. Arrange them in a single layer on a baking sheet, freeze until solid, then transfer to a freezer‑safe bag. They’ll keep for up to 2 months. When ready, bake from frozen, adding an extra 10‑15 minutes to the cooking time.
Best Reheating Method
For the crispiest top, reheat in a preheated oven at 375°F, uncovered, until the cheese bubbles again. Add a tiny splash of water to the pan before covering with foil; the steam revives the sauce, while the uncovered finish restores that golden crust.