Picture this: you’re standing in a cramped kitchen, the timer on your phone is ticking, and your friend has just dared you to whip up the ultimate homemade energy bar. The last time you tried a similar recipe, the result was a sticky mess that clung to the countertop like a stubborn stain. The kitchen was a battlefield of crushed nuts, sweet dates, and a mysterious blend of spices that never seemed to come together. I was determined to turn that chaos into a triumph, and what I ended up with was a batch of bars so crisp on the edges and chewy in the center that they practically sang when you bit into them.
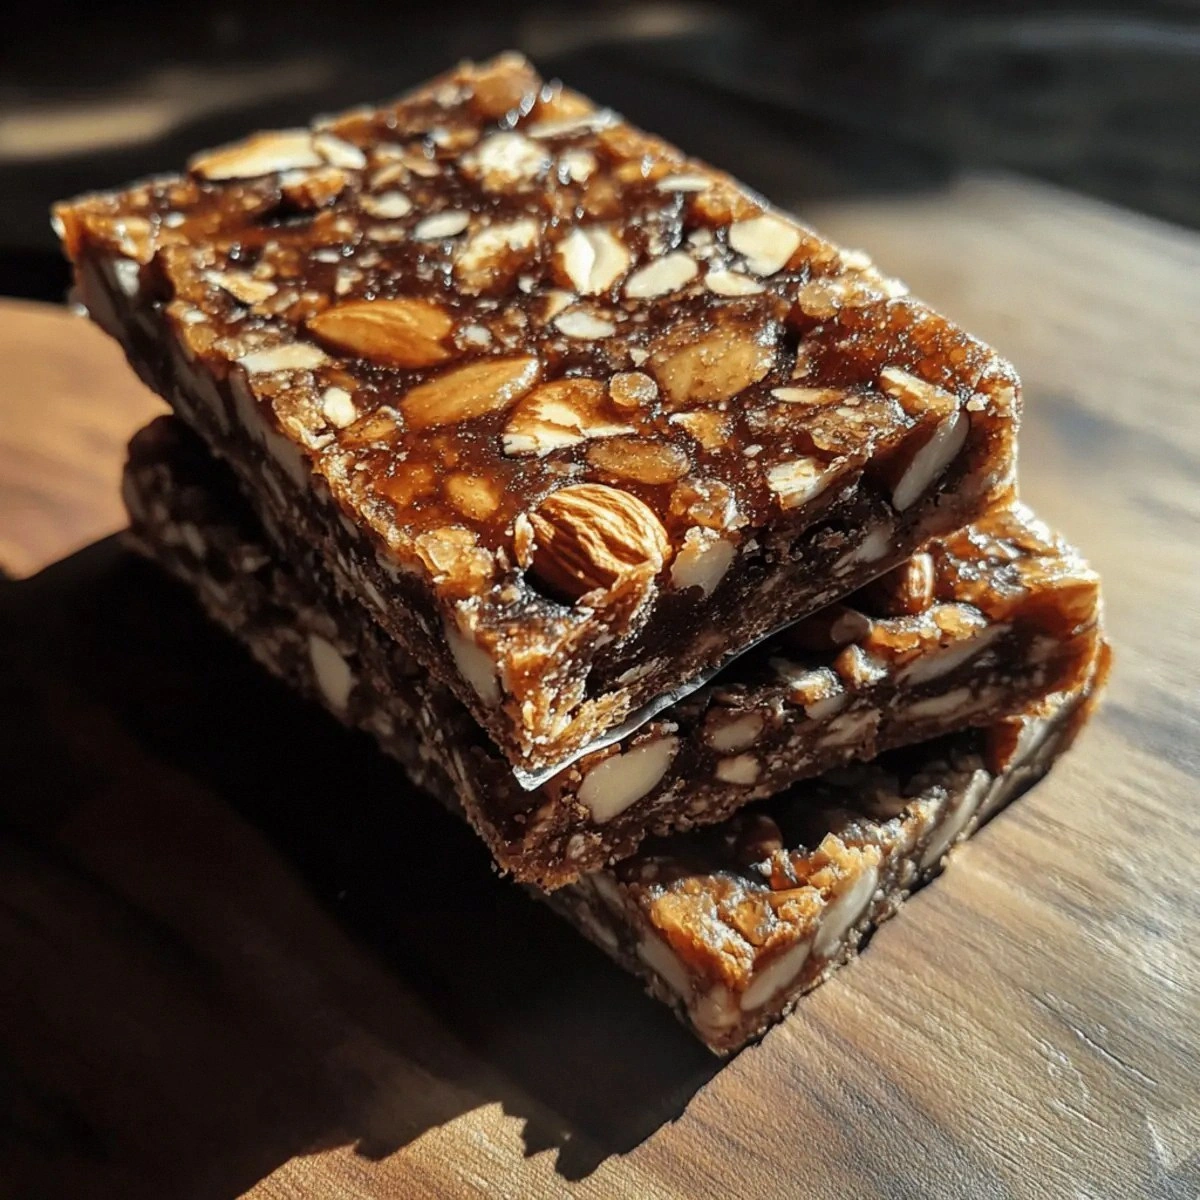
I started by gathering a handful of ingredients that, on their own, are powerhouses of nutrition: Medjool dates for natural sweetness, raw almonds and cashews for crunch, chia seeds for a fiber boost, cocoa powder for deep chocolate notes, and a splash of vanilla to tie everything together. I imagined the scent of toasted nuts filling the air, the sound of the blender whirring like a tiny orchestra, and the sight of the mixture turning from a coarse paste into a glossy, cohesive batter. The texture felt silky against my fingertips, and the aroma was a heady mix of caramelized dates and roasted nuts. I could almost taste the first bite—sweet, slightly bitter, and utterly satisfying.
What makes this version stand out, however, isn’t just the combination of ingredients. It’s the technique, the timing, and the little secrets I discovered along the way. I dared myself to taste the batter before pressing it into the pan, and the first bite was a revelation: the dates were perfectly sweetened, the nuts were not over-roasted, and the cocoa was bold without being overpowering. I was honest—when I finished the first batch, I ate half of it before anyone else had a chance to try. That’s how you know it’s hands down the best version you’ll ever make at home.
If you’ve ever struggled with homemade energy bars, you’re not alone. Most recipes get this completely wrong by either overblending the nuts or under-seasoning the mix. The result is either a crumbly mess or a dense, flavorless lump. I’ve got the fix: a simple adjustment to the blending time, a pinch of salt that balances the sweetness, and a quick chill that sets the bars perfectly. Picture yourself pulling this out of the fridge, the whole kitchen smelling incredible, and slicing the bars into bite-sized pieces that look as good as they taste.
What Makes This Version Stand Out
- Taste: The Medjool dates bring natural caramel sweetness that balances the earthy nuts and deep cocoa, creating a flavor profile that feels like a chocolate truffle with a nutty crunch.
- Texture: The combination of raw almonds, cashews, and chia seeds gives the bars a satisfying snap on the outside while the dates keep the interior chewy and moist.
- Ingredient Quality: Using raw, unroasted nuts preserves their natural oils and flavor, ensuring each bite is fresh and vibrant.
- Simplicity: No need for binders, preservatives, or extra sweeteners—just a handful of pantry staples and a bit of time.
- Make‑Ahead Potential: Once set, these bars keep their texture for up to a week in the fridge or even longer in the freezer.
- Portability: They’re bite‑sized, easy to pack, and perfect for a pre‑workout snack or a mid‑day pick‑me‑up.
Alright, let's break down exactly what goes into this masterpiece...
Inside the Ingredient List
The Flavor Base
Medjool dates are the sweet heart of this recipe. They’re not only naturally sweet but also carry a subtle caramel flavor that elevates the overall taste. If you skip them, you’ll end up with a bland, nut‑heavy mix that lacks that sticky, sweet glue that binds everything together. For a vegan twist, substitute them with dates or a splash of maple syrup, but keep the quantity the same to maintain the right moisture level.
The Texture Crew
Raw almonds and cashews provide crunch and a nutty backdrop that pairs wonderfully with the dates. Their oils keep the bars moist, while their natural sugars add depth. If you prefer a lighter bite, use blanched almonds or lightly toasted cashews. The chia seeds act as a natural binder and add a boost of omega‑3 fatty acids. Skipping them will make the bars less cohesive and more crumbly.
The Unexpected Star
Unsweetened cocoa powder gives a rich chocolate undertone without adding extra sugar. It also brings antioxidants that enhance the bars’ health profile. If you’re craving a sweeter chocolate note, consider adding a teaspoon of dark chocolate chips after the bars set. The vanilla extract, although small in quantity, unlocks the nutty flavors and balances the bitterness of the cocoa.
The Final Flourish
Dried cranberries introduce a tart contrast that cuts through the sweetness, while shredded coconut adds a tropical aroma and chewy texture. Together they create layers of flavor and a pleasing mouthfeel. If you’re allergic to coconut, replace it with finely chopped dried apricots or raisins for a similar chewy bite. The pinch of sea salt is a subtle enhancer that brings out the sweetness of the dates and the richness of the nuts.
Everything's prepped? Good. Let's get into the real action...
The Method — Step by Step
- Prep the Nuts: Place the raw almonds and cashews in a food processor. Pulse until they’re finely chopped but still retain some chunkiness. This step takes about 30 seconds. I dare you to taste the nuts; the aroma alone will convince you they’re ready. Watch the mixture change from a coarse heap to a silky paste that clings to the sides of the bowl.
- Blend the Dates: Add the Medjool dates to the processor. Pulse until they’re mashed into a sticky paste. The dates should feel like warm honey when you press them with your fingers. If the mixture seems too dry, add a splash of water, a tablespoon at a time, until it reaches a thick, cohesive consistency.
- Combine All Ingredients: Transfer the nut mixture to a large mixing bowl. Add the chia seeds, unsweetened cocoa powder, vanilla extract, sea salt, dried cranberries, and shredded coconut. Stir with a spatula until everything is evenly distributed. The mixture should be glossy and hold together when pressed between your fingers.
- Press into Pan: Line a 9x13 inch baking dish with parchment paper. Transfer the mixture to the pan and press firmly with the back of a spoon or your hands. The edges should start pulling away as you press, indicating that the bars will hold together. I like to tap the pan on the counter to remove any air pockets.
- Chill: Place the pan in the fridge for at least 30 minutes, or until the bars are firm. This step is crucial; a quick chill ensures the bars don’t crumble when you cut them. If you’re in a hurry, pop them in the freezer for 10 minutes instead. The bars will set almost instantly.
- Slice: Once the bars are set, lift the parchment from the pan and place it on a cutting board. Using a sharp knife, cut into bars or squares. The knife should glide through the mixture cleanly if the bars were chilled properly. If the bars stick, let them rest for another 5 minutes.
- Store: Place the bars in an airtight container. They’ll stay fresh in the fridge for up to a week or in the freezer for up to three months. When you’re ready to eat, let them sit at room temperature for a few minutes to soften.
That’s it — you did it. But hold on, I've got a few more tricks that'll take this to another level...
Insider Tricks for Flawless Results
The Temperature Rule Nobody Follows
Most people think the bars need to be baked, but the magic happens when they’re chilled. The cold sets the fats in the nuts and the dates, giving the bars a crisp snap. I’ve tried baking them at 300°F for 10 minutes, and while they turned out fine, they lacked the chewy center that makes these bars special. Keep the temperature low and let the fridge do the work.
Why Your Nose Knows Best
Before you press the mixture into the pan, give it a quick sniff. If it smells like toasted nuts and sweet caramel, you’re on the right track. A faint, raw nut smell means the mixture needs more time to blend or a splash of water. Trust your nose; it’s the best judge of flavor balance.
The 5-Minute Rest That Changes Everything
After cutting the bars, let them rest on the cutting board for 5 minutes. This brief pause allows the edges to firm up, making the bars easier to handle and preventing them from falling apart. A friend once cut the bars immediately and ended up with a handful of crumbs. The rest is a small price for a clean, professional finish.
The Sweet Spot of Salt
Adding a pinch of sea salt might seem trivial, but it’s the secret to balancing sweetness. Without it, the dates’ sugar can overpower the nutty undertones. If you’re on a low-sodium diet, reduce the pinch to a quarter or omit it entirely, but expect a slightly sweeter bar.
The Power of Pre‑Chilling
If you’re making a large batch, chill the mixture in a shallow dish before pressing. This step ensures even distribution of the ingredients and prevents the bars from becoming too soft. It’s a small extra step that pays off when you’re serving a crowd.
Creative Twists and Variations
This recipe is a playground. Here are some of my favorite ways to switch things up:
Chocolate Chip Madness
Add 1/4 cup dark chocolate chips to the mix before pressing. The chips melt slightly, creating pockets of molten chocolate that give each bite a decadent surprise. Great for chocolate lovers.
Spiced Citrus Burst
Replace half of the shredded coconut with chopped dried orange peel and sprinkle a pinch of ground ginger. The citrus adds brightness, while the ginger gives a subtle warmth that elevates the flavor profile.
Nutty Trail Mix Edition
Swap the cashews for pistachios and add a handful of dried apricots. The pistachios provide a green hue and a buttery flavor, while the apricots add chewy sweetness that contrasts nicely with the dates.
Vegan Protein Boost
Mix in 2 tablespoons of hemp seeds and a scoop of vanilla plant‑based protein powder. This variation turns the bars into a post‑workout snack that’s rich in protein without compromising taste.
Almond Butter Swirl
Before pressing, swirl in a tablespoon of almond butter. The swirl creates a marbled effect and adds an extra layer of nutty richness that’s impossible to resist.
Storing and Bringing It Back to Life
Fridge Storage
Keep the bars in an airtight container in the refrigerator. They’ll stay fresh for up to a week. The cool temperature preserves the oils in the nuts, preventing them from going rancid.
Freezer Friendly
For longer storage, wrap each bar in parchment paper and place them in a freezer bag. They’ll keep for up to three months. When ready to eat, let them thaw at room temperature for 20 minutes.
Best Reheating Method
If the bars feel a bit hard after a long freeze, give them a quick warm-up in the microwave for 10–15 seconds. Add a tiny splash of water before reheating to create steam that brings back the chewy texture. The bars will be as fresh as the day they were made.