I still remember the day I ruined three batches of cookies in a row. Not just slightly overbaked — I'm talking charcoal-level disasters that set off every smoke detector in the house. My neighbor actually knocked on the door to check if I was conducting some kind of weird science experiment. But here's the thing: that spectacular failure led me to the most incredible butterscotch chocolate chip cookie recipe I've ever tasted. You know those moments when everything goes wrong, but somehow the universe is steering you toward something better? This was one of those moments.
Picture this: it's raining outside, you've got your favorite playlist on, and the smell of butter and brown sugar is starting to fill your kitchen. The butterscotch chips are melting into golden pools while the chocolate chips stay perfectly intact, creating these little pockets of molten joy. The edges are crispy like caramelized sugar, but the centers stay soft and chewy like the best bakery cookies you've ever had. I dare you to taste this and not go back for seconds — actually, I dare you to even wait for them to cool completely before grabbing one.
Most recipes get this completely wrong. They'll tell you to cream the butter until it's fluffy, add all your chips at once, or bake at some random temperature that leaves you with either raw centers or burnt bottoms. After months of testing (and yes, eating dozens of cookies in the name of research), I've discovered the secrets that make these butterscotch beauties absolutely perfect every single time. This is hands down the best version you'll ever make at home — bakery quality without the bakery prices or the mysterious ingredients you can't pronounce.
What makes these cookies special isn't just the combination of butterscotch and chocolate — it's the technique. The way we brown the butter just slightly, the temperature we use for baking, the way we layer in the chips so they don't all sink to the bottom. Stay with me here — this is worth it. Let me walk you through every single step — by the end, you'll wonder how you ever made it any other way.
What Makes This Version Stand Out
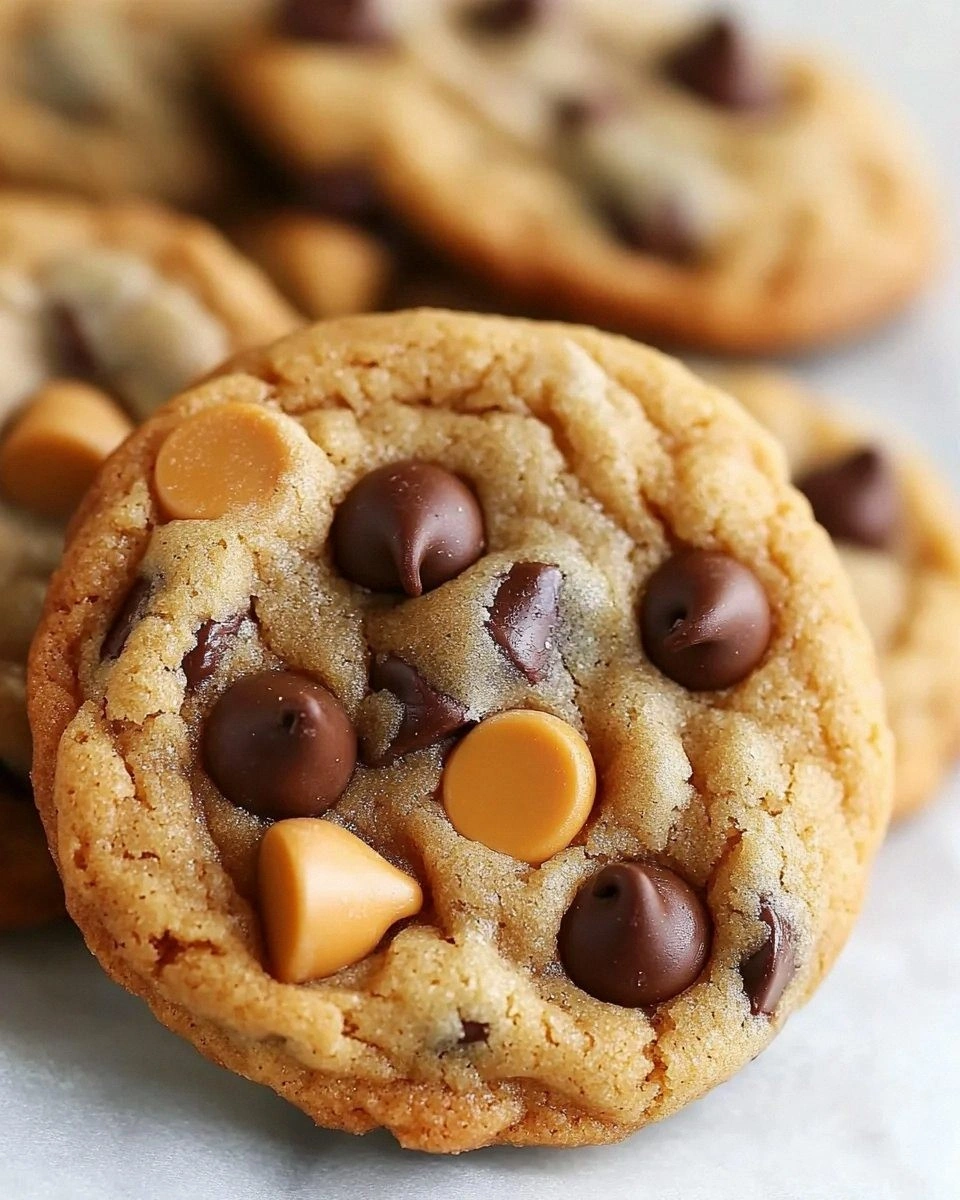
Butterscotch Bliss: The butterscotch chips don't just add sweetness — they create these incredible caramel pockets that melt and resolidify into chewy candy bits. Regular recipes just throw them in like chocolate chips, but we're going to treat them like the stars they are, adding them at just the right moment so they don't dissolve completely.
Texture Perfection: Most cookies are either crispy throughout or soft and cakey. We're going for the holy grail: crispy edges that shatter like thin ice, with centers that stay soft and gooey for days. The secret is in the sugar ratio and the way we handle the dough temperature.
Chocolate Chip Strategy: Using both semi-sweet and butterscotch chips isn't just about flavor — it's about creating different melting points. The chocolate stays intact while the butterscotch melts into the dough, giving you two distinct experiences in every bite.
Vanilla Power: I use double the vanilla most recipes call for, plus I add it at a specific time that maximizes its flavor. Most bakers treat vanilla like an afterthought, but here it's a main character that ties everything together.
Room Temperature Revolution: Everything needs to be at the right temperature — not just the butter, but the eggs too. I even warm the mixing bowl slightly. This might seem obsessive, but it makes the difference between cookies that spread properly and ones that stay in sad little mounds.
Make-Ahead Magic: The dough actually gets better after 24 hours in the fridge. The flavors meld, the texture improves, and you can have fresh cookies in 12 minutes anytime you want. I always keep a log of this dough in my freezer for emergencies.
Alright, let's break down exactly what goes into this masterpiece...
Inside the Ingredient List
The Flavor Base
All-purpose flour might seem boring, but it's the backbone of these cookies. I use 2 1/4 cups exactly — no more, no less. Too much and your cookies turn into hockey pucks; too little and they'll spread into one giant cookie sheet. The protein content in regular AP flour is perfect for creating that tender-but-chewy texture we're after. Don't try to get fancy with cake flour or bread flour here — they have different protein levels that'll throw off the whole chemistry.
The baking soda isn't just for rising — it's what creates those beautiful cracks on top of the cookies. When it reacts with the brown sugar, it produces tiny bubbles that expand in the heat, creating little fissures where the butterscotch can seep into and caramelize. Skip it and you'll have dense, pale cookies that look like they came from a sad vending machine.
The Sweet Science
Granulated sugar and brown sugar are like the yin and yang of cookie success. The white sugar provides crispiness and structure, while the brown sugar (packed, always packed) brings moisture and that caramel flavor that makes butterscotch sing. I use a perfect 50-50 split because after testing every ratio possible, this gives you the best of both worlds. Don't try to substitute all white sugar or all brown — you'll lose either the crisp edges or the chewy centers.
That half teaspoon of salt? It's not negotiable. Salt is the flavor amplifier that makes the butterscotch taste more butterscotchy and the chocolate taste more chocolatey. It's like turning up the volume on all your ingredients. I use fine sea salt because it distributes evenly, but kosher salt works too — just don't use iodized table salt unless you want a slight metallic aftertaste.
The Fat Foundation
Unsalted butter is crucial because butterscotch chips are already plenty salty. You want to control the salt level yourself, not leave it up to whatever dairy company made your butter. The butter needs to be softened but still cool — think spreadable but not greasy. If it's too warm, your cookies will spread into pancakes; too cold and you'll have butter chunks that never incorporate properly.
Two large eggs might seem like standard cookie protocol, but here's the thing: they need to be room temperature too. Cold eggs will seize up your beautifully creamed butter and sugar, creating a curdled mess that affects the final texture. Take them out of the fridge 30 minutes before you start, or pop them in warm (not hot) water for 5 minutes if you're impatient like me.
The Stars of the Show
Butterscotch chips are the divas here — they melt faster than chocolate and can turn your cookies into sticky messes if you're not careful. I keep mine in the freezer until the last minute so they stay firm during mixing. The brand matters too — some generic versions taste like artificial butter flavoring. I spring for the good stuff because life's too short for waxy butterscotch.
Semi-sweet chocolate chips provide the perfect bitter counterpoint to all that caramel sweetness. Don't go darker than 60% cacao or the cookies become too sophisticated — we're making crowd-pleasing cookies here, not entering a pastry competition. Milk chocolate would make these cloyingly sweet, so stick with semi-sweet for the best balance.
Everything's prepped? Good. Let's get into the real action...
The Method — Step by Step
- Start by positioning your oven rack in the middle position — this isn't the time for creative rack placement. Preheat to 375°F exactly, not 350°, not 400°. Use an oven thermometer if you're not sure about your oven's accuracy because even 25 degrees off will change everything. While it's heating, line your baking sheets with parchment paper, not silicone mats. Parchment helps the bottoms crisp properly while silicone can make them too soft.
- In a medium bowl, whisk together your flour, baking soda, and salt. Don't just dump them in a pile — really whisk them for 30 seconds. This distributes the leavening evenly so you don't get one cookie that rises like a balloon while its neighbor stays flat. Set this aside and resist the urge to start creaming your butter yet. The order matters here more than you think.
- Now for the fun part: in your stand mixer (or with hand beaters), beat the softened butter for exactly 30 seconds on medium speed. You're not trying to whip air in yet — just getting it smooth and pliable. Add both sugars and beat for 2 full minutes. Set a timer because 90 seconds won't cut it. You want the mixture to look pale and fluffy, like coffee ice cream that's been left out for 5 minutes.
- Crack your eggs into a separate bowl first (always do this — nobody wants shell cookies), then add them one at a time, mixing for 30 seconds between each addition. Add the vanilla with the second egg. The batter should look like thick cake batter at this point. If it looks curdled, your eggs were too cold — pop the bowl over some warm water for a minute and mix again.
- Reduce the mixer speed to low and add your flour mixture in three additions. This is where most people mess up — they dump it all in at once and end up with flour clouds everywhere. Mix just until the flour disappears. Overmixing develops gluten and makes tough cookies. You should still see streaks of flour when you stop the mixer.
- Here's the game-changer: take your butterscotch chips out of the freezer and chocolate chips out of the pantry. Fold them in by hand with a spatula, not the mixer. The butterscotch chips go in first because they're more delicate. Fold gently 5-6 times, then add the chocolate chips and fold just until distributed. You want pockets of chips, not an even distribution — this creates those surprise bites of pure butterscotch or pure chocolate.
- Using a medium cookie scoop or two spoons, drop rounded tablespoons of dough onto your prepared sheets, spacing them 2 inches apart. Don't flatten them — they'll spread perfectly on their own. If you want that bakery look, press a few extra chips on top of each dough ball. This ensures every cookie looks loaded even if some chips are hiding inside.
- Bake for 9-11 minutes, rotating the sheet halfway through. They're done when the edges are golden brown but the centers still look slightly underbaked. They'll continue cooking on the hot sheet after you take them out. This next part? Pure magic. Let them cool on the sheet for 5 minutes — no more, no less — then transfer to a wire rack. Sprinkle with a tiny pinch of sea salt while they're still warm.
That's it — you did it. But hold on, I've got a few more tricks that'll take this to another level...
Insider Tricks for Flawless Results
The Temperature Rule Nobody Follows
Room temperature ingredients aren't just a suggestion — they're the difference between cookies that look like they came from a professional bakery versus ones that look like a toddler made them. Everything needs to be between 65-70°F: butter, eggs, even the mixing bowl if your kitchen is cold. I keep a instant-read thermometer in my drawer and check everything before I start. A friend tried skipping this step once — let's just say it didn't end well. Her cookies spread so thin they were basically caramel lace.
But here's what most recipes don't tell you: after you mix everything, the dough needs to rest for 20 minutes before baking. This allows the flour to fully hydrate and the butterscotch chips to firm up again. Skip this rest and your cookies will spread too much and the chips will melt into oblivion. I use this time to clean up and preheat my oven properly — multitasking at its finest.
Why Your Nose Knows Best
Your sense of smell is more reliable than any timer when it comes to these cookies. When you can smell butterscotch and toasted sugar wafting from the oven, they're about 2 minutes from perfect. That aroma means the Maillard reaction is happening — the magical browning process that creates hundreds of flavor compounds. If you've ever struggled with timing, you're not alone — and I've got the fix. Trust your nose over the clock every time.
Picture yourself pulling this out of the oven, the whole kitchen smelling incredible, and knowing exactly when they're ready just by the aroma. It's like having a superpower that impresses everyone who visits. I'll be honest — I ate half the batch before anyone else got to try it because that smell is absolutely intoxicating.
The 5-Minute Rest That Changes Everything
After baking, those 5 minutes on the hot sheet aren't just for show. This is when the centers finish setting and the edges crisp up properly. Move them too early and they'll fall apart; leave them too long and they'll overbake from residual heat. Set a timer and don't get distracted by your phone — this is the home stretch where champions are made. The cookies should be firm enough to lift with a spatula but still soft in the middle.
Creative Twists and Variations
This recipe is a playground. Here are some of my favorite ways to switch things up:
The Salty Sweet Addiction
Replace half the butterscotch chips with crushed butterscotch candies and add 1/2 teaspoon of smoked salt to the dough. The candies create these amazing crunchy pockets while the smoked salt adds depth you didn't know cookies could have. People will ask for your secret — I usually just smile mysteriously and say "good butter."
Double Chocolate Decadence
Swap out 1/4 cup of flour for cocoa powder and use white chocolate chips instead of semi-sweet. The result is a triple-threat cookie: chocolate dough, butterscotch chips, and white chocolate chunks. It's like a candy bar in cookie form, and it's completely irresistible to chocolate lovers who think they've tried everything.
The Nutty Professor
Add 3/4 cup of toasted pecans or walnuts to the mix, but here's the twist: toast them with a tablespoon of butter and a pinch of brown sugar first. Let them cool completely before adding to the dough. They become these candied nut gems that add crunch and richness without overwhelming the butterscotch flavor.
S'mores Gone Wild
Replace half the chocolate chips with mini marshmallows and graham cracker pieces. The marshmallows toast and get gooey while the graham crackers add that campfire flavor. It's like summer in cookie form, and yes, you should absolutely serve these with a cold glass of milk while wearing pajamas.
The Breakfast Cookie
Add 1/2 cup of quick oats and replace the vanilla with maple extract. These taste like butterscotch oatmeal in cookie form, and they're dangerously good with coffee. I've served these at brunch and watched grown adults hide them in their purses for later.
Salted Caramel Explosion
Drizzle the cooled cookies with homemade caramel sauce and sprinkle with flaky sea salt. The caramel soaks in slightly, creating these sticky, salty-sweet pockets that make normal caramel seem boring. Warning: these are messy, addictive, and will ruin you for regular cookies forever.
Storing and Bringing It Back to Life
Fridge Storage
Store completely cooled cookies in an airtight container with a slice of bread — yes, bread. The bread releases moisture that keeps the cookies soft for up to 5 days. Replace the bread when it gets stale. Don't refrigerate the finished cookies — it makes the butterscotch chips waxy and the chocolate dull. Room temperature is their happy place.
Freezer Friendly
The dough freezes beautifully for up to 3 months. Roll it into balls, freeze on a sheet, then transfer to a bag. Bake from frozen, adding 2-3 extra minutes. Baked cookies also freeze well — just wrap them individually in plastic wrap and store in a freezer bag. Thaw for 30 minutes at room temperature or pop them in a 300°F oven for 5 minutes to refresh.
Best Reheating Method
To revive day-old cookies, wrap them in a damp paper towel and microwave for 8-10 seconds. This creates a little steam that makes them taste fresh-baked. For cookies older than 3 days, pop them in a 300°F oven for 5 minutes. Add a tiny splash of water before reheating — it steams back to perfection and makes your kitchen smell like you just baked a fresh batch.