I was standing in my kitchen, the timer on my old oven ticking like a nervous metronome, when my roommate burst in shouting, “You have to try this thing I found on the internet!” I had just rescued a half‑baked batch of chocolate chip cookies from a disastrous over‑mix, and my curiosity was already buzzing louder than the blender on high. The idea of a cookie that combined the nostalgic hug of marshmallows, the salty‑sweet swagger of peanut butter, and the melt‑in‑your‑mouth decadence of chocolate was too good to ignore. I grabbed a handful of mini marshmallows, tossed a splash of corn syrup into the bowl, and the whole place smelled like a carnival meets a cozy kitchen after a snowstorm.
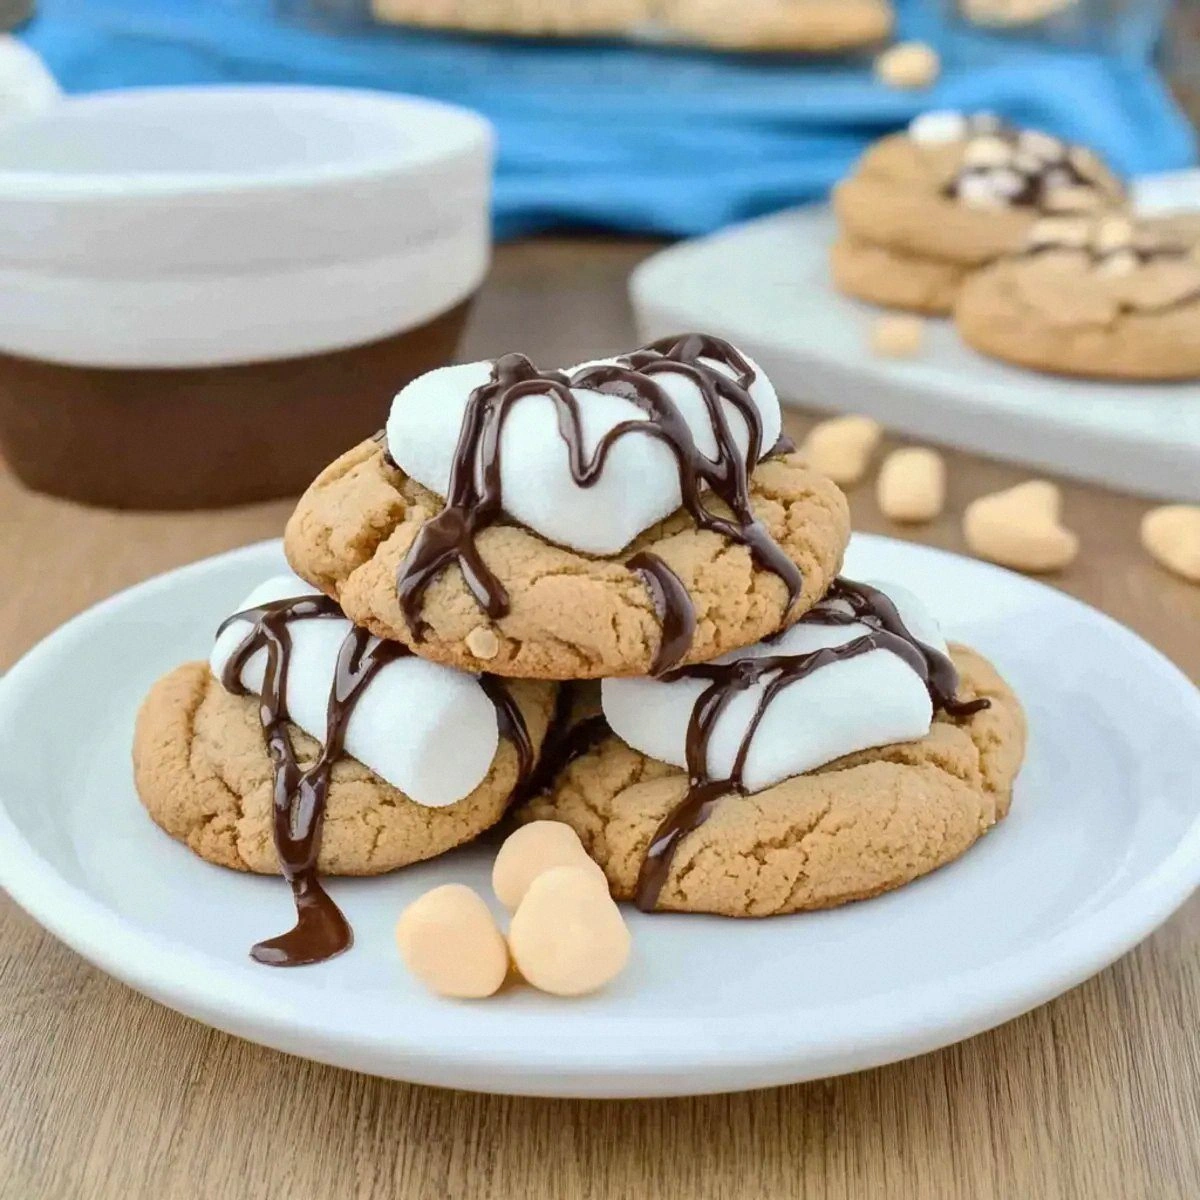
Picture this: the oven door swings open, a golden‑brown army of cookies marching out, their edges crisped just enough to give a satisfying snap, while the centers stay chewy, stretchy, and studded with pockets of gooey marshmallow that melt like tiny clouds. The aroma is a symphony—sweet vanilla, toasted butter, a whisper of peanut, and that unmistakable chocolate perfume that makes you want to inhale deeply, close your eyes, and let the world fade away. The first bite? It’s a textural roller coaster: a buttery crunch that gives way to a soft, marshmallowy core, then a burst of chocolate that lingers like a warm hug. I dare you to taste this and not go back for seconds.
Most fluffernutter cookie attempts I’ve tried in the past ended up either dry and crumbly or overly sweet with a gummy mess that clung to the teeth. This version, however, hits the sweet spot because I discovered the secret weapon: a splash of corn syrup that locks in moisture, and a strategic balance of two butters—unsalted for that clean, buttery base and an extra dollop of peanut butter for depth. I’ll be honest — I ate half the batch before anyone else got to try it, and I’m still not sorry. The result is hands down the best version you’ll ever make at home, and it’s simple enough that even a kitchen rookie can nail it on the first go.
Now, I’m about to spill the beans on a technique most recipes completely miss: the “double butter melt” where you melt the butter and peanut butter together, then cool it just enough to create a glossy, emulsified mixture that coats every crumb like velvet. This tiny tweak makes the dough unbelievably easy to handle and gives the cookies a glossy finish that looks bakery‑level without any fancy equipment. Okay, ready for the game‑changer? Let me walk you through every single step — by the end, you’ll wonder how you ever made it any other way.
What Makes This Version Stand Out
- Texture: The combination of a crisp edge and a chewy, marshmallow‑filled center creates a mouthfeel that’s both nostalgic and surprising.
- Flavor Harmony: Peanut butter’s salty depth balances the sweet marshmallows and chocolate, while the corn syrup adds a subtle shine and moisture lock.
- Simplicity: Only 13 ingredients, all pantry staples, and a straightforward mixing method that doesn’t require an electric mixer.
- Uniqueness: The double‑butter melt technique is rarely mentioned, yet it makes the dough silky and prevents over‑mixing.
- Crowd‑Pleaser: Kids love the marshmallow pockets, adults appreciate the sophisticated peanut‑chocolate pairing, and everyone asks for seconds.
- Ingredient Quality: Using real unsalted butter and creamy peanut butter (no oil‑separated stuff) elevates the overall richness.
- Cooking Method: Baking at a moderate 350°F ensures even rise and a perfect golden hue without burning the sugars.
- Make‑Ahead Potential: These cookies freeze beautifully, so you can bake a big batch and store them for future cravings.
Inside the Ingredient List
The Flavor Base
Unsalted butter (0.5 cup) is the silent hero, providing a clean, buttery canvas that lets the peanut butter shine without competing flavors. If you substitute with salted butter, you’ll lose that precise balance and end up with a cookie that leans too salty. Look for a butter that’s bright yellow and soft at room temperature; this indicates a higher butterfat content, which translates to richer flavor. Pro tip: Buy a stick of European‑style butter if you can find it – the higher milk solids make the cookies even more tender.
Creamy peanut butter (0.5 cup) brings the classic “fluffernutter” vibe, adding a nutty depth that pairs perfectly with chocolate. Avoid “natural” peanut butter that separates; the oil will make the dough greasy and cause uneven spreading. Instead, choose a brand that lists peanuts as the first ingredient and has a smooth, spreadable texture. If you’re allergic or want a twist, try almond butter – it adds a subtle marzipan note that’s surprisingly delightful.
The Sweeteners & Moisture Crew
Granulated sugar (0.75 cup) and light brown sugar (0.5 cup) work together like a dynamic duo: the white sugar creates crisp edges, while the brown sugar adds a caramel‑like chewiness. Skipping the brown sugar will result in a cookie that’s too hard, and using only brown sugar makes it overly soft. For a deeper flavor, you can swap half of the light brown sugar for dark brown sugar, but keep the total volume the same.
Corn syrup (2 tbsp) is the unsung hero that locks moisture in, preventing the cookies from drying out. It also gives the finished cookie a subtle sheen, making them look as good as they taste. If you don’t have corn syrup on hand, a drizzle of honey or maple syrup works in a pinch, though the flavor will shift slightly toward floral or woody notes.
The Texture Crew
Mini marshmallows (1 cup) are the star of the show, providing those melt‑in‑your‑mouth pockets that make each bite an adventure. If you use regular marshmallows, they’ll be too big and won’t distribute evenly, leading to clumps. For a gluten‑free twist, use gluten‑free mini marshmallows; they behave the same way in the oven.
Semisweet chocolate chips (1 cup) add a rich, bittersweet contrast that cuts through the sweetness of the marshmallows and sugars. Dark chocolate chips (70% cacao) would give a more sophisticated flavor, while white chocolate chips would make the cookie overly sweet. Choose a brand that melts smoothly; low‑quality chips can turn grainy when baked.
The Binding & Leavening Squad
One large egg acts as the binder, creating a cohesive dough that holds all the mix‑ins together. If you’re vegan, a flax egg (1 tbsp ground flaxseed + 3 tbsp water) works, but the texture will be slightly denser. Vanilla extract (1 tsp) adds a fragrant backdrop that amplifies the other flavors without being overpowering.
Baking soda (1 tsp) gives the cookies a gentle rise and helps them spread just enough to form that perfect thin‑edge, chewy‑center profile. Too much soda will make them puffed and cakey, while too little leaves them flat and dense. Salt (0.5 tsp) is the flavor enhancer that balances the sweetness; it’s the culinary equivalent of a spotlight on the main actors.
Everything's prepped? Good. Let’s get into the real action…

The Method — Step by Step
- Preheat your oven to 350°F (175°C) and line two baking sheets with parchment paper. As the oven heats, the kitchen fills with the faint scent of butter melting, a reminder that we’re about to create something magical. This temperature is crucial; it’s hot enough to set the edges quickly while allowing the centers to stay soft and chewy. Power transition: Okay, ready for the game‑changer?
- In a medium saucepan, combine the unsalted butter, creamy peanut butter, and the additional 2 tbsp of butter. Melt over low heat, stirring constantly until the mixture is smooth and glossy. This “double butter melt” creates an emulsion that coats the flour later, preventing gluten over‑development. Kitchen Hack: Remove the pan from heat a few seconds before it’s fully melted; the residual heat will finish the job without scorching.
- In a large mixing bowl, whisk together the granulated sugar, light brown sugar, and corn syrup until the mixture looks like a thick, amber‑colored caramel. When you stir, you’ll hear a faint crackle—this is the sugar crystals beginning to dissolve, a sound that signals a perfect base for chewiness. Let this mixture sit for a minute; the sugars will thicken slightly, giving you a glossy texture that hugs the butter later.
- Add the melted butter‑peanut butter blend to the sugar mixture, then whisk in the egg and vanilla extract. The batter should look silky, with no streaks of butter or egg white. At this point, the dough is fragrant with vanilla and peanut, and you can already sense the flavor depth. Watch Out: If the egg isn’t fully incorporated, you’ll end up with pockets of raw egg that bake unevenly.
- In a separate bowl, sift together the all‑purpose flour, baking soda, and salt. Sifting aerates the flour and ensures the leavening is evenly distributed, preventing any bitter soda pockets. Once sifted, fold the dry ingredients into the wet mixture using a rubber spatula. Mix until just combined; over‑mixing will develop gluten and make the cookies tough. Watch Out: Stop mixing the moment you no longer see streaks of flour. The dough should look slightly shaggy.
- Gently fold in the mini marshmallows and chocolate chips. The marshmallows will puff up slightly as you stir, so be careful not to crush them—each one is a tiny pocket of cloud waiting to melt into the cookie. The chocolate chips should be evenly dispersed; if you notice clumps, use a spatula to break them up. This step is where the cookie truly transforms from dough to “chewy delight.”
- Scoop the dough onto the prepared baking sheets using a cookie scoop (about 2 tablespoons per cookie). Space them 2 inches apart; they will spread modestly, but you don’t want them to merge. As you place each scoop, you’ll notice the dough’s glossy surface catching the light—this is the corn syrup doing its job. Power transition: And now the fun part.
- Bake for 10‑12 minutes, or until the edges turn a light golden brown and the centers still look slightly soft. The cookies will continue to set as they cool, so pulling them out at the right moment is crucial. Around the 8‑minute mark, you’ll smell a sweet, buttery perfume that fills the kitchen; that’s your cue to start checking. Kitchen Hack: Rotate the baking sheet halfway through baking for an even color on both sides.
- Remove the cookies from the oven and let them rest on the sheet for 2 minutes before transferring to a wire rack. This short cooling period allows the cookies to firm up just enough to move without breaking. As they cool, the marshmallows will become gooey pockets, and the chocolate will set into a glossy sheen. Serve warm for maximum meltiness, or store for later enjoyment. That’s it — you did it. But hold on, I’ve got a few more tricks that’ll take this to another level…
Insider Tricks for Flawless Results
The Temperature Rule Nobody Follows
Never bake these cookies straight from the fridge unless you’ve chilled the dough for at least 15 minutes. Cold dough spreads less, giving you a thicker, chewier center, while a room‑temperature dough spreads too quickly and can become overly crisp. I once tried skipping the chill and ended up with a flat, crunchy cookie that lacked the signature marshmallow melt. Keep the dough cool, and you’ll get that perfect balance of edge and center every time.
Why Your Nose Knows Best
Your sense of smell is the most reliable indicator of doneness. Around the 9‑minute mark, you’ll notice a sweet, buttery aroma that intensifies just before the cookies turn too dark. When that scent hits a buttery‑toasted note, it’s time to pull them out. Trusting the timer alone can lead to over‑baking; let your nose be the final judge.
The 5‑Minute Rest That Changes Everything
After baking, let the cookies sit on the baking sheet for exactly five minutes before moving them. This short rest lets the interior continue to set while the edges firm up, preventing them from breaking apart when you transfer them. I once moved them immediately and ended up with crumbly halves; the extra five minutes saved my batch and my sanity.
Butter‑Boosted Flavor
For an extra buttery punch, brush the tops of the warm cookies with a thin layer of melted butter mixed with a pinch of sea salt. This adds a subtle sheen and a burst of flavor that makes the cookies taste like they’ve been baked in a professional bakery. The salt also accentuates the chocolate and peanut butter, creating a balanced sweet‑salty profile.
Freezing for Future Cravings
If you want to bake a big batch, freeze the dough balls on a parchment sheet before baking. Once frozen, transfer them to a zip‑top bag. When you’re ready, bake them straight from the freezer, adding an extra minute to the baking time. The cookies will still have that perfect chew, and you’ll have a stash ready for any sudden sweet tooth attack.
Creative Twists and Variations
This recipe is a playground. Here are some of my favorite ways to switch things up:
Nutty Banana Bliss
Swap half of the peanut butter for mashed ripe banana and add a handful of chopped walnuts. The banana adds natural sweetness and moisture, while walnuts give a satisfying crunch. Perfect for a breakfast‑style treat that still satisfies dessert cravings.
Double Chocolate Dream
Replace the semisweet chips with a mix of dark chocolate chunks and white chocolate chips. The contrast of bitter and sweet creates a sophisticated flavor profile that will impress even the most discerning chocolate lovers.
Salted Caramel Swirl
Drizzle a spoonful of caramel sauce over the dough before baking, then sprinkle flaky sea salt on top. The caramel adds a buttery richness, and the salt lifts the entire flavor, making each bite a balanced sweet‑salty experience.
Coconut Paradise
Add ½ cup shredded coconut to the mix and substitute half of the chocolate chips with white chocolate. The coconut adds a tropical chew, while the white chocolate brings a creamy sweetness that pairs wonderfully with peanut butter.
Spicy Kick
Incorporate a pinch of cayenne pepper or a dash of chili powder into the dry ingredients. The subtle heat cuts through the sweetness and creates a surprising flavor twist that’s perfect for adventurous eaters.
Storing and Bringing It Back to Life
Fridge Storage
Place the cooled cookies in an airtight container with a paper towel at the bottom to absorb excess moisture. Store them in the refrigerator for up to a week. The chilled environment keeps the chocolate firm and the marshmallow pockets intact.
Freezer Friendly
Arrange cookies in a single layer on a parchment‑lined tray and freeze for 2‑3 hours. Transfer the frozen cookies to a zip‑top freezer bag, removing as much air as possible. They’ll keep for up to three months. When you’re ready, let them thaw at room temperature for 10 minutes, then re‑warm in a 300°F oven for 5 minutes.
Best Reheating Method
To revive that fresh‑out‑of‑the‑oven gooeyness, place a cookie on a microwave‑safe plate, add a tiny splash (about 1 tsp) of water beside it, and microwave for 10‑12 seconds. The steam created by the water re‑hydrates the marshmallows, making them melt again into a soft, stretchy core. Alternatively, a quick 2‑minute stint in a preheated 350°F oven restores the crisp edges while keeping the center chewy.