Picture this: it’s a rainy Saturday afternoon, the kitchen lights are dim, and you’re scrolling through Pinterest while the world outside is a gray blur. Suddenly, a craving hits you harder than the thunder outside – you need something salty, sweet, and utterly addictive, but you’re also trying to keep your waistline in check. That moment, that electric jolt of hunger, is exactly what sparked my obsession with the Healthy Peanut Butter Pretzel. It’s a snack that feels like a guilty pleasure, but with a conscience. I dared myself to create a version that would make everyone, even the most skeptical, swoon. And here it is, the definitive recipe that will forever change how you think about snack time.
The first time I tasted it, I could feel the crunch of pretzels and the silky smoothness of peanut butter dancing on my tongue. The honey added a golden sweetness that cut through the saltiness, and the dark chocolate chips wrapped the whole thing in a decadent finish. The aroma was a sweet, nutty, salty symphony that made the whole kitchen smell like a cozy bakery. The texture was a glorious contrast – a bite that started with a crisp snap, softened into a chewy center, and finished with a glossy chocolate coat that melted in your mouth. It was so good that I almost didn’t let anyone else taste it. I’ll be honest – I ate half the batch before anyone else got to try it.
What makes this version stand out from every other recipe out there? It’s the meticulous balance of flavors and textures, the use of wholesome ingredients that still deliver that indulgent feel, and the sheer versatility of the snack. I’ve spent hours tweaking the ratio of peanut butter to honey, experimenting with different types of pretzel twists, and even trying a handful of chocolate varieties. The result? A snack that is hands down the best version you'll ever make at home. Most recipes get this completely wrong. Here’s what actually works. And I dare you to taste this and not go back for seconds.
Let me walk you through every single step — by the end, you'll wonder how you ever made it any other way. From the first swirl of peanut butter to the final chocolate drizzle, every moment is a revelation. Stay with me here — this is worth it. If you've ever struggled with making a snack that’s both healthy and indulgent, you're not alone — and I've got the fix.
What Makes This Version Stand Out
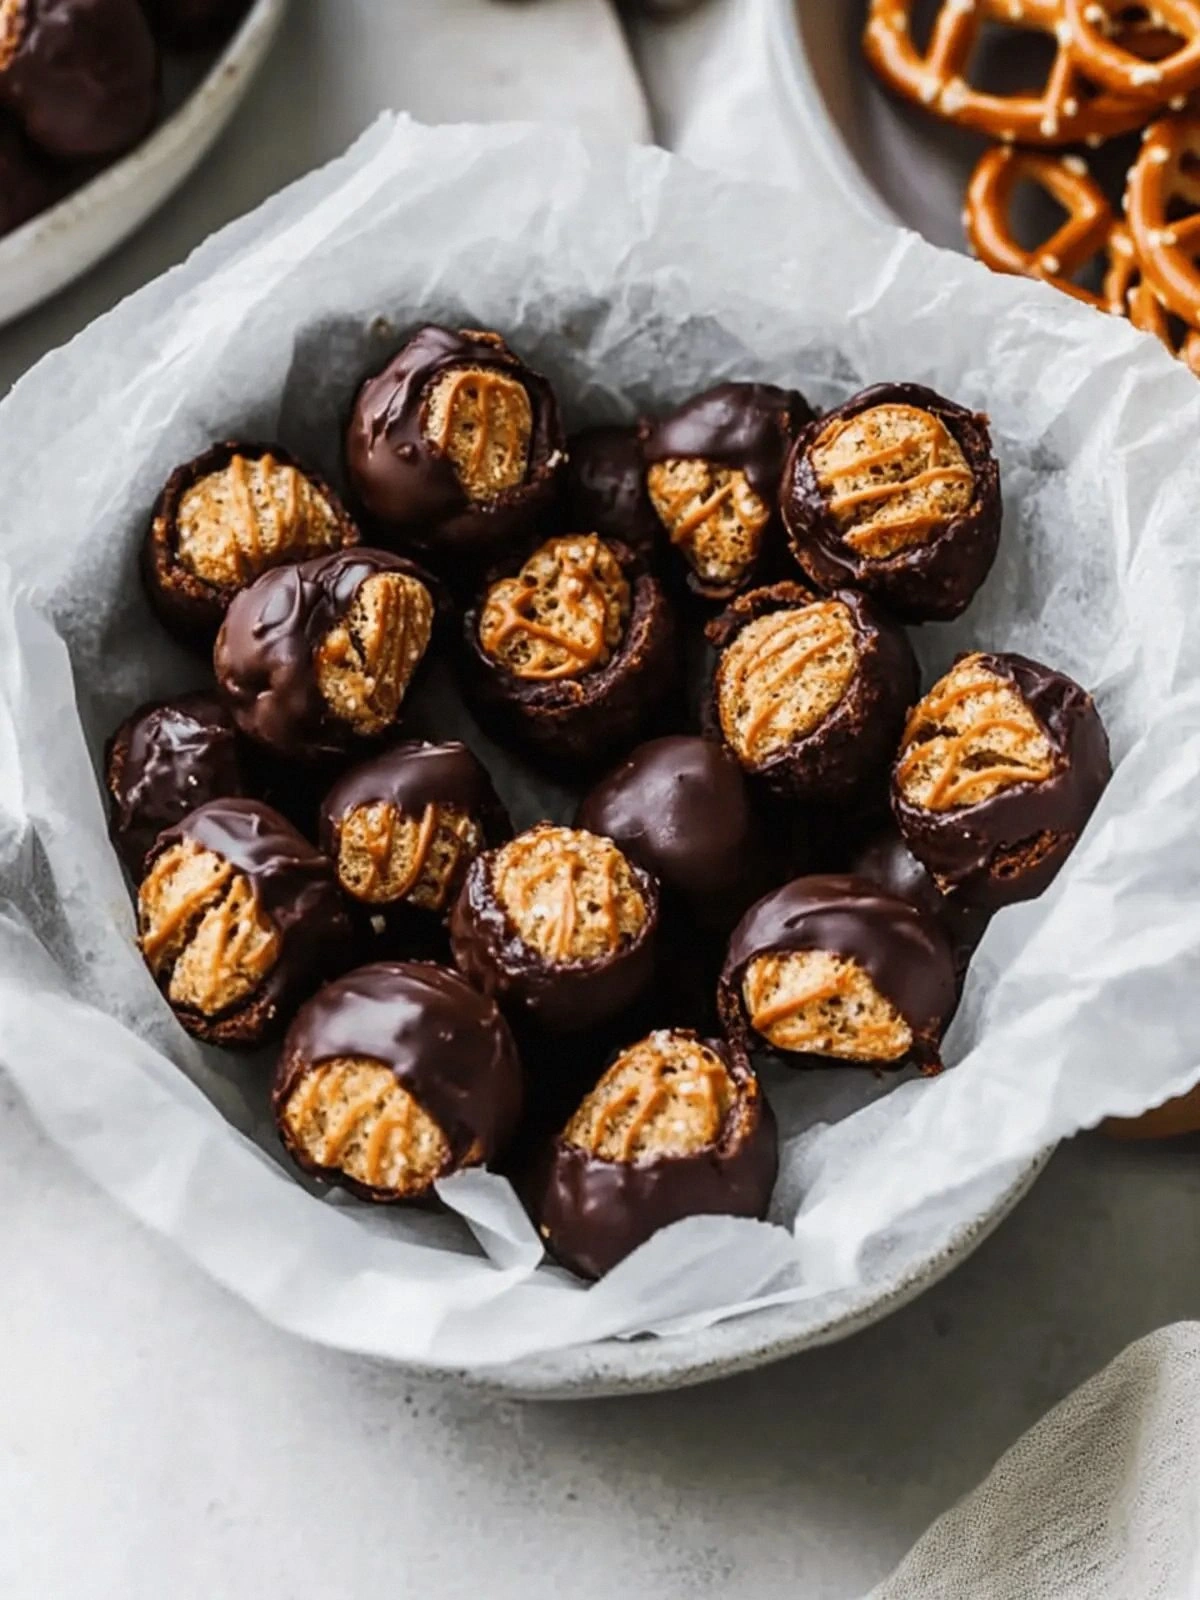
- Flavor: The marriage of creamy peanut butter and sweet honey creates a rich base that sings with every bite. The subtle bitterness of dark chocolate chips balances the sweetness, resulting in a harmonious flavor profile that satisfies.
- Texture: Crisp pretzel twists provide a satisfying crunch, while the peanut butter mixture gives a chewy center. The chocolate coating adds a glossy, melt-in-your-mouth finish.
- Simplicity: No oven required, no complicated equipment—just a mixing bowl, a spoon, and a little patience. This is the kind of snack that can be whipped up in under 30 minutes.
- Uniqueness: The combination of pretzel twists and peanut butter is rarely seen in snack recipes. It offers a savory-sweet contrast that feels both nostalgic and brand new.
- Crowd Reaction: At my last gathering, the snack was a hit. Guests kept asking for the recipe, and the leftovers disappeared in minutes. This snack is guaranteed to bring people together.
- Ingredient Quality: Using a high‑quality creamy peanut butter and dark chocolate chips ensures that the snack is both indulgent and wholesome. No artificial additives, just pure, natural flavors.
- Make‑Ahead Potential: Once you chill them, the snacks hold up for a week in the fridge. They’re also freezer friendly—just pop them on a sheet and freeze; thaw before serving.
- Portability: The bite‑size form makes these snacks perfect for on‑the‑go, whether it’s a road trip, a picnic, or a quick office break.
Alright, let's break down exactly what goes into this masterpiece. The next section will walk you through the ingredient list, why each component matters, and some handy swaps.
Inside the Ingredient List
The Flavor Base
Creamy Peanut Butter is the soul of this snack. It delivers a rich, nutty flavor that pairs perfectly with the sweet honey. If you’re looking for an extra protein kick, choose a natural, no‑salt variant. Skipping it would leave the snack bland and lacking depth. A good tip: look for a peanut butter that’s made with just peanuts and a touch of sea salt for a balanced profile.
The Sweet Touch
Honey is the secret sweetener that balances the saltiness of the pretzel twists. Its floral undertones add a subtle complexity. If you’re allergic or just want a different twist, maple syrup can work, but keep in mind it will alter the flavor profile. The key is to use a golden honey, not a light one, for that deeper, richer taste.
The Texture Crew
Almond Flour provides a gluten‑free, nutty base that holds the mixture together. It’s lighter than wheat flour and adds a pleasant nutty crunch. If you’re looking to experiment, try oat flour or coconut flour, but remember to adjust the liquid content accordingly. Skipping the flour would result in a sticky mess that won’t hold its shape.
The Crunch Factor
Pretzel Twists are the star of the show. Their salty crunch adds a satisfying bite that contrasts with the chewy center. If you can’t find pretzel twists, you can use pretzel sticks or even mini pretzel nuggets. The key is to keep them whole; crushed pretzels lose the crunch factor.
The Final Flourish
Dark Chocolate Chips give the snack its glossy finish and a bittersweet finish that cuts through the sweetness. They also add a touch of indulgence without overloading the snack with sugar. For a vegan option, use dairy‑free dark chocolate chips. Skipping the chocolate will turn the snack into a plain peanut‑butter bite—still good, but missing that wow factor.
Everything's prepped? Good. Let's get into the real action.
The Method — Step by Step
- First, gather all your ingredients on a clean surface. Measure out 1 cup of creamy peanut butter, 1/4 cup honey, 1 cup almond flour, 1 cup pretzel twists, and 1 cup dark chocolate chips. Having everything ready will keep the process smooth and prevent any last‑minute scrambling. This is the moment of truth.
- In a large mixing bowl, combine the creamy peanut butter and honey. Use a whisk or a hand mixer on low speed until the mixture is silky and lump‑free. The honey should dissolve into the peanut butter, creating a glossy base that’s ready to absorb the flour. If the mixture is too thick, add a splash of almond milk to loosen it.
- Gradually fold in the almond flour, stirring constantly. The dough should start to come together, forming a cohesive mass that isn’t sticky. This step is crucial for the texture; too much flour will make the bites dry, too little will make them fall apart. The dough should be firm enough to roll into balls.
- Fold in the pretzel twists, ensuring they’re evenly distributed throughout the dough. The pretzels should be coated in the peanut‑butter mixture, so they’re not just stuck together. This gives each bite that satisfying salty crunch.
- Using a tablespoon or a small cookie scoop, portion the mixture into 1‑inch balls. Place them on a parchment‑lined baking sheet, spaced about an inch apart. The balls should look uniform; this ensures even chilling and chocolate coating.
- Refrigerate the balls for 20 minutes, or until they’re firm to the touch. Chilling sets the structure and makes the chocolate coating easier to apply. If you’re in a hurry, you can pop them in the freezer for 10 minutes.
- While the bites chill, melt the dark chocolate chips. Microwave in 30‑second intervals, stirring in between, until smooth. Alternatively, use a double boiler for a gentler melt. Watch the chocolate closely; it can scorch quickly.
- Dip each chilled bite into the melted chocolate, coating about half of each ball. Use a fork to lift them, letting excess chocolate drip back into the bowl. Place the coated bites back on the parchment sheet. The chocolate should set within 5 minutes, creating a glossy shell.
- Once the chocolate has set, store the bites in an airtight container in the refrigerator. They’ll keep fresh for up to a week. If you’re making them in bulk, you can freeze them for up to a month; just thaw them at room temperature before serving.
That's it — you did it. But hold on, I've got a few more tricks that'll take this to another level. These insider tips will help you avoid common pitfalls and elevate the flavor profile even further.
Insider Tricks for Flawless Results
The Temperature Rule Nobody Follows
Many people think room temperature ingredients are fine, but that can make the mixture too soft and sticky. Keep everything chilled until you’re ready to mix. This ensures the peanut butter stays thick, making it easier to coat the pretzels and form firm balls. I once made a batch at room temperature, and the result was a mushy mess that didn’t hold its shape. Lesson learned.
Why Your Nose Knows Best
When you first add honey to the peanut butter, you’ll notice a subtle floral aroma. Trust that scent; it indicates the honey has blended properly. If you don’t smell anything, it might be because the mixture is too thick or not well combined. A good aroma signals a well‑balanced flavor.
The 5‑Minute Rest That Changes Everything
After the chocolate sets, let the bites rest for 5 minutes before moving them to the fridge. This allows the chocolate to fully firm up, preventing it from melting when you handle them. Some friends skipped this step and ended up with chocolate drips on their fingers. It’s a small pause that pays off big.
The Secret to Non‑Sticky Balls
If your hands get sticky, use a silicone spatula or a damp paper towel to scoop the mixture. The damp towel helps keep your hands clean and reduces the need for extra oil. This trick keeps the prep area tidy and makes the process smoother.
The Quick Chill Trick
If you’re short on time, pop the formed balls in the freezer for 10 minutes. This rapid chill sets the structure faster than the fridge, saving you valuable minutes. Just remember to take them out to room temperature before dipping in chocolate to avoid condensation.
The Perfect Chocolate Finish
For a glossy finish, add a teaspoon of coconut oil to the melted chocolate. This small addition smooths the surface and gives a shine that’s irresistible. I once tried this and the chocolate looked like a glossy lake, making the snacks look even more decadent.
Creative Twists and Variations
This recipe is a playground. Here are some of my favorite ways to switch things up:
Sweet & Salty Surprise
Swap the pretzel twists for sea‑salted popcorn. The popcorn’s light crunch pairs beautifully with the peanut butter base, creating a snack that’s both sweet and salty. This variation is great for movie nights.
Nut‑Free Alternative
Replace the peanut butter with sunflower seed butter and almond flour with oat flour. This keeps the snack nut‑free while still delivering a creamy texture. The sunflower seeds add a subtle earthy flavor that complements the honey.
Extra Crunchy Pretzel Twist
Crush a portion of the pretzel twists into smaller pieces and fold them into the dough. This adds an extra crunch factor that’s perfect for those who love a bit more texture. It also gives a more uniform bite size.
Spiced Peanut Butter Edition
Add a pinch of cayenne pepper or smoked paprika to the peanut butter mixture. The spice gives the snack a subtle kick that pairs well with the chocolate. This variation is great for those who like a little heat.
Mini Cookie Dough Twist
Fold in a handful of mini chocolate chip cookie dough pieces before forming the balls. This turns the snack into a chocolate cookie‑in‑a‑bite treat. The cookie dough adds a chewy, chocolatey center that’s hard to resist.
Vegan Dark Chocolate Delight
Use dairy‑free dark chocolate chips and ensure your peanut butter is free from added sugars or oils. This version is fully vegan and still delivers that rich, bittersweet chocolate finish. It’s a great option for plant‑based snack lovers.
Storing and Bringing It Back to Life
Fridge Storage
Place the finished bites in an airtight container with a paper towel at the bottom to absorb excess moisture. Store them in the refrigerator for up to 7 days. The paper towel keeps the chocolate from becoming sticky and the container prevents the snacks from absorbing fridge odors.
Freezer Friendly
For longer storage, lay the bites on a parchment‑lined tray and freeze them for 2–3 hours until solid. Transfer the frozen bites to a freezer‑safe zip‑lock bag and store for up to 3 months. When ready to serve, let them thaw at room temperature for 15 minutes.
Best Reheating Method
To revive the crunch, pop the bites in the microwave for 10 seconds on low power. The brief heat restores the chocolate’s glossy shine and the pretzel’s crunch. If you prefer a warm snack, you can warm them in a preheated oven at 300°F for 3–4 minutes. Just watch closely to avoid over‑browning.