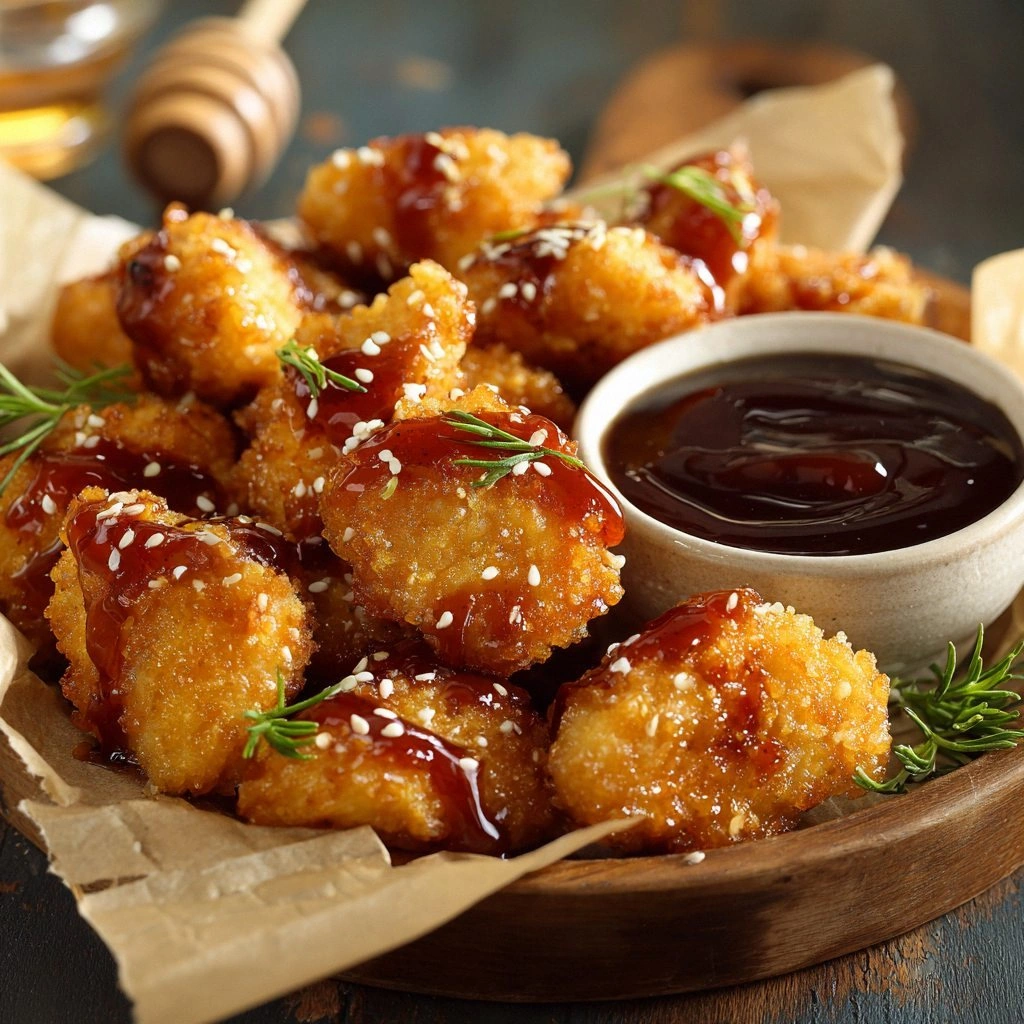
Picture this: I was in the middle of a late‑night binge on takeout when my phone buzzed with a text from my roommate: “You’re not going to believe the mess I made with that chicken recipe.” I stared at the stack of half‑cooked, soggy nuggets that had somehow ended up in a paper bag. My stomach growled louder than the sizzling pan. That night, I decided to rewrite the rulebook for chicken nuggets, turning a kitchen disaster into a culinary triumph. The result? A honey‑garlic glaze that coats the chicken like a velvet ribbon, with a crunch that shatters like thin ice.
I’ll be honest — I ate half the batch before anyone else even got a taste. That sticky, sweet‑savory coating was so addictive that I almost tried to serve it as a main course. If you’ve ever struggled with bland or soggy nuggets, you’re not alone. I’ve spent years tweaking sauces and coatings, and this version is hands down the best you’ll ever make at home. The secret? A simple, balanced glaze that caramelizes in the pan, creating a glossy finish that clings to each bite. And the flavor? It’s a dance of honey’s natural sweetness, garlic’s punchy bite, and soy sauce’s umami depth.
Most recipes get this completely wrong by over‑browning the coating or under‑seasoning the glaze. I dare you to taste this and not go back for seconds. Picture yourself pulling this out of the oven, the whole kitchen smelling incredible, and every family member begging for the recipe. The first bite is a burst of sweet, smoky, and slightly spicy notes that linger on the palate. The texture is a delightful contrast: a crisp exterior that gives way to juicy, tender chicken inside. This is the kind of dish that turns an ordinary dinner into a memorable feast.
Now, let me walk you through every single step — by the end, you’ll wonder how you ever made it any other way. I’ve poured my heart and a few kitchen mishaps into this recipe, and I can’t wait to share the playbook. So grab your apron, and let’s get cooking.
What Makes This Version Stand Out
- Taste: The glaze balances honey’s sweetness with garlic’s boldness, creating a flavor profile that’s both comforting and exciting. It’s the kind of sauce that makes every bite a new experience.
- Texture: The coating crisps up to a golden brown while the interior stays juicy, thanks to the double‑dipping technique that locks in moisture.
- Simplicity: With only fifteen ingredients, the recipe stays approachable for beginners and seasoned cooks alike. No fancy gadgets required.
- Uniqueness: The addition of fresh ginger and a splash of olive oil elevates the glaze, giving it a subtle heat and a silky finish that sets it apart from ordinary nuggets.
- Crowd Reaction: This dish is a guaranteed crowd‑pleaser at family gatherings, parties, or a quick weekday dinner. Even the pickiest eaters can’t resist.
- Ingredient Quality: Using high‑quality chicken breast and fresh aromatics ensures a depth of flavor that canned or frozen alternatives can’t match.
- Cooking Method: The pan‑fry‑then‑glaze method is a time‑saver that still delivers professional results.
- Make‑ahead Potential: The nuggets can be pre‑baked, refrigerated, and then quickly reheated, making this a perfect make‑ahead meal.
Inside the Ingredient List
The Flavor Base
All the sweet, salty, and umami notes that make the glaze sing come together in the flavor base. Honey provides a natural sweetness that caramelizes beautifully when heated. Soy sauce adds depth, creating a savory backbone that balances the honey’s sugar. Fresh garlic offers a pungent kick, while a touch of grated ginger brings a subtle heat that lingers on the tongue. Together, they form a sauce that coats the nuggets like a glossy ribbon.
The Texture Crew
The texture crew is all about achieving that coveted crunch. The flour and panko breadcrumb blend creates a light, airy coating that crisps up to a golden brown. The flour also helps the coating adhere to the chicken, preventing it from falling apart during cooking. Milk and egg form a batter that binds the coating to the meat, creating a uniform crust. The butter and olive oil add richness and help the coating brown evenly.
The Unexpected Star
The unexpected star is the fresh ginger. Though it’s a small amount, it adds a bright, zesty note that cuts through the sweetness of honey. Ginger’s natural antioxidants also bring a subtle health benefit to the dish. If you’re not a fan of ginger, you can substitute it with a pinch of ground coriander for a different aromatic twist.
The Final Flourish
The final flourish is the finishing glaze that caramelizes on the surface of the nuggets. It’s applied in the last few minutes of cooking, allowing the sugars to brown and the flavors to intensify. The glaze locks in moisture, ensuring each bite remains juicy. A quick swirl of butter at the end adds a silky sheen that makes the dish look restaurant‑quality.
Everything's prepped? Good. Let's get into the real action. I’m about to walk you through each step with a splash of personality and a pinch of humor.
The Method — Step by Step
- Start by cutting the chicken breast into bite‑sized nuggets, about 2 inches each. Pat them dry with a paper towel to ensure the coating sticks. Season each piece lightly with salt and pepper; this will enhance the overall flavor. Set the seasoned chicken aside while you prepare the coating.
- In a shallow dish, whisk together the flour, garlic powder, onion powder, and a pinch of black pepper. This dry mix forms the first layer of your coating. Make sure the spices are evenly distributed; a clumpy mix will ruin the crispness.
- In a second dish, beat the egg with the milk until frothy. This wet mixture will bind the flour to the chicken. Dip each nugget in the egg wash, letting excess drip off before transferring it to the flour mixture. Ensure each piece is fully coated.
- Heat the olive oil in a large skillet over medium heat. Once hot, add the butter and let it melt until foamy. Add the coated chicken pieces in a single layer, making sure not to overcrowd the pan. This allows each nugget to develop a golden crust.
- Cook the nuggets for 4–5 minutes on each side, flipping only once. The goal is to achieve a crisp exterior while keeping the inside juicy. When the edges start pulling away and the underside turns a deep amber, it’s time to flip.
- While the chicken is still sizzling, whisk together the honey, soy sauce, minced garlic, and grated ginger in a small bowl. Pour this mixture over the nuggets, ensuring each piece is coated. The glaze will bubble and thicken, creating a glossy finish.
- Once the glaze has thickened and the nuggets are golden brown, remove the pan from heat. Let the nuggets rest for a minute; this allows the coating to set and prevents the glaze from sliding off.
- Serve immediately with a side of your favorite dipping sauce or a fresh green salad. The sweet‑savory glaze pairs beautifully with a tangy yogurt dip or a spicy sriracha mayo.
- If you’re preparing ahead, store the cooked nuggets in an airtight container in the fridge for up to 3 days. Reheat in a skillet or oven to restore crispness.
That’s it — you did it. But hold on, I’ve got a few more tricks that will take this to another level. From tweaking the glaze consistency to mastering the perfect flip, these insider tips will ensure every batch is flawless.
Insider Tricks for Flawless Results
The Temperature Rule Nobody Follows
Many cooks assume a single heat setting works for all steps. In reality, the skillet should be medium‑high when searing the nuggets and then lowered to medium when glazing. This prevents the coating from burning while still achieving a deep, caramelized finish. Keep the oil shimmering but not smoking; a small drop of water should sizzle instantly.
Why Your Nose Knows Best
Before flipping the nuggets, listen for that subtle crackle of the crust. The aroma of caramelizing honey is a reliable indicator that the glaze is ready to set. If the smell is more sweet than savory, you’re still too early. Trust your senses; they’re the best sous‑chef you’ll ever have.
The 5‑Minute Rest That Changes Everything
After removing the nuggets from heat, let them rest for 5 minutes. This pause allows the juices to redistribute, keeping the meat moist. It also lets the glaze thicken into a silky coating that clings to each piece. Skipping this step often results in a soggy, uneven finish.
Double‑Dip for Extra Crunch
If you love an extra crunch, double‑dip the nuggets in the flour mixture before frying. This creates a thicker crust that stays crisp even after the glaze is applied. Just be sure to shake off any excess flour before adding the next layer.
Use a Cast‑Iron Skillet for Even Heat
A cast‑iron skillet retains heat better than non‑stick pans, ensuring a consistent sear across all nuggets. The even heat distribution prevents hot spots that can burn the glaze. If you don’t have cast iron, a heavy‑bottomed skillet will also work well.
Creative Twists and Variations
This recipe is a playground. Here are some of my favorite ways to switch things up:
Spicy Sriracha Honey
Add a tablespoon of sriracha to the glaze for a fiery kick that complements the honey’s sweetness. This variation is perfect for those who love heat but don’t want to sacrifice flavor. Serve with a cool cucumber yogurt dip to balance the spice.
Citrus Zest Surprise
Grate a teaspoon of orange zest into the glaze for a bright, citrusy twist. The zest adds a fresh aroma that lifts the dish. Pair with a light vinaigrette for a refreshing contrast.
Smoky Chipotle Touch
Incorporate a teaspoon of chipotle powder into the flour mixture for a subtle smokiness. This gives the nuggets a deeper, more complex flavor profile. A side of corn salsa works wonders with this variant.
Herb‑Infused Crunch
Stir chopped fresh rosemary and thyme into the breadcrumb mix. The herbs infuse the coating with aromatic depth. This version pairs beautifully with roasted vegetables.
Maple‑Mustard Blend
Replace half the honey with pure maple syrup and add a splash of Dijon mustard to the glaze. The maple’s subtle molasses flavor complements the mustard’s sharpness, creating a sophisticated sweet‑savory balance.
Thai Coconut Twist
Swap the milk for coconut milk in the batter and add a pinch of curry powder to the glaze. The coconut milk gives a creamy undertone, while the curry adds a hint of warmth. Serve with a lime‑coconut dipping sauce for a tropical flair.
Storing and Bringing It Back to Life
Fridge Storage
Cool the nuggets completely before placing them in an airtight container. Store in the refrigerator for up to three days. The coating will stay firm, and the glaze will retain its flavor.
Freezer Friendly
For longer storage, freeze the nuggets in a single layer on a parchment‑lined tray, then transfer to a freezer bag. They’ll keep for up to two months. Thaw overnight in the fridge before reheating.
Best Reheating Method
Reheat in a hot skillet or oven at 375°F until the coating is crisp again. Add a splash of water before reheating to keep the nuggets moist, then let the steam evaporate. This simple trick restores the original texture without drying out the chicken.