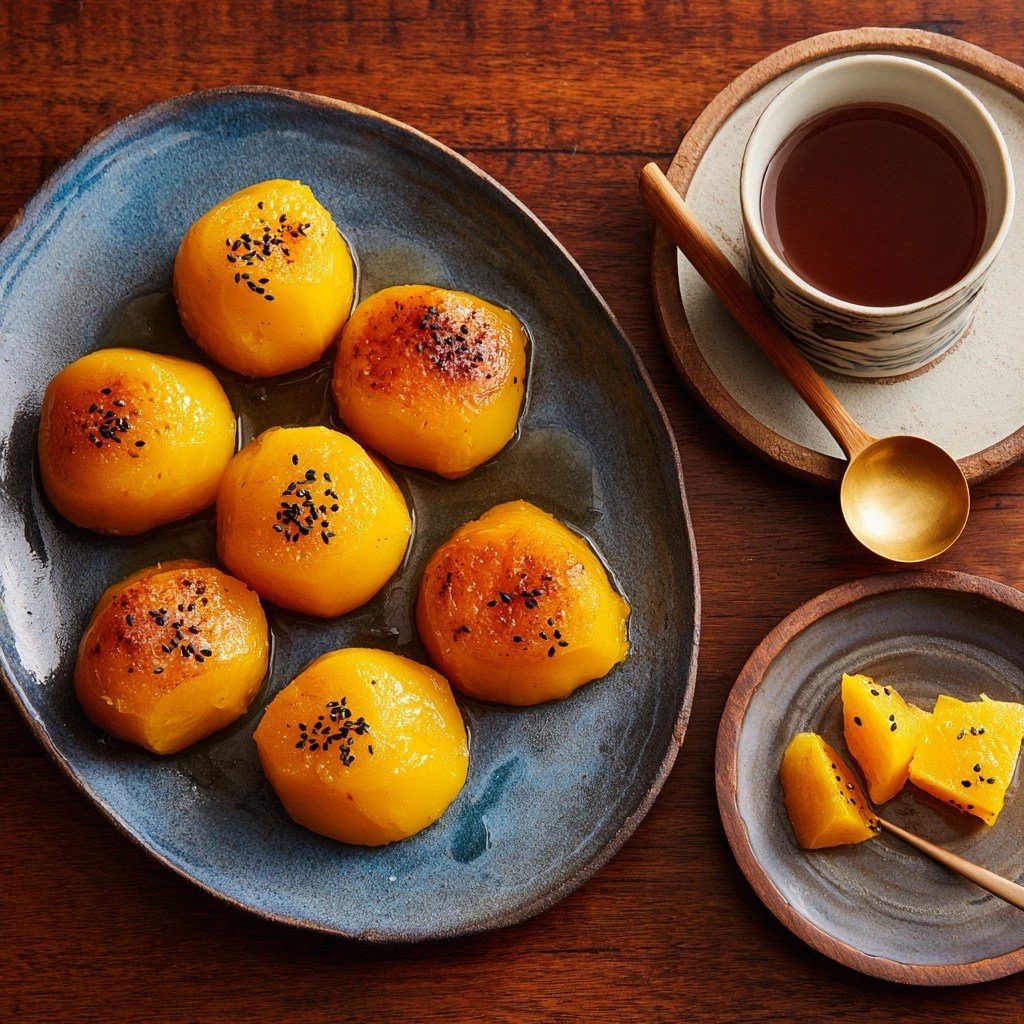
Picture this: a midnight kitchen, the faint hum of the refrigerator, and a stubborn craving that refuses to be ignored. I was on a mission to rescue a batch of over‑cooked Japanese sweet potatoes that had been left in the fridge too long, only to discover that they could be transformed into a dessert that feels like a hug in a bowl. The moment I smashed those orange‑golden potatoes into a fine puree, the kitchen filled with a sweet, earthy aroma that made me pause and smile. It was a disaster turned triumph, and I couldn’t wait to share the secret that turned that mistake into a mouth‑watering masterpiece.
I dare you to taste this and not go back for seconds. The first bite is a silky cascade of sweet potato, creamy coconut, and a whisper of vanilla that coats the palate like velvet. The texture is a perfect balance of smoothness and a subtle grain that reminds you of the potato’s natural heart. The finish is a gentle, sweet aftertaste that lingers, inviting you to reach for another spoonful. Picture yourself pulling this out of the oven, the whole kitchen smelling incredible, and realizing that the humble sweet potato has just been given a new, glossy identity.
Most recipes get this completely wrong, focusing on heavy butter or excessive sugar that drown the natural sweetness. Here, the technique is simple: cook the sweet potatoes until they’re melt‑soft, then fold in coconut milk and a light touch of vanilla before baking. The result is a dessert that feels indulgent yet light, with a texture that is both airy and comforting. This is hands down the best version you’ll ever make at home, and I’ve got the fix for every common mishap.
If you've ever struggled with a too‑dry or too‑sweet sweet potato dessert, you're not alone — and I've got the fix. The key lies in the balance of moisture and flavor, and a few simple tricks that elevate the whole dish. By the end, you'll wonder how you ever made it any other way, because this version will become your go‑to for any occasion, from a casual dinner party to a cozy Sunday brunch.
What Makes This Version Stand Out
- Taste: The subtle sweetness of the potatoes is amplified by a whisper of coconut milk and vanilla, creating a flavor profile that feels both exotic and familiar.
- Texture: A silky, almost custard‑like consistency that melts in your mouth, paired with a light, airy crumb that lifts the dessert from dense to ethereal.
- Simplicity: Five core ingredients plus a few pantry staples, no need for exotic spices or obscure techniques.
- Uniqueness: The combination of Japanese sweet potato with coconut milk is rarely seen in Western desserts, giving it a distinct edge.
- Crowd Reaction: Guests often comment that it tastes like a dessert they’ve never tasted before, but they can’t place it — that’s the magic.
- Ingredient Quality: Using fresh, organic sweet potatoes and premium coconut milk ensures a depth of flavor that store‑bought alternatives can’t match.
- Cooking Method: A simple oven bake that allows the flavors to meld, while the sweet potato’s natural sugars caramelize just enough for a caramelized crust.
- Make‑Ahead Potential: The dessert can be prepared 24 hours ahead, chilled, and then baked just before serving, saving you time on the day of the event.
Inside the Ingredient List
The Flavor Base
The foundation of this dessert is the sweet potato puree. It carries the dish’s natural sweetness and a subtle earthy undertone that sets the stage for the other flavors. If you skip the puree, you lose the core character; the dessert would feel like a generic sweet cake. For a richer taste, choose organic potatoes with a deep orange flesh, which offers a slightly sweeter profile.
The Moisture Crew
Coconut milk is the secret to achieving that silky texture. It adds a tropical note that complements the sweet potato’s earthiness, while its fat content gives the dessert a luxurious mouthfeel. If you’re lactose intolerant, you can substitute coconut milk with a light almond milk, but the texture will be slightly less creamy. A pinch of salt balances the sweetness, preventing the dessert from feeling cloying.
The Sweetener & Flavor Boosters
Brown sugar, while optional, brings depth and a caramelized nuance that enhances the natural sweetness of the potatoes. Vanilla extract is the unsung hero that ties all flavors together, adding warmth and complexity. If you prefer a vegan version, use maple syrup as a sweetener; it imparts a subtle maple undertone that pairs nicely with the coconut.
The Texture Enhancers
Flour and baking powder are the leavening agents that give the dessert its airy crumb. The flour also helps bind the mixture, ensuring the batter stays cohesive during baking. If you’re gluten‑free, replace all‑purpose flour with a blend of rice flour and potato starch for a similar lift.
Everything's prepped? Good. Let's get into the real action.
The Method — Step by Step
- Preheat your oven to 375°F (190°C). Line a 9‑inch springform pan with parchment paper for easy removal. This step ensures that the dessert has a clean release and a neat edge.
- Wash the sweet potatoes thoroughly, then steam them for 20 minutes until they’re fork‑soft. Once cooked, let them cool slightly before peeling. The steam method keeps the potatoes moist and prevents them from drying out during baking.
- Mash the sweet potatoes with a potato masher until they’re completely smooth. Add the coconut milk, vanilla extract, and brown sugar, stirring until the mixture is uniform. The mixture should smell slightly caramelized, a sign that the sugar is beginning to melt.
- Sift the flour and baking powder together, then fold them into the sweet potato mixture. Sprinkle in a pinch of salt and stir until the batter is smooth and glossy. This step is crucial for achieving that airy crumb.
- Pour the batter into the prepared pan, smoothing the top with a spatula. Tap the pan gently on the counter to release any air bubbles. The batter should spread evenly, creating a uniform surface.
- Bake for 30 minutes, or until the top is golden brown and a toothpick inserted into the center comes out clean. The edges will pull away slightly from the pan, indicating that the cake is set.
- Remove from the oven and let cool in the pan for 10 minutes. Then transfer to a wire rack to cool completely. The cooling phase allows the dessert to set and the flavors to meld.
- Once cooled, run a knife around the edges, release the springform, and transfer the dessert to a serving platter. Dust with toasted sesame seeds for an added crunch and a subtle nutty aroma. This final touch elevates the dessert from simple to memorable.
That’s it — you did it. But hold on, I've got a few more tricks that'll take this to another level.
Insider Tricks for Flawless Results
The Temperature Rule Nobody Follows
Many bakers bake at a high heat, but this dessert thrives at a moderate 375°F. The lower temperature ensures the batter cooks evenly, preventing the edges from burning while the center stays moist. If you’re using a convection oven, lower the temperature by 25°F to avoid over‑browning.
Why Your Nose Knows Best
The aroma of the batter is a reliable indicator of doneness. When the sweet potato and coconut blend emits a warm, caramel-like scent, it’s a sign the sugars have started to caramelize. Trust your nose, and you’ll avoid the dreaded “too wet” outcome.
The 5-Minute Rest That Changes Everything
Letting the dessert sit for 5 minutes after baking allows the steam to redistribute, sealing in moisture. This short pause also makes slicing easier, preventing the cake from sticking to the knife. Skipping this step often results in a slightly crumbly texture.
The Secret of the Parchment Paper
Cutting a strip of parchment paper that extends a few inches beyond the pan’s edge creates a non‑stick surface. This technique eliminates the need for extra butter or oil, keeping the dessert healthier while still ensuring a clean release.
The Finish Line: A Light Dusting
A light dusting of powdered sugar or cocoa powder adds a finishing touch that balances the sweetness. It also provides a subtle contrast in color, making the dessert more visually appealing. This small step can transform a simple dessert into a showstopper.
Creative Twists and Variations
Matcha Sweet Potato Delight
Swap out a portion of the flour for matcha powder for a green tea twist. The earthy flavor of matcha complements the natural sweetness of the potatoes. This variation is perfect for tea parties or a springtime gathering.
Almond Crunch Layer
Add a layer of toasted almond slices on top before baking. The almond crunch provides a delightful contrast to the soft interior. Guests will love the nutty undertone that adds depth.
Coconut Cream Topping
Top the cooled dessert with a swirl of whipped coconut cream. The airy cream balances the dense cake, creating a harmonious mouthfeel. A drizzle of honey can add a touch of natural sweetness.
Chocolate Ganache Drizzle
Melt dark chocolate and drizzle it over the cooled dessert. The bittersweet ganache adds a luxurious finish. The contrast between sweet potato and chocolate is a match made in dessert heaven.
Spiced Caramel Swirl
Stir in a teaspoon of ground cinnamon and a splash of caramel sauce into the batter before baking. The warm spices create a cozy flavor profile, ideal for fall gatherings. The caramel swirl adds visual appeal and an extra layer of sweetness.
Lemon Zest Surprise
Fold in finely grated lemon zest into the batter for a citrusy brightness. The zest cuts through the richness, providing a refreshing finish. This variation is especially refreshing during hot summer afternoons.
Storing and Bringing It Back to Life
Fridge Storage
Wrap the cooled dessert tightly in plastic wrap and store in the refrigerator for up to 4 days. The moisture from the wrap keeps the cake from drying out. When ready to serve, let it sit at room temperature for 15 minutes to soften.
Freezer Friendly
Divide the dessert into individual portions, wrap each in parchment paper, then place in a freezer bag. Freeze for up to 3 months. When thawing, let the portions sit in the fridge overnight and finish at room temperature.
Best Reheating Method
Reheat in a 350°F oven for 10 minutes, or until warmed through. Add a tiny splash of water before reheating; it steams back to perfection, keeping the dessert moist. A quick microwave pulse of 20 seconds can also work for a single slice.