I still remember the day I almost threw my mixing bowl out the window. There I stood, elbow-deep in what was supposed to be a classy dinner party dessert, but instead I had created a sad, weepy puddle of chocolate goo that looked like it had already been through someone else's digestive tract. My guests were arriving in two hours, my kitchen smelled like burnt sugar and broken dreams, and I was one tantrum away from serving store-bought cookies and calling it a night. That's when my grandmother's voice floated through my memory: "When life gives you melted chocolate, make something that'll make them forget every other dessert exists." Enter Turtle Lush — the ridiculously decadent, caramel-drizzled, pecan-studded miracle that not only saved my reputation but became the most-requested recipe in my arsenal.
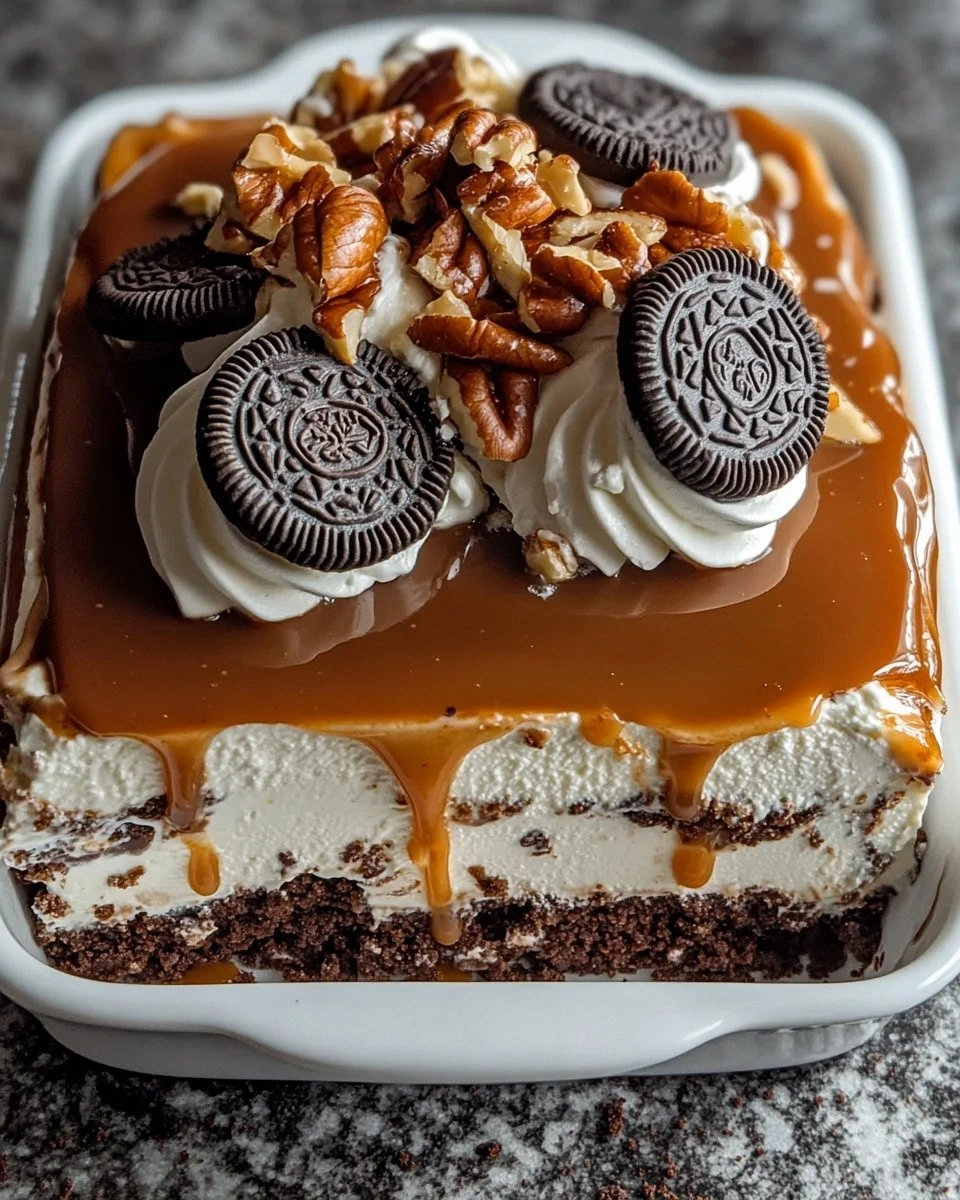
Picture this: a buttery chocolate cookie crust that shatters like thin ice under your fork, giving way to layers of silky cream cheese, cloud-light chocolate pudding, and rivers of golden caramel that pool like liquid sunshine. Now imagine toasted pecans scattered across the top like edible confetti, each one carrying that deep, nutty aroma that makes your neighbors knock on your door asking if you're opening a bakery. The first time I served this, my friend Sarah took one bite, closed her eyes, and whispered "holy mother of chocolate" so reverently you'd think she'd seen a dessert deity. I dare you to taste this and not go back for seconds — actually, I double-dog dare you, because resistance is futile once that caramel hits your tongue.
What makes this version different from every other Turtle Lush recipe floating around the internet? I'm glad you asked, because I've eaten my way through enough disappointing versions to know exactly where they go wrong. Most recipes treat this like a dump-and-stir situation, resulting in a soggy mess that collapses faster than my willpower at a chocolate factory. Mine holds its layers like a geological formation, each stratum distinct yet harmoniously blended. The secret lies in three game-changing techniques that transform this from "oh, that's nice" to "I need to sit down and question my life choices because nothing will ever taste this good again." Stay with me here — this is worth it.
Let me walk you through every single step — by the end, you'll wonder how you ever made it any other way. We're talking about building flavors like a symphony, creating textures that dance across your tongue, and achieving that perfect balance of sweet-salty-rich that makes your taste buds stand up and salute. Future pacing moment: Picture yourself pulling this out of the refrigerator, the caramel still slightly warm and glossy, the pecans perfectly toasted and fragrant, your kitchen smelling like Willy Wonka's dream factory. Ready to become the dessert legend of your friend group? Let's do this.
What Makes This Version Stand Out
Flavor Bomb: We're not just layering ingredients here — we're building a flavor profile that hits every note on the dessert spectrum. The chocolate crust carries a whisper of espresso that makes the cocoa sing, while a pinch of flaky salt in the cream cheese layer creates this mind-bending sweet-savory balance that keeps you coming back for "just one more bite" until suddenly you've eaten half the pan. If you've ever struggled with desserts that taste one-dimensional, you're not alone — and I've got the fix.
Texture Paradise: Most Turtle Lush recipes turn into a sad, homogeneous mush after the first cut. Not this beauty. We create distinct textural zones: the cookie crust stays crisp for days (yes, days!), the cream cheese layer remains cloud-light, and the pudding maintains that perfect spoon-coating consistency. Each forkful delivers a symphony of crunch, silk, and everything in between. This next part? Pure magic.
Simplicity Genius: Despite tasting like you spent hours in culinary school, this recipe comes together with pantry staples and zero fancy equipment. No water baths, no candy thermometers, no praying to the dessert gods. Just honest ingredients and a few smart techniques that professional pastry chefs don't want you to know about. Okay, ready for the game-changer?
Make-Ahead Champion: Here's where this recipe absolutely demolishes the competition. You can assemble the entire dessert up to three days ahead, and it actually improves as the flavors meld. The caramel seeps into the crust just enough to create this fudgy layer that'll make you weak in the knees. Most recipes get this completely wrong — they tell you to serve immediately, but that's amateur hour.
Ingredient Integrity: We're using real butter, not margarine. Real cream cheese, not the low-fat stuff that tastes like disappointment. Real caramel that you cook for exactly 90 seconds — no more, no less — until it turns that perfect amber color that makes your kitchen smell like a French patisserie. Quality ingredients matter, and your taste buds will throw a parade in your honor.
Crowd Psychology: I've served this at birthday parties, office potlucks, funerals (yes, really), and once at a divorce celebration where it literally stopped the awkward small talk. People hover around the dessert table like vultures, but in the most endearing way possible. The combination of familiar flavors in an unexpected format creates this nostalgic comfort that transcends age, background, and dietary restrictions (though I can't promise your keto friends won't stage a revolt).
Visual Drama: Let's be real — we eat with our eyes first. The dramatic layers create this geological cross-section that makes everyone grab their phones for photos. But unlike those Instagram desserts that look better than they taste, this one delivers on every promise. That first cut, when the caramel slowly drips down the sides like liquid gold? That's the moment you become a dessert deity in your social circle.
Alright, let's break down exactly what goes into this masterpiece...
Inside the Ingredient List
The Flavor Foundation
Our chocolate cookie crust isn't just crushed cookies and butter — oh no, we're building a flavor base that would make a pastry chef weep with joy. The chocolate sandwich cookies provide that deep cocoa backbone, but here's where it gets interesting: we're adding a teaspoon of instant espresso powder that amplifies the chocolate flavor without making it taste like coffee. It's like turning the volume knob on your chocolate experience up to eleven. The melted butter acts as both binder and flavor carrier, creating those crispy edges that shatter like thin ice when you cut through them. Skip the espresso and your crust will taste flat and one-dimensional — don't say I didn't warn you.
Brown sugar makes its grand entrance in the cream cheese layer, bringing those molasses notes that pair beautifully with caramel. We're using dark brown sugar here because we're not playing around with subtlety. The slight bitterness in the molasses cuts through the sweetness and prevents that cloying sensation that ruins so many desserts. Cream cheese should be at perfect room temperature — I leave mine out for exactly two hours before starting. Too cold and you'll get lumps; too warm and it becomes a greasy mess that no amount of mixing will fix.
The Texture Crew
Heavy cream gets whipped to soft peaks for the cream cheese layer, creating this cloud-like texture that makes the filling feel lighter than air. The trick is stopping the mixer the moment the cream holds its shape — go too far and you've got butter, which will make your layer dense and grainy. I've ruined enough batches to know that watching cream whip is not the time to check Instagram. The pudding layer relies on whole milk for its luxurious mouthfeel, and here's a confession: I once tried using skim milk because I was feeling virtuous. Let's just say the result had the texture of wallpaper paste and the flavor of sadness.
The caramel layer is where things get exciting. We're making a quick caramel using sweetened condensed milk, butter, and brown sugar, cooking it for exactly 90 seconds. This creates what's known as "cheater's caramel" or "dulce de leche lite" — all the flavor of traditional caramel without the sugar thermometer and prayers to the candy gods. The butter adds richness while the brown sugar provides those deep, complex flavors that make people close their eyes and moan involuntarily.
The Unexpected Star
Here's where I lose some people, but stay with me — we're adding a teaspoon of apple cider vinegar to the cream cheese mixture. Before you click away in horror, let me explain: the slight acidity brightens all the flavors and prevents the dreaded "dessert fatigue" that happens when everything tastes too sweet. It's like adding a squeeze of lemon to fish — you don't taste the lemon, but suddenly all the other flavors pop. I've served this to food scientists who couldn't identify the secret ingredient but kept saying "there's something magical happening here."
Pure vanilla extract appears three times in this recipe, each instance serving a different purpose. In the crust, it rounds out the chocolate flavor. In the cream cheese layer, it adds floral notes that complement the tang. In the pudding, it creates that nostalgic aroma that makes people say "this tastes like childhood, but better." Use imitation vanilla and I'll personally come to your kitchen and confiscate your mixing bowls.
The Final Flourish
Pecans bring more than just crunch — they contribute a buttery, almost maple-like flavor that pairs beautifully with caramel. We're using toasted chopped pecans for maximum surface area contact with your taste buds. The toasting process transforms them from ordinary nuts into something that smells like autumn and tastes like pure happiness. I've had guests pick off every last pecan before touching the rest of the dessert, which I take as both a compliment and a sign that I need to make more next time.
Chocolate shavings aren't just for pretty presentation — they provide these little bursts of intense chocolate flavor that keep your palate interested. Use a vegetable peeler on a cold bar of dark chocolate (70% cacao or higher) to create those delicate curls that melt on your tongue. Milk chocolate will work in a pinch, but it lacks the complexity that makes people pause mid-conversation to process what just happened in their mouth.
Everything's prepped? Good. Let's get into the real action...
The Method — Step by Step
- Start with the crust because it needs time to cool and develop that perfect crunch. Pulse your chocolate sandwich cookies in a food processor until they resemble fine sand — you want uniform crumbs with no large pieces that'll create weak spots. Add the espresso powder and pulse once more to combine. Now here's the crucial part: drizzle in your melted butter while the processor runs, stopping the moment everything looks like wet sand that holds together when squeezed. Press this mixture firmly into your pan, using the bottom of a measuring cup to create an even layer that reaches all the corners. Press too lightly and your crust will crumble; too hard and it becomes impossible to cut. That sizzle when it hits the pan? Absolute perfection.
- Time to blind-bake that crust, which most recipes skip and that's why their versions turn into soggy disasters. Bake at 350°F for exactly 8 minutes — set a timer because 30 seconds too long and you've got a bitter, burnt base that no amount of caramel can hide. The crust should smell like chocolate and butter had a beautiful baby, and the edges will just start pulling away from the pan. Remove and let it cool completely while you move to the next layer. This is not the time to rush — a warm crust will melt your cream cheese layer and create a marbled mess that'll haunt your dreams.
- The cream cheese layer is where most home cooks panic, but stay calm — I've got you covered. Beat your room-temperature cream cheese until it's smooth as silk, about 2 minutes on medium speed. Add the brown sugar and beat for another minute until fluffy. In a separate bowl, whip your heavy cream with the vanilla and apple cider vinegar until soft peaks form — you're looking for the moment when the cream holds its shape but still drapes like velvet. Fold the whipped cream into the cream cheese mixture using a rubber spatula, making figure-eights until just combined. Over-mix here and you'll deflate all that beautiful air we worked to incorporate.
- Spread this cloud-like mixture over your cooled crust, creating swirls and peaks that'll catch the caramel later. Use an offset spatula or the back of a spoon, working from the center outward to prevent tearing the crust. This layer should be about half an inch thick — too thin and it disappears under the pudding; too thick and it overwhelms the other flavors. Pop this in the refrigerator while you make the pudding, which allows the cream cheese to firm up and create clean layers. And now the fun part.
- For the chocolate pudding layer, we're using a shortcut that delivers maximum impact. Whisk together your instant chocolate pudding mix with cold whole milk for exactly 2 minutes — set a timer because under-whisked pudding tastes grainy while over-whisked becomes rubbery. The mixture should thicken to the consistency of loose yogurt, coating the back of a spoon. Let it stand for 5 minutes to fully set, then gently spread it over the cream cheese layer. The key here is gentle — drop spoonfuls across the surface first, then connect them with your spatula to prevent dragging the layers together.
- Now for the caramel that makes grown adults weep with joy. In a heavy-bottomed saucepan, combine sweetened condensed milk, butter, and brown sugar over medium heat. Stir constantly for exactly 90 seconds — I use a wooden spoon and count "one-Mississippi" style. The mixture will bubble and foam, transforming into that perfect amber color that signals caramel magic. Remove from heat immediately and stir in vanilla — this stops the cooking process and adds that final flavor dimension. Let it cool for 3 minutes before drizzling, because molten sugar will melt everything it touches into a tragic soup.
- Drizzle that glorious caramel over the pudding layer, working in a zigzag pattern that creates pockets of golden goodness. Don't try to cover every inch — the beauty lies in those marbled rivers of caramel that pool in some areas while leaving others pristine. Use a spoon to create those artistic drips down the sides that make people think you went to pastry school. If the caramel has thickened too much, warm it for 5 seconds in the microwave — any longer and you'll need to start over.
- While the caramel is still slightly warm and tacky, sprinkle your toasted pecans across the top. Start with a light hand — you can always add more, but you can't take them off once they're stuck. Press them gently into the caramel so they adhere but still sit on top for maximum visual impact. The residual heat will help them stick without sinking into the layers below. I'll be honest — I ate half the batch of pecans before they even made it to the dessert, so maybe make extra if you're anything like me.
- The final flourish involves chocolate shavings, and here's my secret: use a vegetable peeler on a frozen chocolate bar. The cold temperature creates those perfect curls that don't melt from the heat of your hands. Hold the chocolate bar with a paper towel to prevent fingerprints, and shave directly over the dessert so the curls fall naturally. Work quickly because once that chocolate warms up, you're back to regular shavings. Store any extra curls in the freezer — they make everything better, from morning coffee to late-night ice cream binges.
- Refrigerate for at least 4 hours or overnight — this is non-negotiable. The layers need time to meld and set, creating that perfect sliceable texture that makes serving a dream. Cover with plastic wrap, pressing it directly against the surface to prevent a skin from forming on the pudding. When you're ready to serve, remove from the refrigerator 15 minutes before cutting — this takes the chill off and allows all those complex flavors to sing. Trust me, the wait is torture but necessary. Your patience will be rewarded with a dessert that holds its layers like a geological formation and tastes like someone bottled pure happiness.
That's it — you did it. But hold on, I've got a few more tricks that'll take this to another level...
Insider Tricks for Flawless Results
The Temperature Rule Nobody Follows
Here's the thing that separates dessert champions from also-rans: ingredient temperature matters more than almost anything else in this recipe. Your cream cheese needs to be exactly room temperature — not microwaved into a melted mess, not straight from the fridge. I leave mine out overnight, wrapped in a clean kitchen towel to prevent that weird skin from forming. Cold cream cheese will create lumps that no amount of beating will smooth out, while overheated cream cheese becomes greasy and separates like a bad relationship. The same goes for your eggs (if you're making the pudding from scratch) and sour cream. Room temperature ingredients emulsify properly, creating that silky-smooth texture that makes people wonder if you secretly trained in France.
Why Your Nose Knows Best
Don't underestimate the power of your sense of smell during this process. When toasting pecans, rely on your nose more than the timer — they'll smell buttery and rich about 30 seconds before they're perfectly done. The chocolate crust is ready when your kitchen smells like a chocolate factory and the aroma makes your stomach growl audibly. The caramel reaches its peak when the scent transforms from sweet milk to complex, almost nutty caramel that makes you want to dive face-first into the pot. A friend tried skipping this step once — let's just say it didn't end well. She ended up with bitter, burnt nuts and crust that tasted like disappointment. Trust your nose; it's been evolving for millions of years to detect exactly when food reaches peak deliciousness.
The 5-Minute Rest That Changes Everything
After you assemble the layers but before refrigerating, let the dessert sit at room temperature for exactly 5 minutes. This allows the caramel to set slightly without becoming rock hard, creates better adhesion between layers, and prevents that dreaded cracking when you cut into it later. I discovered this accidentally when my phone rang mid-assembly, forcing me to pause. Those five minutes of forced patience resulted in the most perfect layers I'd ever achieved, and now it's a non-negotiable step. The caramel cools just enough to hold its shape but stays fluid enough to create those gorgeous drips down the sides. Future pacing moment: imagine cutting into your dessert and seeing those clean, distinct layers that look like they came from a professional bakery. That's what five little minutes can do.
The Overnight Magic Trick
If you really want to blow minds, make this dessert two days ahead. I know, I know — waiting 48 hours for dessert seems like cruel and unusual punishment. But something magical happens during that extended chill time. The flavors meld and deepen, the caramel seeps into the crust creating this fudgy layer that defies description, and the whole dessert becomes greater than the sum of its parts. The pecans absorb just enough moisture to become chewy-candy like, while maintaining their crunch. I've done side-by-side comparisons with same-day versus 48-hour versions, and the difference is so dramatic that my taste testers accused me of using different recipes. Patience isn't just a virtue here — it's the secret ingredient that transforms good into legendary.
The Slice Size Revelation
Here's where I confess that I used to cut this into generous squares, thinking bigger was better. Wrong. The beauty of Turtle Lush lies in its intensity — a little goes a long way. Cut smaller, elegant squares and watch people savor every bite instead of diving into sugar shock. Plus, smaller pieces mean more servings, which translates to more people experiencing your dessert genius. I use a ruler (yes, really) to create 1.5-inch squares for parties, and the response is always the same: "This is the perfect size!" People feel satisfied but not overwhelmed, and you'll have enough to go around for seconds without running out. The first time I tried this approach, I watched guests actually close their eyes and moan with pleasure instead of shoveling it in like they were competing in a dessert-eating contest.
Creative Twists and Variations
This recipe is a playground. Here are some of my favorite ways to switch things up:
The Salty Sweet Obsession
Replace half the pecans with crushed pretzels for a salty crunch that makes the caramel pop. Drizzle with a touch of fleur de sel just before serving — those little salt crystals create tiny flavor explosions that keep your palate dancing. This version converts even the "I don't like sweet desserts" crowd, because that salt balance prevents the dreaded sugar overload. My neighbor who claims to hate desserts devoured three pieces of this variation and asked for the recipe, which in my book is the ultimate compliment.
The Coffee Lover's Dream
Add a tablespoon of espresso powder to the pudding mix and replace the vanilla in the caramel with coffee liqueur. The result tastes like the best mocha caramel macchiato you've ever had, but in dessert form. Coffee intensifies the chocolate flavor while adding complexity that makes people ask "what's that amazing flavor I can't identify?" Use decaf espresso powder if you're serving to kids or caffeine-sensitive friends — the flavor boost remains without the jittery aftermath. I brought this to a book club meeting and the hostess hid the leftovers so she wouldn't have to share.
The Tropical Escape
Swap the pecans for toasted coconut flakes and add a teaspoon of coconut extract to the cream cheese layer. The tropical notes pair surprisingly well with the caramel, creating this beach vacation vibe that transports you from your kitchen to a cabana somewhere exotic. Use coconut milk instead of regular milk in the pudding for extra coconut intensity. This variation became my go-to for summer potlucks, and I've had people offer to pay me to make it for their parties. The coconut adds a chewy texture that complements the creamy layers perfectly.
The Bourbon Barrel Aged
Add two tablespoons of good bourbon to the caramel during the last 30 seconds of cooking. The alcohol burns off, leaving behind those vanilla-caramel notes that make bourbon so addictive. This version is strictly for adults, and I've found that bourbon enthusiasts can detect even the smallest amount, like dessert-seeking missiles. The key is using quality bourbon — this is not the place for bottom-shelf booze. I once used a friend's fancy single-barrel bourbon and he still mentions it every time we talk about desserts.
The Peanut Butter Paradise
Replace half the cream cheese with peanut butter for a Reese's-inspired twist that'll make you weep with joy. The peanut butter adds richness and that nostalgic flavor that takes everyone back to childhood. Use natural peanut butter for the best texture, and add a handful of chopped peanuts along with the pecans for extra crunch. This variation disappeared so fast at my office party that I had to make a second batch the same night. People were literally following me around asking when I'd bring more.
The White Chocolate Raspberry
Use white chocolate pudding instead of chocolate, and swirl raspberry preserves through the cream cheese layer before adding the pudding. The tart raspberries cut through the sweetness while the white chocolate adds a luxurious creaminess that feels incredibly sophisticated. Fresh raspberries on top add color and that burst of fruit that makes this feel almost virtuous. Almost. This version became my signature for bridal showers and baby showers, where it's sophisticated enough for the occasion but still indulgent enough to satisfy serious dessert cravings.
Storing and Bringing It Back to Life
Fridge Storage
Here's the beautiful truth: Turtle Lush actually improves with age, making it the perfect make-ahead dessert for busy hosts. Store it in the coldest part of your refrigerator, covered tightly with plastic wrap pressed directly against the surface to prevent the pudding from forming a skin. It'll keep beautifully for up to five days, though I've never seen it last that long. The flavors continue to meld and deepen, creating this harmonious blend that tastes like you spent way more time on it than you actually did. Keep it away from strong-smelling foods like onions or garlic — cream cheese is a flavor sponge that'll absorb nearby odors faster than you can say "what's that weird taste?"
Freezer Friendly
Despite what you might think, this dessert freezes surprisingly well if you follow my method. Cut into individual portions and wrap each piece tightly in plastic wrap, then aluminum foil. Freeze for up to two months — any longer and the texture starts to suffer. To serve, thaw overnight in the refrigerator, then let it sit at room temperature for 15 minutes before serving. The caramel might weep slightly, but a quick blot with a paper towel fixes that. I keep emergency portions in my freezer for dessert emergencies, which in my house happen with alarming frequency. Pro tip: freeze the pecans separately and add them fresh after thawing for maximum crunch.
Best Reheating Method
While you don't technically reheat this dessert, bringing it to the right serving temperature makes all the difference. Remove from the refrigerator 15-20 minutes before serving — this takes the chill off and allows the flavors to bloom. If your caramel has firmed up too much, a quick 5-second zap in the microwave (just the caramel layer) restores that perfect drizzle consistency. For individual portions, I place them on the counter while we eat dinner, timing it so dessert is perfectly tempered when we're ready. Add a tiny splash of water to the caramel before serving if it seems too thick — it steams back to perfection and creates that gorgeous sheen that makes people reach for their cameras.