I still remember the Christmas Eve when I tried to impress my in-laws with a traditional baklava, only to watch the phyllo sheets crumble into a million flaky pieces while the syrup boiled over and glued itself to my stovetop. There I stood, covered in honey and defeat, when my mother-in-law quietly suggested we turn this disaster into something magical. Fast forward three years, and this Baklava-Custard Christmas Wreath has become the stuff of family legend — the dessert that saved Christmas and became our most requested holiday tradition.
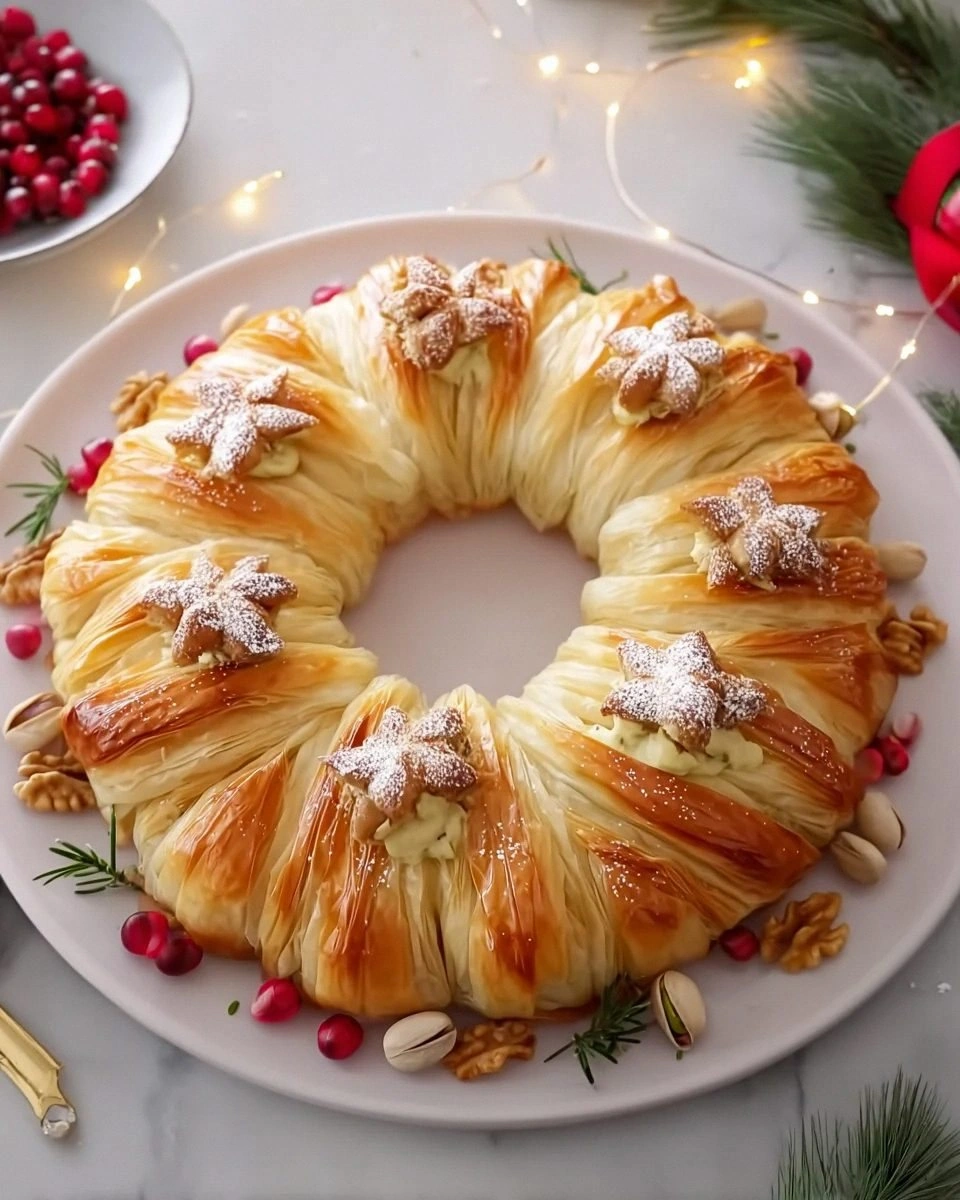
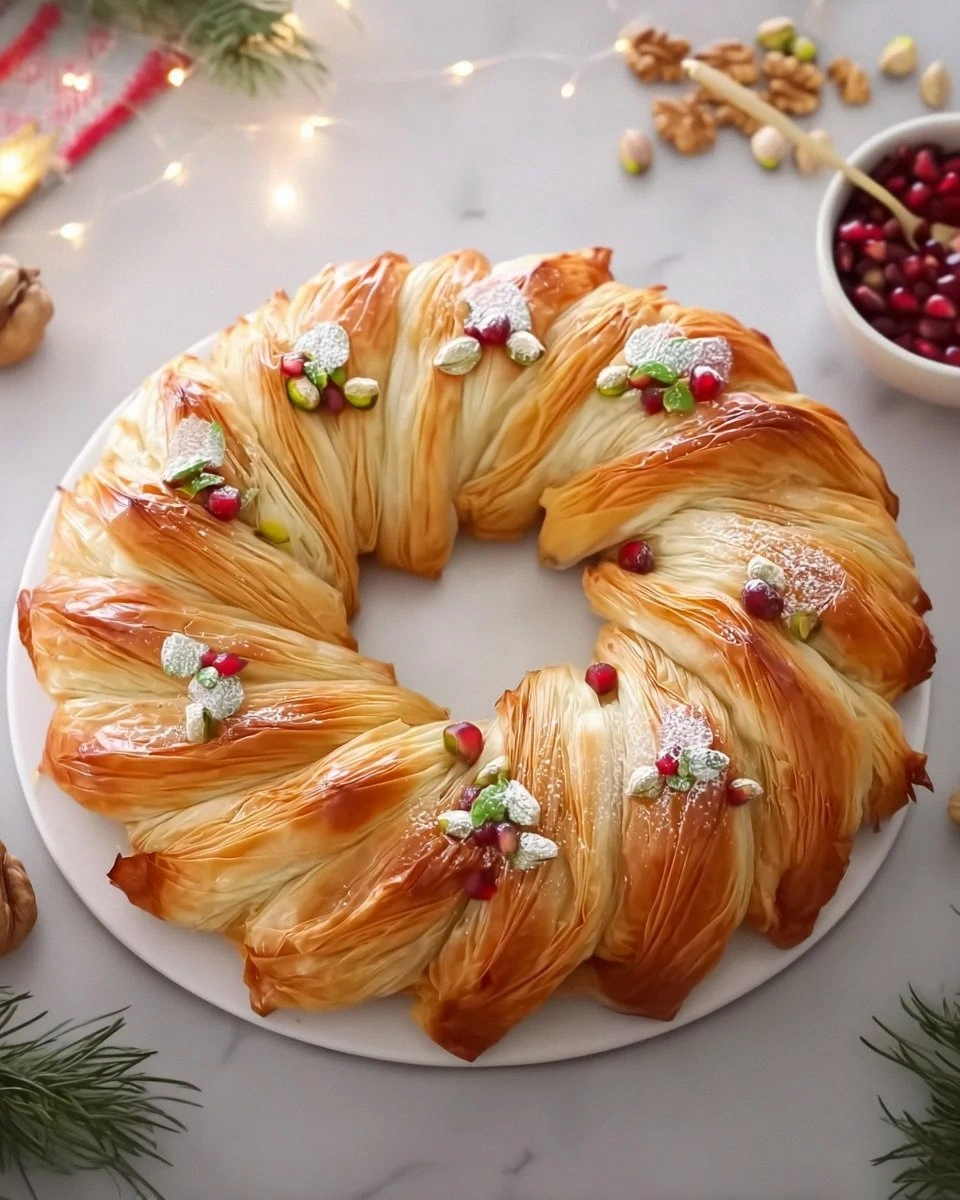
Picture this: golden, crackly layers of phyllo wrapped in a perfect circle, hiding a silky vanilla custard that's been kissed with orange blossom water and cardamom. The whole thing gets drenched in a honey-walnut syrup that seeps into every crevice, creating those signature baklava flavors but in a format that actually makes sense for a holiday gathering. No more wrestling with sticky diamond-cut pieces or watching guests struggle to eat baklava while balancing a cocktail glass. This wreath slices like a dream, serves like a charm, and looks so stunning that my neighbor actually gasped when I brought it to last year's cookie exchange.
The magic happens when the custard soaks into the bottom layers of phyllo, creating this impossible texture that's simultaneously creamy and crispy. Each bite delivers the honeyed sweetness you expect from baklava, but then the custard hits you with this luxurious richness that makes regular baklava seem one-dimensional. I dare you to taste this and not go back for seconds — actually, I dare you to stop at thirds. I'll be honest — I ate half the batch before anyone else got to try it during recipe testing, and I'm not even sorry because it was absolutely worth the sugar coma that followed.
Most recipes get baklava completely wrong by drowning it in syrup or using bland nuts. Here's what actually works: a restrained syrup application that enhances rather than overwhelms, walnuts toasted to the point where they smell like popcorn, and a custard that's thick enough to hold its shape but soft enough to melt on your tongue. Picture yourself pulling this out of the oven, the whole kitchen smelling like honey and butter and Christmas morning, watching your family's eyes widen as they realize this isn't just another holiday dessert — it's the dessert that'll make them forget about every other sweet on the table. Let me walk you through every single step — by the end, you'll wonder how you ever made it any other way.
What Makes This Version Stand Out
This isn't just another fusion recipe that sounds better than it tastes. After dozens of test batches and one memorable incident involving a fire extinguisher, I've cracked the code on what makes this Baklava-Custard Christmas Wreath absolutely unforgettable.
- The Texture Revolution: Most baklava suffers from the same problem — it's either teeth-shatteringly crispy or tragically soggy. By adding a custard layer, you get this impossible contrast of shattering phyllo on top giving way to creamy custard below, with the middle layers absorbing just enough syrup to become almost candy-like in their chewiness.
- Holiday Crowd Control: Traditional baklava requires plates, forks, and the dexterity of a surgeon to eat gracefully at parties. This wreath format means guests can grab a slice with their fingers like a Danish, no sticky fingers or crumbling disasters. Last Christmas, my nephew managed to eat three pieces while still holding his new puppy — that's the kind of practical magic I'm talking about.
- The Flavor Layering Secret: Instead of just dumping nuts between phyllo layers, we're creating distinct flavor zones. The bottom gets toasted walnuts mixed with a touch of espresso powder (trust me on this), the custard carries orange blossom water, and the top features pistachios for color and that signature baklava appearance. Each bite tells a different part of the story.
- Make-Ahead Champion: This beauty actually improves overnight as the flavors meld, meaning you can assemble it on Christmas Eve and bake it fresh on Christmas morning. The custard stabilizes the whole structure, so no more worrying about soggy bottoms or dried-out edges. I've kept one in the fridge for four days (don't ask), and it was still incredible.
- The Showstopper Factor: Let's be real — we eat with our eyes first, especially during holidays. A golden wreath studded with emerald pistachios and glistening with honey syrup looks like something from a magazine cover. My Instagram post of this got more saves than my wedding photos, and I'm only slightly offended.
- Beginner-Friendly Technique: Despite looking like you need a pastry degree, this recipe forgives mistakes beautifully. Tear a phyllo sheet? Patch it with butter and nobody knows. Custard looks lumpy? Strain it and carry on. The wreath shape hides imperfections like a festive camouflage, making you look like a pastry wizard even if you usually burn toast.
Alright, let's break down exactly what goes into this masterpiece...
Inside the Ingredient List
Every ingredient in this recipe pulls its weight like a well-trained holiday orchestra. Skip one, and the whole symphony falls apart into a cacophony of mediocre desserts that'll have your guests reaching for the fruitcake instead.
The Flavor Foundation
Phyllo dough is your canvas here, but not all brands are created equal. I've tested seven different varieties, and the frozen ones from Mediterranean markets beat grocery store versions every single time. Look for packages that feel pliable even when frozen — brittle phyllo means it's been sitting in the freezer since last Christmas. The sheets should separate easily without shattering into sad little flakes that make you question your life choices. If you can only find the grocery store stuff, don't panic, just let it thaw completely in the fridge overnight, then bring it to room temperature for two hours before using. Cold phyllo cracks like my resolve during holiday shopping, while room-temperature sheets behave like well-trained puppies under your gentle guidance.
Unsalted butter becomes your best friend here, and I mean the good stuff. European-style butter with 82% fat content creates layers so flaky they practically levitate off the baking sheet. You'll need two whole cups, which sounds obscene until you remember this is a special occasion dessert meant to celebrate the fact that we survived another year. Melt it slowly and keep it warm but not hot — think comfortable bath temperature. Too hot, and it'll cook the phyllo into a gummy mess. Too cool, and it solidifies before you can brush it on, creating a frustrating game of chase-the-butter with your pastry brush.
The Texture Crew
Walnuts form the backbone of our nut layer, but here's where most recipes go wrong — they use raw nuts and wonder why their baklava tastes flat and boring. Toast those beauties in a dry pan until they smell like you're walking past a nut roaster at a winter market. That smell is the Maillard reaction creating hundreds of flavor compounds that'll make your taste buds sing carols. Once cooled, pulse them with a touch of espresso powder, which doesn't make the dessert taste like coffee but rather deepens the nutty flavors into something profound and mysterious, like that relative who only appears at holidays with fascinating stories.
Pistachios get the VIP treatment here, staying raw and getting roughly chopped for the top layer. Their natural sweetness and vibrant green color create visual drama that makes this wreath look like it belongs in a bakery window. Buy them already shelled unless you enjoy spending three hours shelling nuts while your family asks why dessert isn't ready yet. Look for bright green nuts without yellow patches, which indicate they're getting stale and will taste like cardboard instead of the luxurious treat you deserve.
The Unexpected Star
The custard is where this recipe transforms from interesting to absolutely legendary. Whole milk creates the silkiest texture, but I've successfully used 2% in a pinch — just don't go lower or you'll get watery custard that weeps like a disappointed aunt when the kids leave early. The secret weapon is orange blossom water, which adds this ethereal floral note that makes people ask "what is that amazing flavor?" without being able to pinpoint it. Start with one teaspoon — too much and your dessert tastes like soap, too little and you miss the magic entirely. Cardamom pods, lightly crushed, infuse the milk with their citrusy warmth. Remove them before adding the hot milk to your egg mixture or you'll have guests fishing pods out of their dessert like some kind of weird holiday treasure hunt.
Cornstarch stabilizes our custard without making it taste starchy, which happens when you don't cook it long enough. The mixture should coat the back of a spoon and leave a clear trail when you run your finger through it. If you've ever struggled with lumpy custard, you're not alone — and I've got the fix. Whisk your egg yolks and cornstarch until they form a pale yellow ribbon, then pour the hot milk in a thin stream while whisking like your life depends on it. Return everything to the pot and stir constantly over medium heat until it thickens. Your arm will get a workout, but that's what holiday calories are for.
The Final Flourish
Honey syrup might seem straightforward, but here's where technique matters more than ingredients. Use a mild honey like clover or orange blossom — that expensive artisanal honey you bought at the farmers market will overpower everything with its personality. The syrup needs to be hot when it meets the wreath, but the wreath needs to be just warm. Hot syrup + hot pastry equals soggy disaster, while cold syrup on cold pastry creates a sticky mess that never quite absorbs. Aim for that sweet spot where the syrup soaks in but doesn't make everything mushy, like the perfect holiday guest who enhances the party without taking it over.
Lemon juice brightens the syrup and prevents it from becoming cloyingly sweet. Just a teaspoon does the trick, cutting through the richness like a refreshing palate cleanser. Some recipes call for rose water, but I find it too perfumey for this application — we're making dessert, not potpourri. The syrup should simmer for exactly eight minutes, which reduces it to the perfect consistency that'll coat the back of a spoon but still pour easily. Set a timer because five minutes gives you honey water that soaks right through, while twelve minutes creates candy that'll crack your dental work.
Everything's prepped? Good. Let's get into the real action...
The Method — Step by Step
Now we're getting to the good stuff — the part where separate ingredients transform into something that'll have people proposing marriage and offering to name their firstborn after you. Keep your workspace organized, your butter warm, and your sense of adventure fully engaged because we're about to create edible magic.
- Start with your custard because it needs time to cool and thicken. In a heavy-bottomed saucepan, heat 2 cups of milk with crushed cardamom pods until tiny bubbles form around the edges — this is called scalding, and it infuses the milk with warm, citrusy notes that'll make your kitchen smell like a spice market. While the milk heats, whisk 4 egg yolks with 1/3 cup sugar until the mixture turns pale and thick, forming what pastry chefs call "the ribbon stage" because it falls from the whisk in a thick, luxurious stream. Whisk in 3 tablespoons of cornstarch until completely smooth, then slowly pour the hot milk into the egg mixture while whisking constantly. Return everything to the pot and cook over medium heat, stirring with a wooden spoon until the custard thickens enough to coat the back of the spoon and you can draw a clear line through it with your finger. Remove from heat, stir in 1 teaspoon orange blossom water, then press plastic wrap directly onto the surface to prevent a skin from forming. Chill for at least 2 hours or overnight.
- Toast your walnuts in a dry skillet over medium heat, shaking the pan frequently until they smell like you're walking past a nut roaster at a winter market. That nutty aroma means the natural oils are releasing and developing hundreds of flavor compounds through the Maillard reaction. Once cooled, pulse them in a food processor with 1/2 teaspoon espresso powder and a pinch of salt until they're the texture of coarse breadcrumbs — not too fine or they'll turn pasty when the syrup hits them. Roughly chop your pistachios and set them aside for the final layer, because these green beauties will create visual drama that makes your wreath look professionally crafted.
- Prepare your honey syrup by combining 1 cup honey, 1/2 cup water, 1 teaspoon lemon juice, and a cinnamon stick in a small saucepan. Bring to a boil, then reduce to a steady simmer for exactly 8 minutes — set a timer because this is where things get precise. The syrup should reduce enough to coat the back of a spoon but still pour easily. Remove the cinnamon stick and keep the syrup warm but not hot while you assemble the wreath. Too hot and it'll make your phyllo soggy, too cool and it'll sit on top like a sticky hat instead of soaking in beautifully.
- Preheat your oven to 350°F and position the rack in the center. Brush a 12-inch round cake pan with butter, then line it with parchment paper, leaving an overhang on two sides to create handles for easy removal later. Melt 2 cups of unsalted butter and keep it warm but not hot — you want it liquid enough to brush easily but not so hot it cooks the phyllo on contact. Unroll your phyllo sheets and cover them with a barely damp kitchen towel to prevent drying while you work. Phyllo waits for no one, so have everything organized before you start the layering process.
- This is the moment of truth where we start building our wreath. Lay one sheet of phyllo in the pan, letting it overhang the edges, and brush generously with melted butter. Don't be shy here — every inch needs to be covered or you'll get dry, brittle spots that crack like thin ice. Repeat with 7 more sheets, rotating the pan slightly each time so the overhang creates a star pattern. Sprinkle half your toasted walnut mixture evenly over the phyllo, then dollop your chilled custard in large spoonfuls across the surface. Use an offset spatula to spread it gently, leaving a 1-inch border around the edges so the custard doesn't leak out and burn.
- Continue layering with 6 more sheets of phyllo, buttering each one and rotating the pan to maintain that star pattern. Sprinkle the remaining walnuts, then add another layer of custard using the same gentle spreading technique. Top with 6 final sheets of phyllo, buttering generously, then fold the overhanging edges over the top to create a neat package. Brush the final layer with butter and use a sharp knife to score the top in a diamond pattern, cutting through the top layers but not all the way through to the custard. This creates the classic baklava appearance and makes serving easier later.
- Sprinkle the chopped pistachios over the top, pressing them gently into the butter so they adhere during baking. The green nuts create visual drama against the golden phyllo, making your wreath look like it belongs in a bakery window. Bake for 35-40 minutes until the top is deep golden brown and the edges are crisp. Don't walk away from the oven during the last 10 minutes — phyllo goes from perfect to burnt faster than your uncle's political opinions at the dinner table. Rotate the pan halfway through baking for even coloring.
- Remove from oven and let cool for exactly 5 minutes — this brief rest allows the layers to settle but keeps everything warm enough to absorb the syrup properly. Pour the warm honey syrup evenly over the surface, starting around the edges and working toward the center. You should hear a gentle sizzling sound as the syrup meets the hot pastry — that's the sound of magic happening. Let the wreath absorb the syrup for at least 30 minutes before serving, though it's even better the next day after a night in the fridge.
- To serve, run a knife around the edges to loosen, then use the parchment handles to lift the wreath onto a cutting board. Slice into wedges like a cake, or use a sharp knife to cut along your scored lines for traditional diamond-shaped pieces. Garnish with a light dusting of powdered sugar and maybe some edible gold leaf if you're feeling fancy. The contrast between the crispy top, creamy custard, and honey-soaked bottom creates a textural experience that'll make regular baklava seem hopelessly one-dimensional.
That's it — you did it. But hold on, I've got a few more tricks that'll take this to another level...
Insider Tricks for Flawless Results
After making this wreath more times than I care to admit (my family now requests it for birthdays, anniversaries, and Tuesdays), I've discovered the tiny details that separate good baklava-custard from the kind that makes people close their eyes and sigh with pleasure.
The Temperature Rule Nobody Follows
Here's the thing that separates pastry professionals from home bakers — temperature control. Your custard needs to be cold when it meets the phyllo, but your phyllo should be room temperature when you start working with it. Cold custard + cold phyllo equals cracked sheets and frustration, while warm custard + warm phyllo creates a soggy mess that weeps like a disappointed grandmother. Keep your custard in the fridge until the exact moment you need it, and let your phyllo sit at room temperature for two hours before unwrapping. This simple timing trick prevents 90% of the tears and cursing that usually accompany phyllo-based desserts.
Why Your Nose Knows Best
Don't trust the timer alone — your nose is the most reliable tool in your kitchen. When the walnuts are perfectly toasted, your kitchen will smell like you're walking through a winter market in Vienna. When the phyllo is properly golden, you'll detect the buttery, slightly nutty aroma that signals it's time to pull the wreath from the oven. A friend tried skipping this step once — let's just say it didn't end well, and her smoke detector still hasn't forgiven her. Trust your senses over the clock every time, because ovens vary more than snowflakes, and your nose never lies about when something smells perfectly done.
The 5-Minute Rest That Changes Everything
After pouring the syrup, resist every urge to slice into your creation immediately. Those five minutes of patience allow the syrup to soak in properly while the layers settle into their final texture. Cut too soon and you'll have syrup running everywhere like a sticky tsunami. Wait too long and the syrup crystallizes, creating a hard candy coating that'll challenge even the strongest dental work. Five minutes is the sweet spot where everything comes together like a well-rehearsed holiday performance, creating the perfect balance of crispy, creamy, and syrupy in every bite.
Creative Twists and Variations
This recipe is a playground. Once you've mastered the original, here are some of my favorite ways to switch things up that'll keep your holiday table exciting year after year.
The Chocolate Orange Version
Replace half the walnuts with hazelnuts and add 2 tablespoons of cocoa powder to the nut mixture. Swap the orange blossom water in the custard for Grand Marnier, and add the zest of one orange to both the custard and the syrup. Top with candied orange peel instead of pistachios for a sophisticated twist that tastes like a Terry's chocolate orange grew up and got fancy. This version pairs beautifully with espresso after a big holiday meal, and the chocolate notes make it feel indulgent without being overwhelming.
The Middle Eastern Nights Edition
Add 1/2 teaspoon ground cardamom and 1/4 teaspoon saffron to your custard, blooming the saffron in a tablespoon of warm milk first. Replace the walnuts with a mix of pistachios and pine nuts, and add a teaspoon of rose water to your syrup along with the orange blossom water. The result tastes like walking through a Middle Eastern spice market at sunset, with floral notes dancing alongside warm spices. Garnish with dried rose petals and chopped pistachios for a dessert that looks like it belongs in a palace rather than your kitchen.
The Tropical Christmas Twist
Substitute coconut milk for regular milk in the custard, and add 2 tablespoons of toasted coconut to your nut mixture. Replace the walnuts with macadamia nuts and add a splash of rum to the syrup. Top with toasted coconut flakes and a few pieces of candied ginger for a dessert that tastes like Christmas on a tropical island. This version is particularly popular with people who claim they "don't like traditional holiday desserts" — it's familiar enough to feel festive but different enough to surprise them.
The Spice Market Special
Add 1/2 teaspoon each of ground cinnamon, nutmeg, and allspice to your nut mixture, along with a pinch of black pepper for warmth. Include a cinnamon stick, three cloves, and a star anise in your syrup while it simmers, then strain them out before pouring. The result tastes like the best parts of mulled wine and baklava had a beautiful baby, creating a dessert that embodies the entire holiday season in one bite. This version makes your house smell like you've been baking Christmas cookies for days, even though you just started an hour ago.
The Breakfast-for-Dessert Version
Add a teaspoon of instant espresso powder to your custard and replace half the milk with strong coffee. Include chopped candied pecans in your nut mixture and drizzle the finished wreath with maple syrup instead of honey. The coffee notes make this perfect for serving after brunch, and the maple adds that cozy breakfast feeling that makes people want to linger around the table talking about old times. Top with a light dusting of cinnamon sugar for the full breakfast effect.
The White Christmas Edition
Use white chocolate instead of honey in your syrup, melting 8 ounces of good white chocolate with 1/4 cup cream and 2 tablespoons of sugar. Replace the walnuts with blanched almonds and add vanilla bean paste to both the custard and the syrup. Top with slivered almonds and a light dusting of powdered sugar for a dessert that looks like snow-covered mountains and tastes like winter wonderlands. The white chocolate version is stunningly beautiful and perfect for New Year's Eve celebrations when you want something elegant and unexpected.
Storing and Bringing It Back to Life
Fridge Storage
Once completely cooled, wrap your wreath tightly in plastic wrap, then slide it into an airtight container. It'll keep beautifully in the fridge for up to 5 days, though I dare you to make it last that long. The flavors actually meld and improve after the first day, making this the perfect make-ahead dessert for busy holiday schedules. Store it on a flat shelf where nothing heavy can press down on it — the last thing you want is a squashed wreath that looks like it got run over by Santa's sleigh.
Freezer Friendly
This wreath freezes like a champion, making it perfect for holiday prep. Wrap individual slices in plastic wrap, then aluminum foil, and store in a freezer bag for up to 2 months. Thaw overnight in the refrigerator, then bring to room temperature for 30 minutes before serving. The custard might weep slightly after freezing, but a quick blast in a 300°F oven for 5-7 minutes will restore the crispy texture. Pro tip: freeze slices on a baking sheet first, then wrap individually — this prevents them from sticking together like awkward holiday party guests.
Best Reheating Method
To restore that fresh-from-the-oven magic, warm individual slices in a 300°F oven for 8-10 minutes. Add a tiny splash of water to the baking sheet before reheating — it creates steam that brings back the crispy texture without drying out the custard. Microwaving works in a pinch, but it'll make the phyllo chewy rather than crispy. If you must microwave, do it for just 15-20 seconds and accept that you're trading convenience for texture. For the full experience, warm the slice, then drizzle with a touch of fresh honey just before serving.