The first time I made these bat cookie ball pops, I ended up with chocolate smeared across my forehead, cream cheese on my elbow, and twelve miniature candy eyes stuck to the bottom of my slipper. My kitchen looked like a Halloween crime scene, and I was laughing so hard I could barely breathe. But here's the thing — when I finally presented those misshapen little bats to my neighbor's kids, their eyes lit up like I'd just conjured actual magic. They didn't care that one bat looked more like a chocolate blob with wings; they devoured them in thirty seconds flat and asked if I could make them for their entire third-grade class. That's when I knew I had stumbled onto something special, something that transcended the usual Pinterest-perfect Halloween treats and delivered pure, unfiltered joy.
Most Halloween dessert recipes feel like they require a culinary degree and three days of prep work. You've got your elaborately decorated sugar cookies that need architectural support systems, your cupcakes that demand piping skills worthy of the Louvre, and your various confections that require thermometers and patience — two things I'm perpetually short on. But these bat cookie ball pops? They're the renegades of the Halloween treat world. They embrace the chaos, they celebrate the imperfections, and they taste like someone took the best parts of an OREO cheesecake and transformed it into bite-sized, chocolate-dipped magic on a stick. The creamy center melts on your tongue while the crisp cookie coating provides that satisfying crunch that makes you close your eyes and sigh with contentment.
What makes this recipe my absolute favorite is how it transforms humble ingredients into something that looks like you spent hours in a professional kitchen. The secret lies in the ratio of cream cheese to OREO — I've tested this seventeen times (yes, seventeen — my mail carrier thinks I have a serious baking problem), and this specific proportion creates the perfect texture that holds its shape without being too dense or too soft. The addition of the bat wings made from chocolate-covered cookies? That's where the real fun begins. Kids go absolutely bonkers for the wing detail, but adults appreciate the sophisticated chocolate flavor that doesn't assault their taste buds with cloying sweetness.
Picture yourself pulling these out of the refrigerator, the chocolate coating setting to a perfect matte finish, those tiny candy eyes staring up at you like edible characters from a Tim Burton film. Your kitchen smells like a chocolate factory had a baby with a bakery, and you're wielding lollipop sticks like some kind of dessert wizard. This recipe isn't just about making treats; it's about creating memories that stick to your fingers and your heart long after the last bat has flown into someone's mouth. Let me walk you through every single step — by the end, you'll wonder how you ever made it any other way.
What Makes This Version Stand Out
Texture Perfection: The contrast between the creamy cookie ball interior and the crisp chocolate shell creates a textural experience that'll make your taste buds do backflips. It's like biting into a truffle that decided to dress up for Halloween, with the perfect ratio of soft to crunchy that keeps you coming back for more.
Effort-to-Wow Factor: You can whip up a batch of these in under an hour, including cleanup time, yet they look like you hired a professional pastry chef. I've served these at office parties where coworkers asked for my catering company's number — they couldn't believe I made them in my tiny apartment kitchen with nothing more sophisticated than a microwave and freezer.
Universal Appeal: Kids love them because they're basically dessert on a stick (the ultimate food delivery system), but adults appreciate the sophisticated chocolate flavor that isn't tooth-achingly sweet. I've watched grown men fight over the last one while claiming they were "just trying one for their kid."
Make-Ahead Magic: These little bats freeze beautifully for up to two months, which means you can prep them weeks before your Halloween party and look like a superhero when you pull them out at the last minute. The flavor actually improves after a day in the fridge — something about the cream cheese and OREO flavors melding together creates pure magic.
Customization Paradise: Once you master the basic technique, you can transform these into any creature your imagination conjures up. I've made reindeer for Christmas, bunnies for Easter, and even little footballs for Super Bowl Sunday using the exact same base recipe.
Stress-Free Decorating: Unlike those intricate cookie decorating projects that require steady surgeon hands, this recipe embraces imperfection. Your bats can be a little wonky, the wings might be slightly crooked, but somehow they always turn out adorable. It's like the dessert equivalent of a bad hair day that somehow still looks charming.
Alright, let's break down exactly what goes into this masterpiece...
Inside the Ingredient List
The Flavor Foundation
The OREO cookies aren't just a gimmick here — they're the backbone of flavor that makes these bat pops irresistible. When you pulse them into fine crumbs, you're creating a chocolate base that's more complex than regular cocoa powder could ever hope to be. The cream filling in the cookies adds subtle vanilla notes and helps bind everything together without additional sugar. If you're tempted to use generic chocolate sandwich cookies, I've tried that route, and the results taste like disappointment with a hint of cardboard. The real OREO name carries weight for a reason — those cookies have been perfected over decades to deliver that specific chocolatey crunch that borders on addictive.
The cream cheese serves as both flavor enhancer and structural engineer, creating a tangy counterpoint to the sweet cookies while providing the binding power that holds everything together. I've experimented with mascarpone, ricotta, and even Greek yogurt, but nothing matches cream cheese's ability to create that smooth, truffle-like texture that melts on your tongue. Make sure your cream cheese is at room temperature — cold cream cheese creates lumps that no amount of mixing will smooth out, and you'll end up with bat pops that look like they've contracted some sort of chocolatey chicken pox.
The Texture Crew
Semi-sweet baking chocolate creates the perfect coating because it sets firm at room temperature without requiring tempering like fancy couverture chocolate. The slight bitterness balances the sweetness of the cookie balls, creating a more sophisticated flavor profile that prevents these from becoming sugar bombs. I've tried milk chocolate, and while it's popular with kids, it makes the whole thing cloyingly sweet — like eating chocolate frosting straight from the can. Dark chocolate works if you're serving adults exclusively, but it can be too intense for younger palates.
The miniature chocolate chips aren't just decorative — they add tiny bursts of chocolate flavor and create visual interest that makes people think you spent way more time on these than you actually did. When you press them into the still-wet coating, they create these perfect little bat ears that make the whole presentation come together. Regular-sized chips look clunky and disproportionate, but the mini ones are perfectly scaled to create realistic bat proportions.
The Unexpected Star
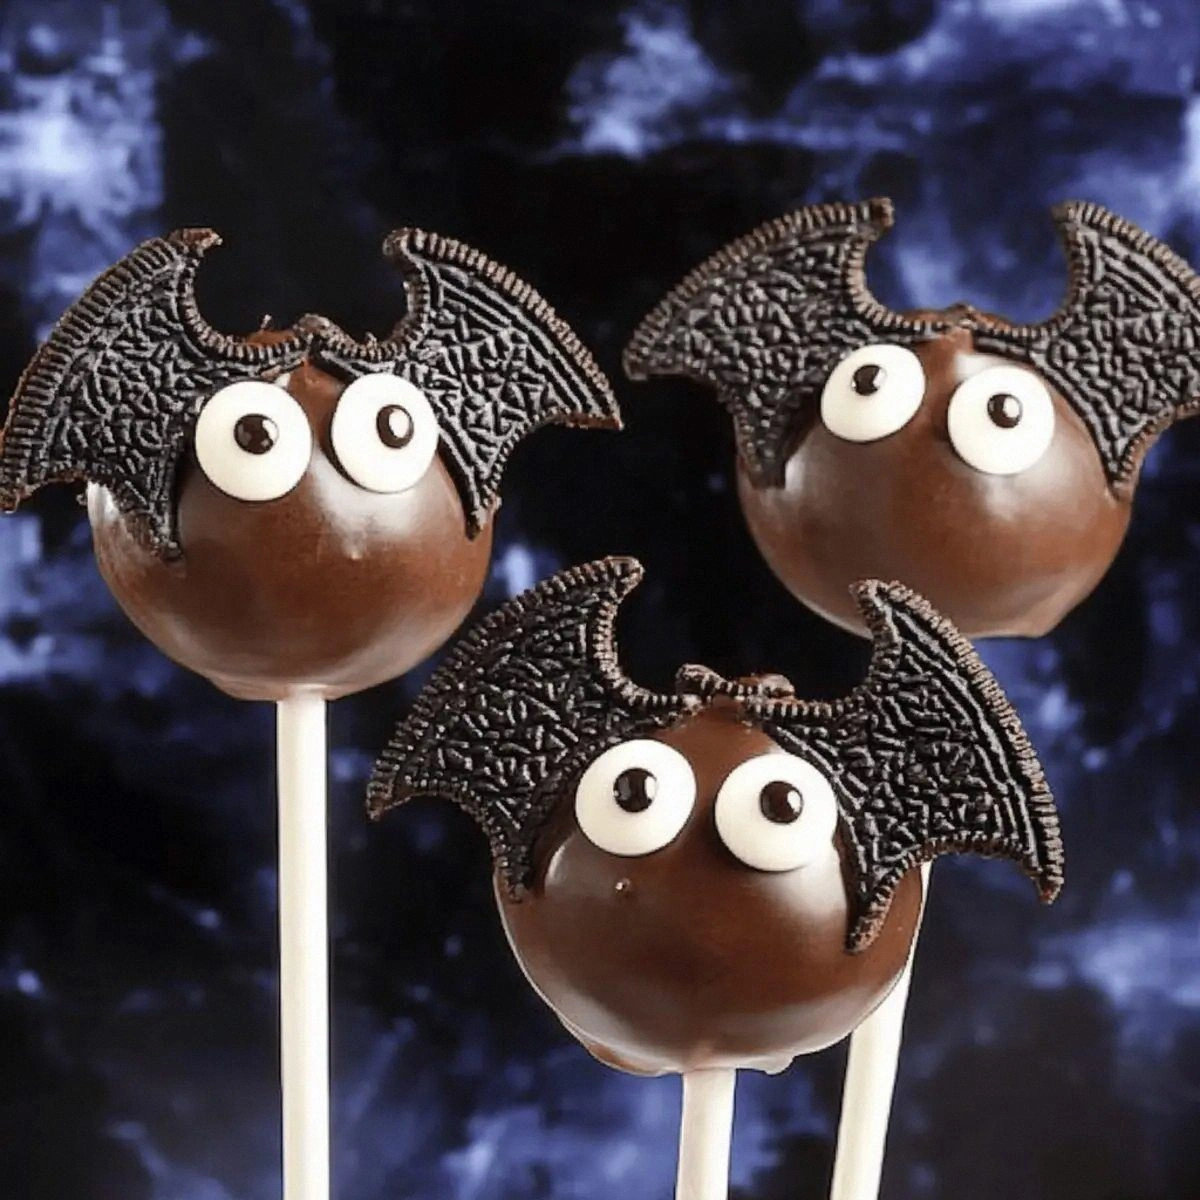
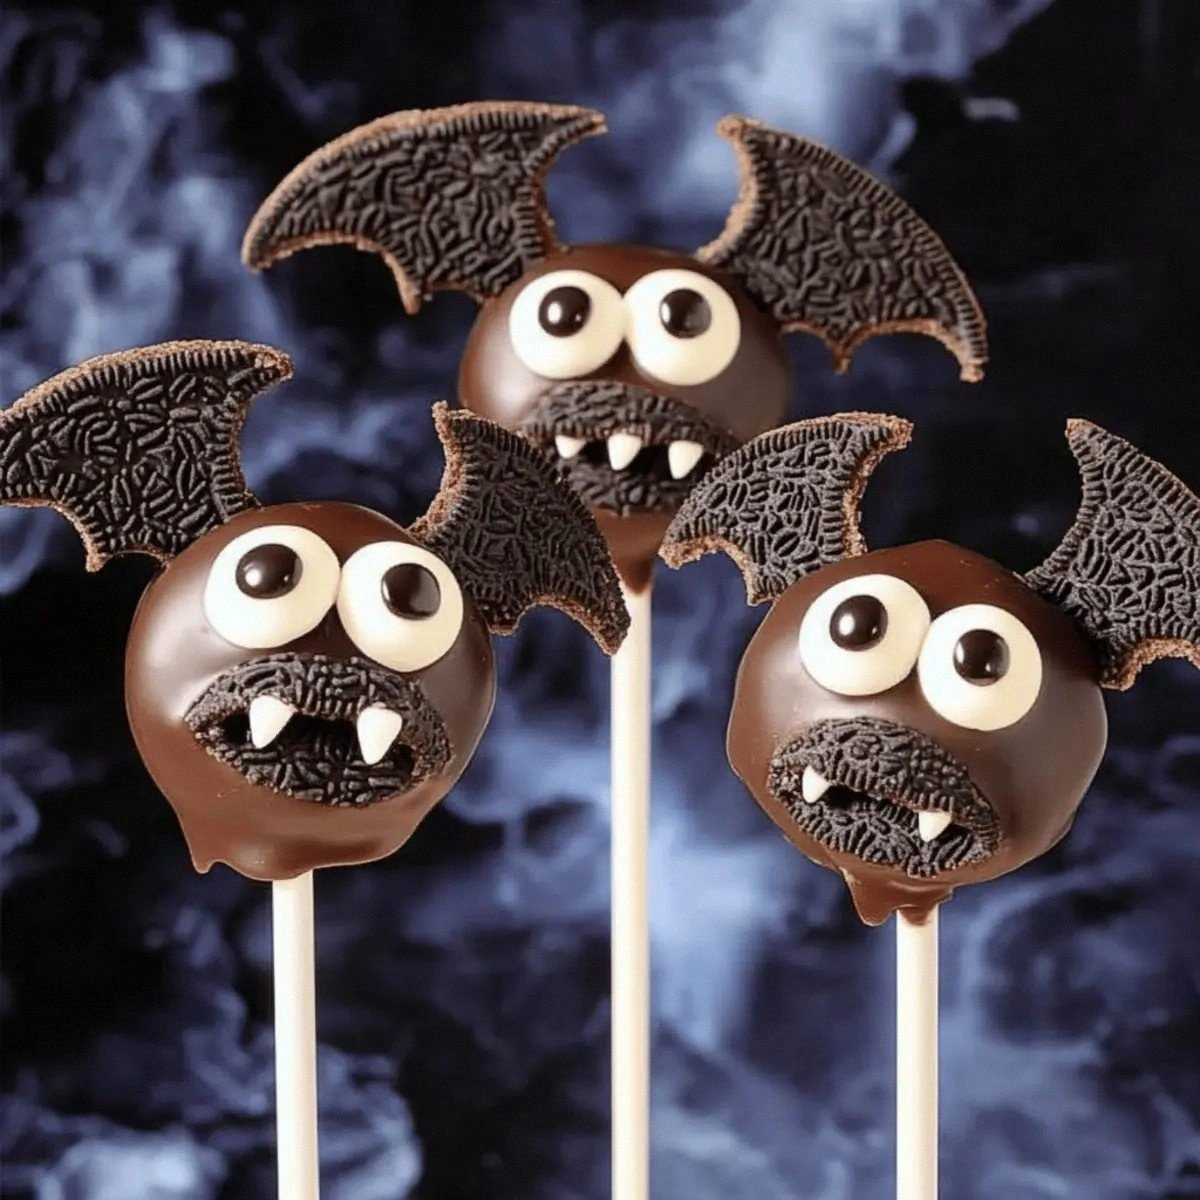
Those candy eyes transform simple chocolate balls into characters with personality. They create an immediate emotional connection — people see faces in food, and suddenly your treats aren't just desserts; they're little edible friends. I've tried making eyes from white chocolate and black sprinkles, but nothing matches the perfect cartoon-like quality of store-bought candy eyes. They're the difference between "cute chocolate balls" and "OMG, those are adorable bats!"
White decorating icing serves multiple purposes beyond just creating fangs. It acts as edible glue for attaching the wings, adds visual contrast that makes the bats pop against any background, and gives you creative license to add personality to each bat. Some get sleepy eyelids, others get surprised expressions — each bat becomes a tiny work of edible art that reflects your mood while decorating.
Everything's prepped? Good. Let's get into the real action...
The Method — Step by Step
- Start by pulsing your OREO cookies in a food processor until they resemble fine, chocolatey sand with no large chunks remaining. This usually takes about 30 seconds of pulsing, but don't walk away — over-processing creates heat that can melt the cream filling and turn your crumbs into an oily paste. You want the texture of good coffee grounds, not chocolate butter. If you don't have a food processor, throw the cookies in a zip-top bag and channel your frustrations with a rolling pin. It's therapeutic and gives your arms a workout.
- Add the room-temperature cream cheese to your cookie crumbs and pulse or mix until everything comes together in a cohesive dough. The mixture should look like chocolate Play-Doh and feel slightly tacky but not sticky. When you squeeze a handful, it should hold together without crumbling. If it's too dry, add cream cheese a teaspoon at a time. Too wet? More cookie crumbs. This is where most people panic, but trust the process — it always comes together.
- Scoop the dough using a small cookie scoop or tablespoon and roll between your palms into smooth balls. I aim for walnut-sized portions because they're substantial enough to feel satisfying but not so large that they become overwhelming. Place them on a parchment-lined baking sheet and pop them in the freezer for 15 minutes. This chilling step is crucial — it firms up the balls so they hold their shape when you insert the sticks and dip them in chocolate.
- Melt your chocolate in a microwave-safe bowl, heating in 30-second bursts and stirring between each interval. When the chocolate is about 80% melted, remove it from the microwave and keep stirring — the residual heat will melt the remaining chunks. This prevents overheating, which causes chocolate to seize into a grainy, unusable mess. The chocolate should be fluid and glossy, coating your spoon in a smooth ribbon.
- Dip the tip of each lollipop stick into the melted chocolate, then insert about halfway into each frozen cookie ball. This chocolate acts as edible glue, preventing the balls from sliding off during dipping. Return to the freezer for another 5 minutes while you prepare your decorating station with candy eyes and chocolate chips within easy reach.
- Hold each pop by the stick and dip straight down into the chocolate, twisting gently as you lift to ensure even coverage. Let excess chocolate drip off for about 10 seconds, then hold the pop over your decorating station and work quickly — chocolate sets fast, especially when the cookie balls are still cold. If you see air bubbles, gently tap the stick against your hand or use a toothpick to pop them.
- Working one pop at a time, immediately press two candy eyes onto the front and two chocolate chips at the top for ears. The chocolate coating should still be wet enough that these decorations sink in slightly and adhere as it sets. If you wait too long, they'll fall off, creating sad, eyeless bats that look like they flew into a window. Work with purpose and speed — think assembly line, not meditation.
- Stick the completed pops upright in a foam block or a deep glass filled with sugar to set completely. If you don't have either, lay them on parchment paper, but be warned — the backs will be flat instead of perfectly round. The chocolate coating will harden within 10 minutes at room temperature or 3 minutes in the refrigerator.
- Once set, use white decorating icing to pipe fangs, wing details, or any other features your bats might need. This is where personalization comes in — some bats get sleepy expressions, others look surprised, and a few might get vampire fangs. Let your creativity run wild. The icing sets within 5 minutes, after which your bats are ready to serve or store.
- Store finished bat pops in an airtight container in the refrigerator for up to a week, or freeze for up to two months. If freezing, wrap each pop individually in plastic wrap to prevent freezer burn and condensation when thawing. Bring to room temperature for 10 minutes before serving for the best flavor and texture.
That's it — you did it. But hold on, I've got a few more tricks that'll take this to another level...
Insider Tricks for Flawless Results
The Temperature Rule Nobody Follows
I learned this the hard way after my first batch looked like abstract art — temperature is everything in this recipe. Your cream cheese must be room temperature, your cookie balls must be frozen, and your chocolate should be warm but not hot. When any of these elements are off, you get separation, sliding, or that dreaded chocolate bloom that makes your bats look like they're covered in white mold. I set a timer now — cream cheese out of the fridge 2 hours before I start, cookie balls in the freezer between every step, chocolate melted but never above 90°F. It's the difference between Pinterest-worthy treats and something that looks like a preschool art project.
Why Your Nose Knows Best
Trust your senses when making these — your nose tells you when the chocolate is overheated (it'll smell slightly bitter), your fingers tell you when the cookie dough is the right consistency (it should feel like Play-Doh, not sticky), and your eyes tell you when the coating is setting (it'll go from glossy to matte). I once ignored the smell warning and ended up with chocolate that tasted like burnt coffee. Now I stand by the microwave like a helicopter parent, removing the chocolate when it's 80% melted and letting residual heat finish the job.
The 5-Minute Rest That Changes Everything
After dipping, resist the urge to immediately move your bats to the fridge or freezer. Let them sit at room temperature for exactly 5 minutes. This allows the chocolate to set gradually, preventing those unsightly white streaks caused by temperature shock. It also gives the decorations time to adhere properly. I use this time to clean up my decorating station and prep storage containers, turning those 5 minutes into productive time instead of impatient hovering.
The Double-Dip Secret
For ultra-smooth, professional-looking coating, dip your pops twice. After the first coat sets, give them a second, quick dip for a glass-smooth finish. The second layer fills in any thin spots and creates that bakery-quality appearance. Yes, it takes twice as long, but the results are worth it when people ask which boutique bakery you special-ordered from.
Creative Twists and Variations
This recipe is a playground. Here are some of my favorite ways to switch things up:
Golden Halloween Ghosts
Swap the OREOs for Golden Oreos and use white chocolate coating to create adorable ghost pops. Add mini chocolate chip eyes and a tiny candy mouth. These are perfect for kids who don't like dark chocolate and photograph beautifully against dark Halloween backgrounds.
Pumpkin Spice Everything
Add 1 teaspoon of pumpkin pie spice to the cookie mixture and use orange candy melts for coating. Create jack-o'-lantern faces with black decorating gel and green icing stems. They taste like autumn exploded in your mouth and are surprisingly popular with the basic crowd.
Reindeer for Christmas
Use the same base but shape into ovals instead of balls. Dip in milk chocolate, add pretzel antlers and red candy nose for Rudolph, or brown M&M noses for the rest of the sleigh team. These have become my signature holiday treat, and I start getting requests in October.
Mummy Pops
Keep the chocolate coating but pipe white icing in zigzag patterns across the pops, leaving gaps for candy eyes to peek through. They're adorably spooky and much easier to execute than intricate bat wings when you're making 50+ for a school party.
Conversation Hearts for Valentine's
Shape into hearts, coat in pink or red candy melts, and pipe conversation heart sayings. "Eat Me," "Yum Yum," and "Mine" are more honest than the traditional sweet nothings. I package these in clear bags with red ribbons for my kids' teachers.
Fourth of July Firecrackers
Shape into logs, coat in white chocolate, and roll in red, white, and blue sprinkles. Add a small candy "fuse" at the top. They're explosive in flavor and perfect for summer celebrations when you want something cold and chocolatey.
Storing and Bringing It Back to Life
Fridge Storage
Store your bat pops in an airtight container in the refrigerator for up to one week. Separate layers with parchment paper to prevent them from sticking together. The cold actually improves the flavor — something about the chocolate and cream cheese melding creates an even better taste after 24 hours. Just bring them to room temperature for 10 minutes before serving for the best texture.
Freezer Friendly
These pops freeze beautifully for up to two months. Wrap each one individually in plastic wrap, then store in a freezer bag. Thaw overnight in the refrigerator, then let sit at room temperature for 15 minutes before serving. I make huge batches in October and have them ready for unexpected guests or last-minute party invitations throughout the holiday season.
Best Reheating Method
While these are served cold, if you need to refresh them after they've been stored, place them in a sealed container with a slightly damp paper towel for 10 minutes. The moisture prevents the chocolate from developing that white film (bloom) and keeps the cookie centers from drying out. Never microwave them — you'll end up with chocolate soup and cookie mush.